VEHICLE PREPARATION FOR LAMP ALIGNMENT
1. Check for and correct any burnt out bulbs.
2. If the vehicle is equipped with headlamp leveling, be certain that the headlamp leveling switch is in the 0 position.
3. Repair or replace any ineffective, worn or damaged body or suspension components that could hinder proper lamp alignment.
4. Verify proper tire inflation pressures.
5. Remove any accumulations of mud, snow or ice from the vehicle under body and clean the front lamp lenses.
6. Verify that there is no load in the vehicle (cargo or passengers), except for the driver.
7. The fuel tank should be FULL. Add 2.94 kilograms (6.5 pounds) of weight over the fuel tank for each estimated gallon of missing fuel.
8. Verify correct vehicle suspension height.
LAMP ALIGNMENT SCREEN PREPARATION

The procedure that follows will prepare a suitable front lamp alignment screen.
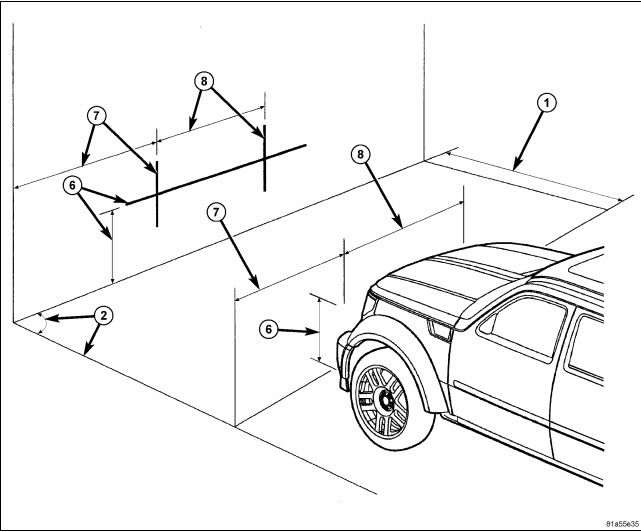
1. Tape a line on a level floor 7.62 meters (25 feet) away from and parallel to the flat wall that will be used as the lamp alignment screen. The level floor will be used as the horizontal zero reference.
2. An adjacent wall or floor member that is perpendicular to the alignment screen can be used as the vertical zero reference. If there is no adjacent wall or floor member that is perpendicular to the screen, tape a second line on the floor perpendicular to both the alignment screen and the first line, and outboard of either side of where the vehicle will be positioned. This will be used as the vertical zero reference.
3. Position the vehicle so that the side of the vehicle is parallel to the vertical zero reference, and so that the front of the lamp lenses are in the vertical plane of the parallel line taped on the floor 7.62 meters (25 feet) away from the screen.
4. Rock the vehicle side-to-side three times to allow the suspension to stabilize.
5. Jounce the front suspension three times by pushing downward on the front bumper and releasing.
6. Measure the distance between the optical center of one of the lamps being aimed (head or fog) and the floor (horizontal zero reference). Transfer this measurement to the alignment screen with a piece of tape placed horizontally to the floor. This line will be used as the lamp horizontal reference.
7. Measure the distance between the vertical zero reference and the optical center of the nearest lamp being aimed (head or fog). Transfer this measurement to the alignment screen with a piece of tape placed vertically across the appropriate (head or fog) lamp horizontal reference. This is the center line reference for the first lamp.
8. Measure the distance on center between the first and the second lamp being aimed. Transfer this measurement to the alignment screen with a second piece of tape placed vertically across the appropriate (head or fog) lamp horizontal reference. This is the center line reference for the second lamp.
HEADLAMP ALIGNMENT
NOTE: Due to the linear nature of the headlamp cutoff, a properly aimed low beam headlamp will project the top edge of the high intensity pattern on the alignment screen from the horizontal line to 50 millimeters (2 inches) below the horizontal line for domestic market vehicles, or to 125 millimeters (5 inches) below the horizontal line for export market vehicles. No horizontal (right/left) adjustment is required for this headlamp beam pattern in domestic market vehicles. Export market vehicles have a second horizontal (right/left) adjustment screw provided. The high beam pattern will be correct when the low beams are properly aimed.

1. Turn the headlamps ON and select the LOW beams for vehicles in all markets.
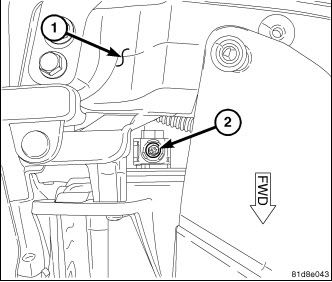
2. On all vehicles except those with headlamp leveling, use a screwdriver to rotate the headlamp vertical adjustment screw (2) on the back of the front lamp unit just inboard of the fender and forward of the upper radiator cross member (1) to adjust the beam height as required.
3. For export markets only, use a screwdriver to rotate the headlamp horizontal adjustment screw on each headlamp to adjust the beam right or left as required.
FOG LAMP ALIGNMENT
NOTE: Each front fog lamp shares a common reflector with the headlamp for that side of the vehicle and is automatically adjusted correctly when the headlamp is properly adjusted.
_________________
2008 KK Liberty Sport NIGHT OPS EDITION + GILLS
OEM & Custom Skids - Factory Tow Package - Rock Lizard Skink Super Sliders
Prototype JBA 4 Inch Lift - JBA UCA's - Flowmaster Super 44 OR - Whacked Resonator
Jet Stage 2 - RL Gecko Basket Rack - Custom Winch Bumper - Recon 10.5K Winch


