REMOVAL
WARNING: To avoid serious or fatal injury on vehicles equipped with airbags, disable the Supplemental Restraint System (SRS) before attempting any steering wheel, steering column, airbag, Occupant Classification System (OCS), seat belt tensioner, impact sensor, or instrument panel component diagnosis or service. Disconnect and isolate the battery negative (ground) cable, then wait two minutes for the system capacitor to discharge before performing further diagnosis or service. This is the only sure way to disable the SRS. Failure to take the proper precautions could result in accidental airbag deployment.
WARNING: To avoid serious or fatal injury when removing a deployed airbag, rubber gloves, eye protection, and a long-sleeved shirt should be worn. There may be deposits on the airbag unit and other interior surfaces. In large doses, these deposits may cause irritation to the skin and eyes.
NOTE: The following procedure is for replacement of an ineffective or damaged passenger airbag. If the airbag is ineffective or damaged, but not deployed, review the recommended procedures for handling non-deployed supplemental restraints. (Refer to 8 - ELECTRICAL/RESTRAINTS - STANDARD PROCEDURE - HANDLING NON-DEPLOYED SUPPLEMENTAL RESTRAINTS). If the passenger airbag has been deployed, review the recommended procedures for service after a supplemental restraint deployment before removing the airbag from the vehicle. (Refer to 8 - ELECTRICAL/RESTRAINTS - STANDARD PROCEDURE - SERVICE AFTER A SUPPLEMENTAL RESTRAINT DEPLOYMENT).
1. Disconnect and isolate the battery negative cable. Wait two minutes for the system capacitor to discharge before further service.
2. Remove the top cover from the instrument panel. (Refer to 23 - BODY/INSTRUMENT PANEL/DEFROSTER GRILLE - REMOVAL).
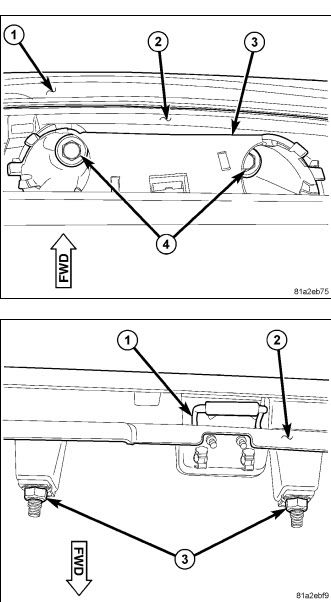
3. Remove the two screws (4) from the screw guide (3) on the top of the instrument panel (2) near the windshield (1) that secure the instrument panel bracket for the passenger airbag to the dash panel.
4. Using a trim stick or another suitable wide flat-bladed tool, pry the screw guide away from the top of the instrument panel far enough to disengage the two integral latch features that secure it and remove the screw guide to allow access to the trim screw that secures the passenger airbag instrument panel bracket to the instrument panel structural duct.
5. Work through the rectangular hole in the top of the instrument panel beneath the removed screw guide to access and remove the one screw that secures the center tab of the passenger airbag instrument panel bracket to the structural duct.
6. Remove the glove box from the instrument panel. (Refer to 23 - BODY/INSTRUMENT PANEL/GLOVE BOX - REMOVAL).
7. Remove the grab handle from the instrument panel. (Refer to 23 - BODY/INSTRUMENT PANEL/HANDLE - ASSIST - REMOVAL)
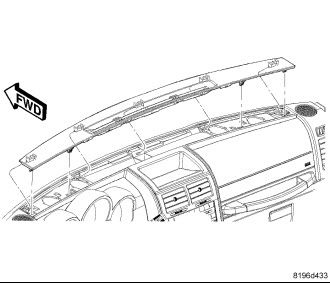
8. Reach up into the instrument panel above the upper glove box opening (2) to access and remove the two nuts (3) that secure the passenger airbag lower studs to the instrument panel base trim on each side of the glove box latch striker (1).
9. Using a trim stick or another suitable wide flat-bladed tool, gently pry the lower edge of the passenger airbag door rearward away from the upper glove box opening reinforcement far enough to disengage the snap features on the door from the receptacles in the instrument panel base trim.
10. Grasp the lower edge of the passenger airbag door and gently pull the door and airbag rearward far enough to disengage the upper snap features from the receptacles in the instrument panel base trim and to access the two instrument panel wire harness connections to the airbag inflators at each side of the airbag housing.
CAUTION: Do not pull on the instrument panel wire harness take outs or pry on the connector insulators to disengage the connectors from the passenger airbag inflator connector receptacles. Improper removal of these take outs and their connector insulators can result in damage to the airbag circuits or connector insulators.
11. The instrument panel passenger airbag wire harness connectors are secured by integral latches to the airbag inflator connector receptacles, which are located on the sides of the passenger airbag housing. Depress the latches on each side of each connector insulator and pull the insulators straight out from the airbag inflator to disconnect them from the connector receptacles.
12. Remove the passenger airbag, airbag door and instrument panel bracket from the instrument panel as a unit.
REMOVAL
CAUTION: Carefully disengage the retaining clips on the defroster grille, make sure the tool does not scratch the instrument panel assembly while removing.
1. Using a trim stick C-4755 or equivalent, release the rearward edge clips, and secondly once the rearward edge clips are released. Move in an upward and rearward direction to release the front edge clips of the instrument panel top cover.
2. Remove the defroster grille from instrument panel.
_________________
2008 KK Liberty Sport NIGHT OPS EDITION + GILLS
OEM & Custom Skids - Factory Tow Package - Rock Lizard Skink Super Sliders
Prototype JBA 4 Inch Lift - JBA UCA's - Flowmaster Super 44 OR - Whacked Resonator
Jet Stage 2 - RL Gecko Basket Rack - Custom Winch Bumper - Recon 10.5K Winch