Here are the pics:
| LOST JEEPS http://www.lostjeeps.com/forum/phpBB3/ |
|
| Mysterious plastic pieces...(stripped interior pics added) http://www.lostjeeps.com/forum/phpBB3/viewtopic.php?f=45&t=38698 |
Page 1 of 2 |
| Author: | SBosco [ Mon Dec 29, 2008 4:58 pm ] |
| Post subject: | Mysterious plastic pieces...(stripped interior pics added) |
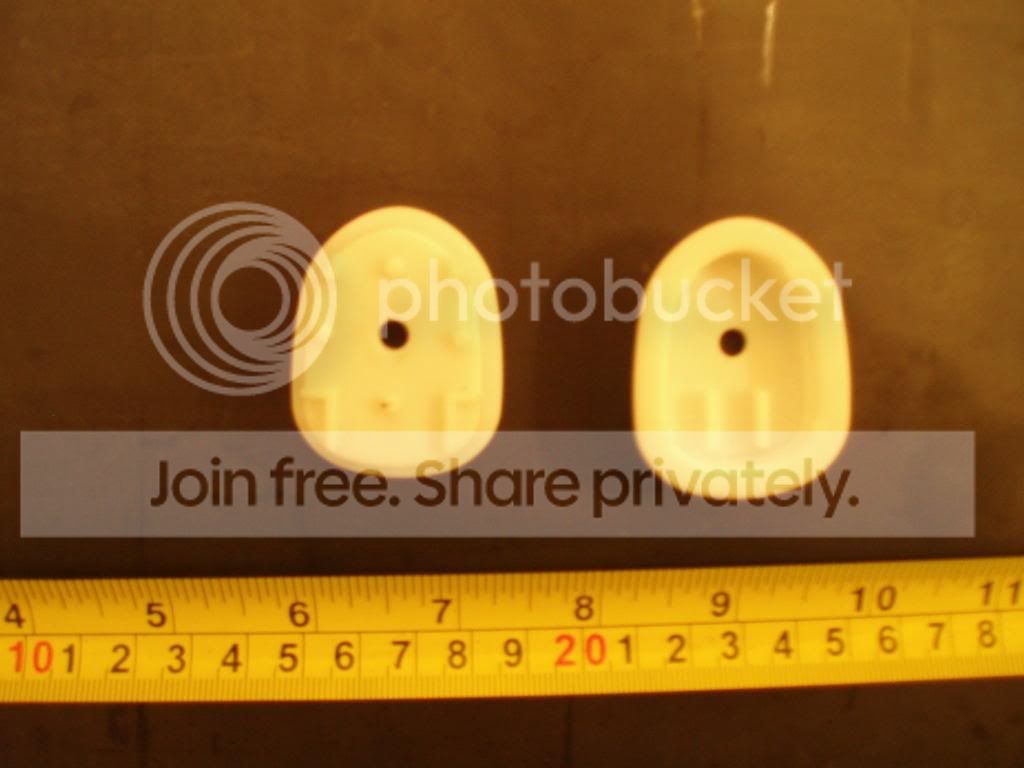
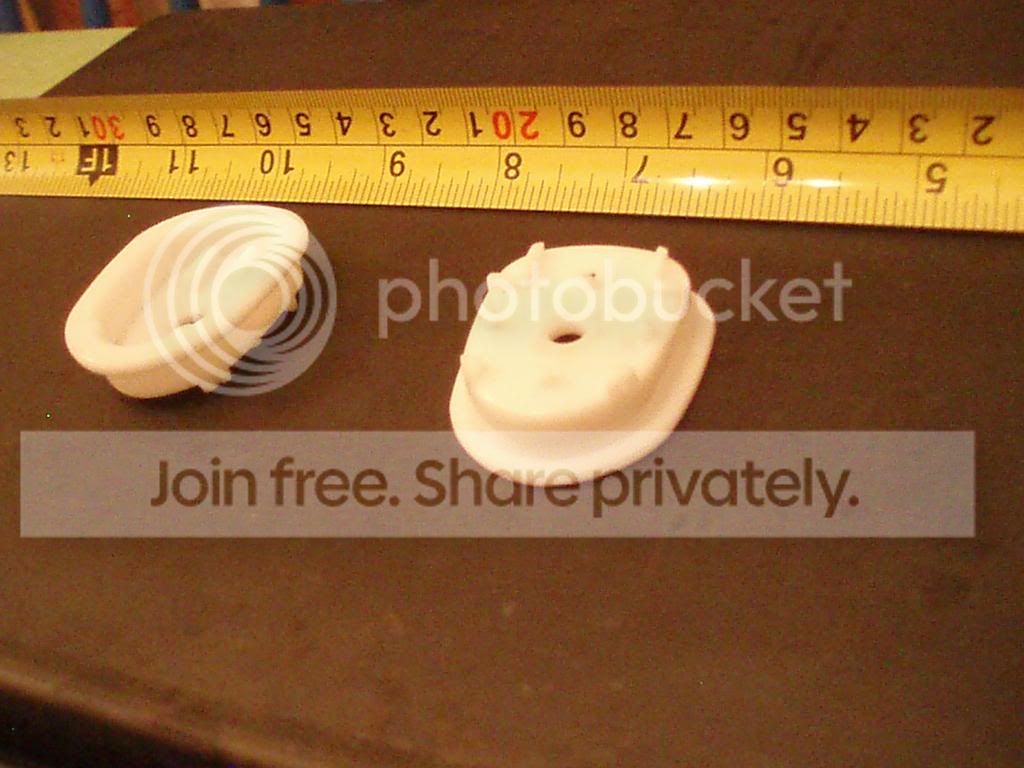
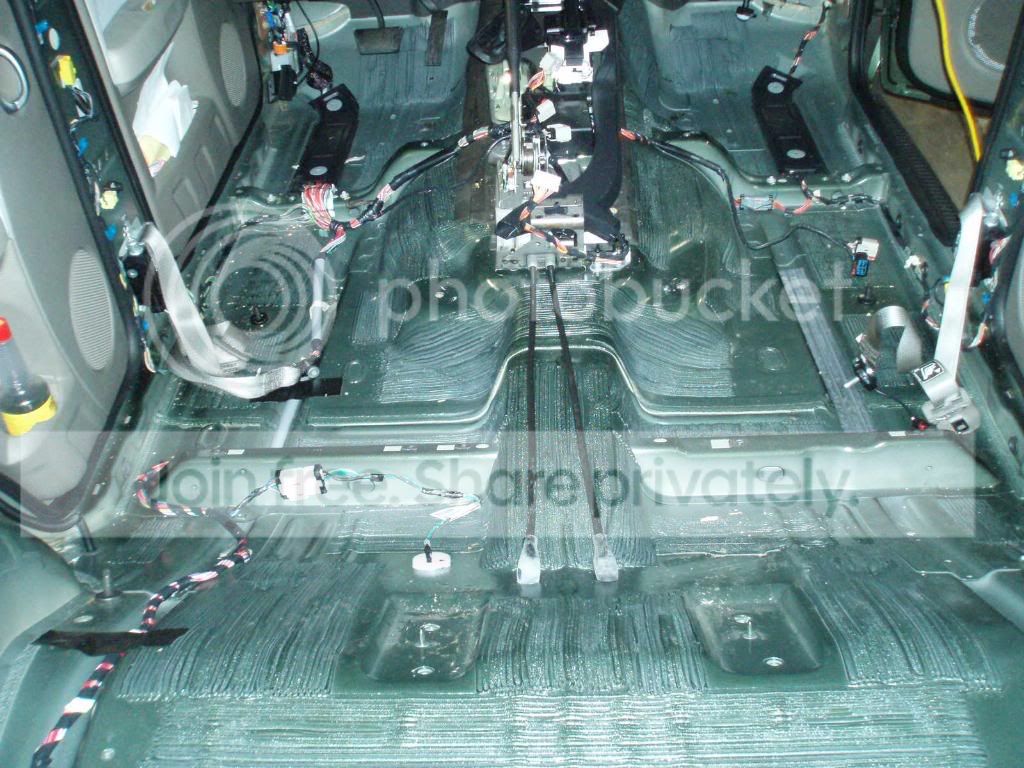
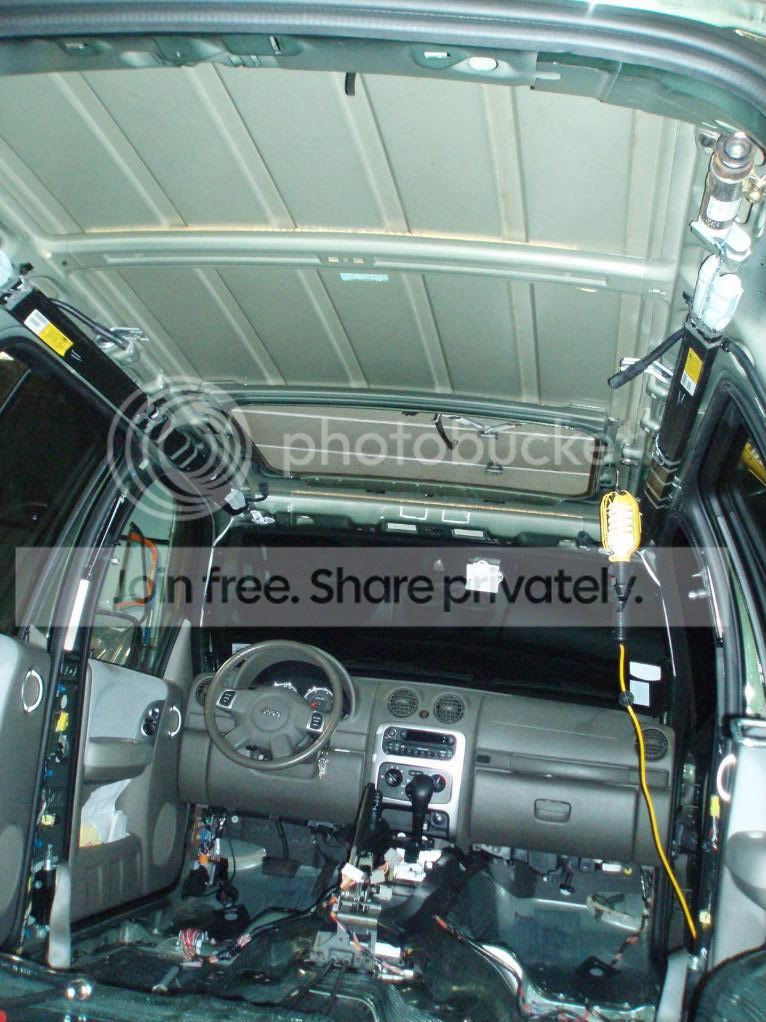
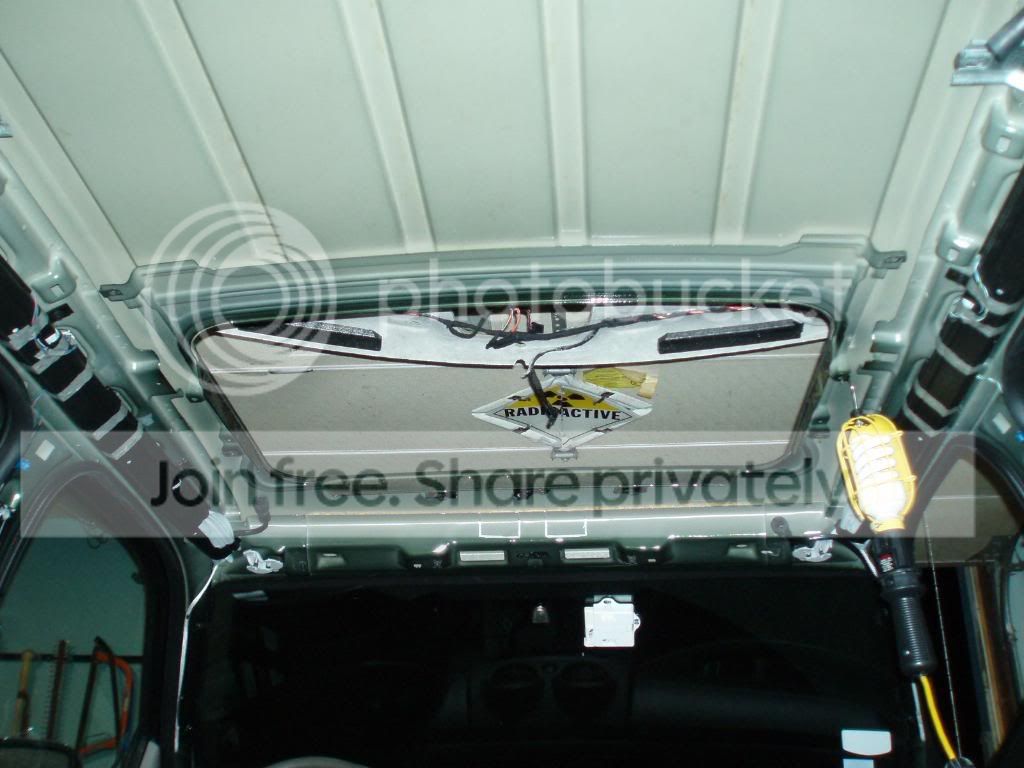
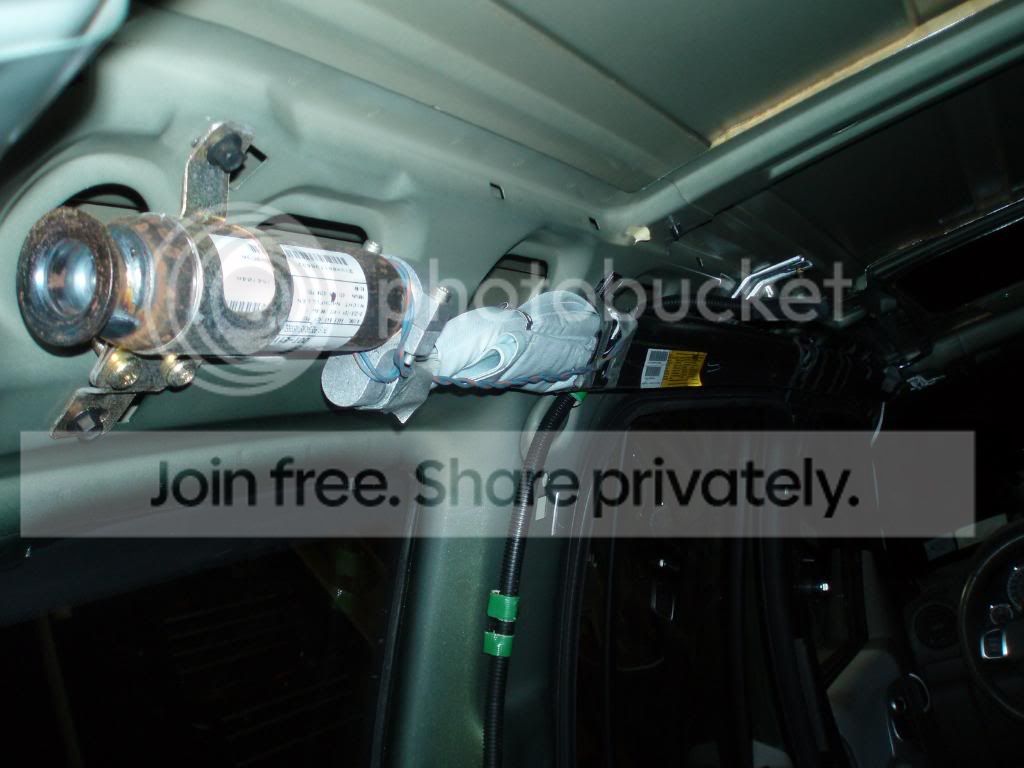
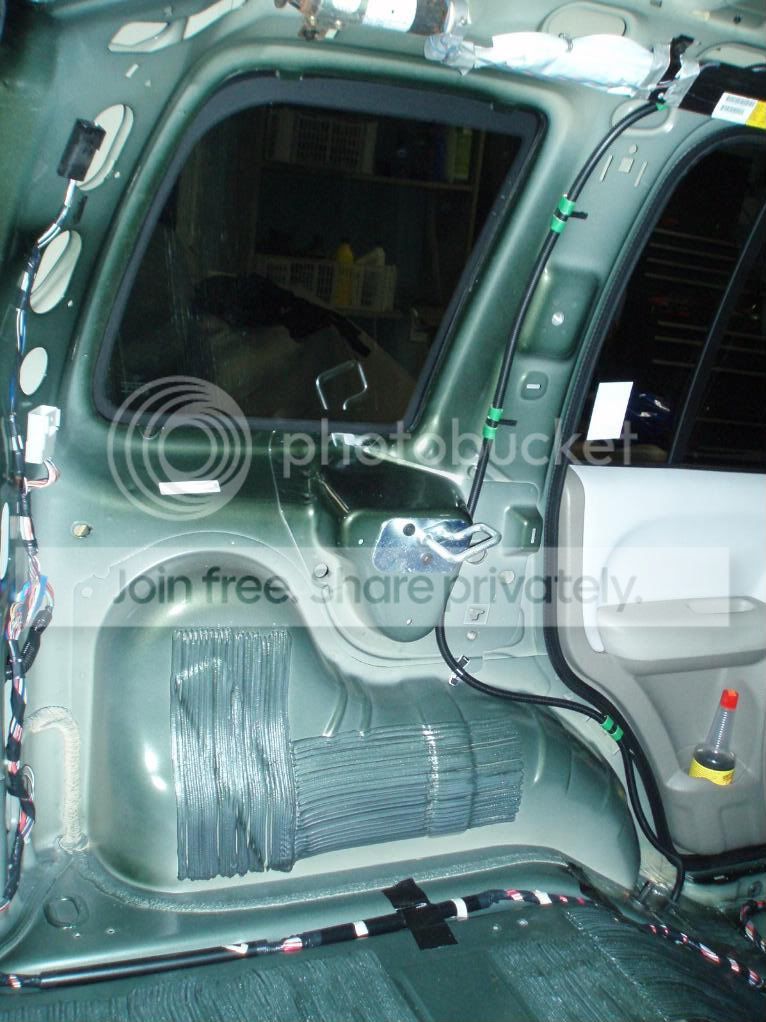
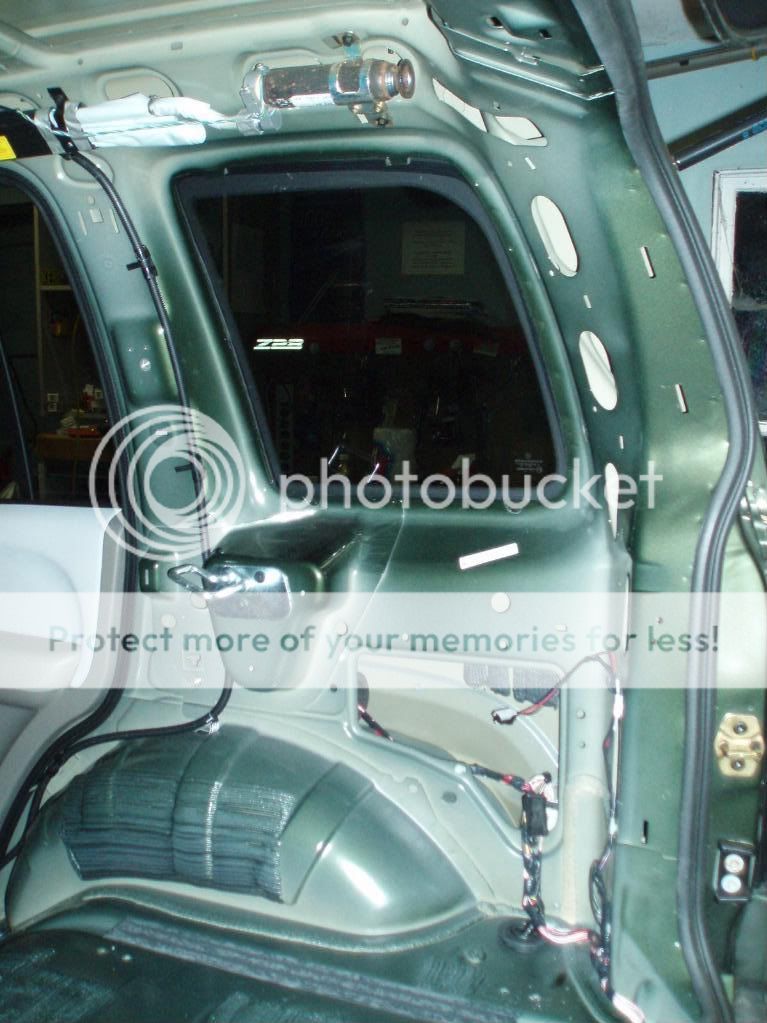
Yesterday I removed the entire interior with the exception of the dash. Upon removal of the headliner, 2 white plastic pieces of some sort fell down. They are oblong in shape; the face is around 1.5" by 1.25" and about .5" deep, with a hole in the middle. I can't for the life of me figure out where these pieces came from. They fell around the front seats, so that's where I looked to find their homes, but to no avail. They fell before I removed the sunroof assembly, so they are not from that. Anybody have any ideas? I realize this is pretty vague, so I will try to post some pictures tonight when I get home. Thanks in advance for your help. |
|
| Author: | SBosco [ Mon Dec 29, 2008 8:04 pm ] |
| Post subject: | |
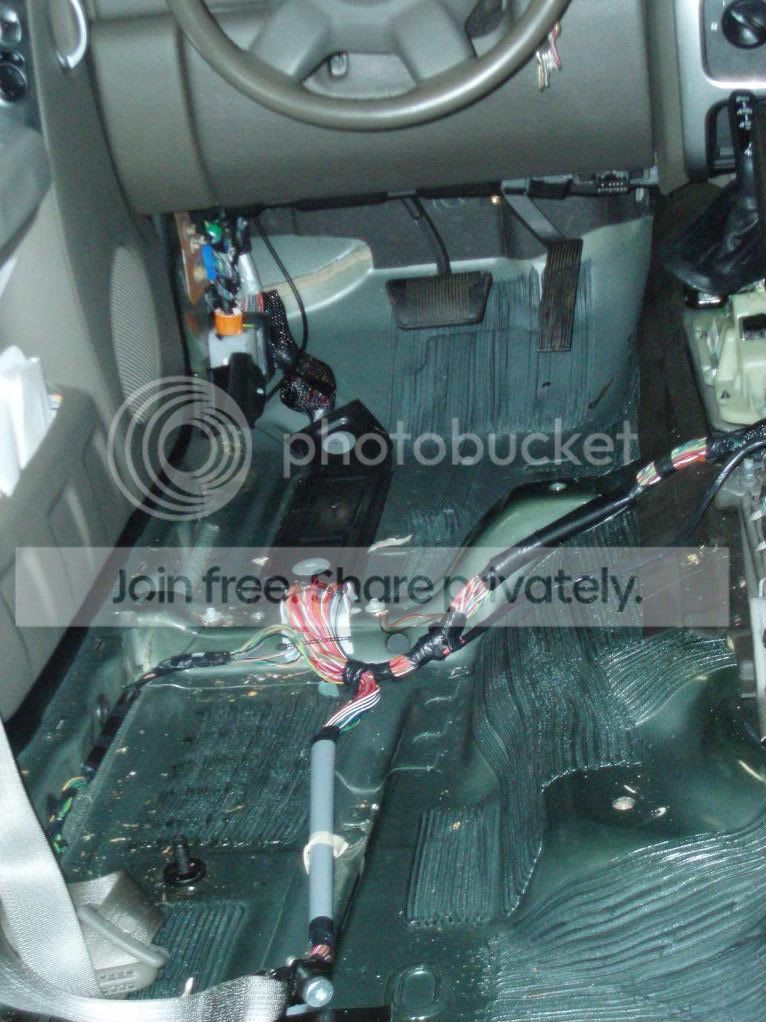
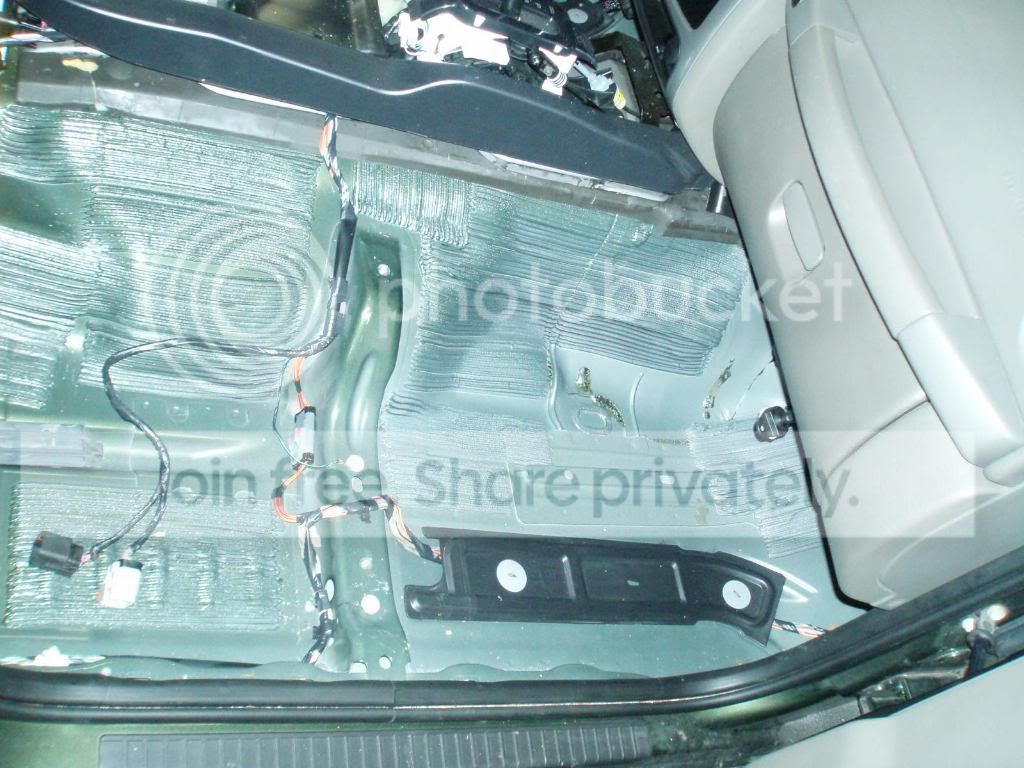
Here are the pics:
|
|
| Author: | Frostednutz [ Mon Dec 29, 2008 10:41 pm ] |
| Post subject: | |
that goes to you visors or for the handles above the rear seating if i remember correctly it's one of the 2. |
|
| Author: | SBosco [ Tue Dec 30, 2008 9:12 am ] |
| Post subject: | |
Frostednutz wrote: that goes to you visors or for the handles above the rear seating if i remember correctly it's one of the 2.
Thanks a bunch...they were in fact for the sunvisors. Stumped me when they fell out though. |
|
| Author: | SBosco [ Tue Dec 30, 2008 9:35 am ] |
| Post subject: | |
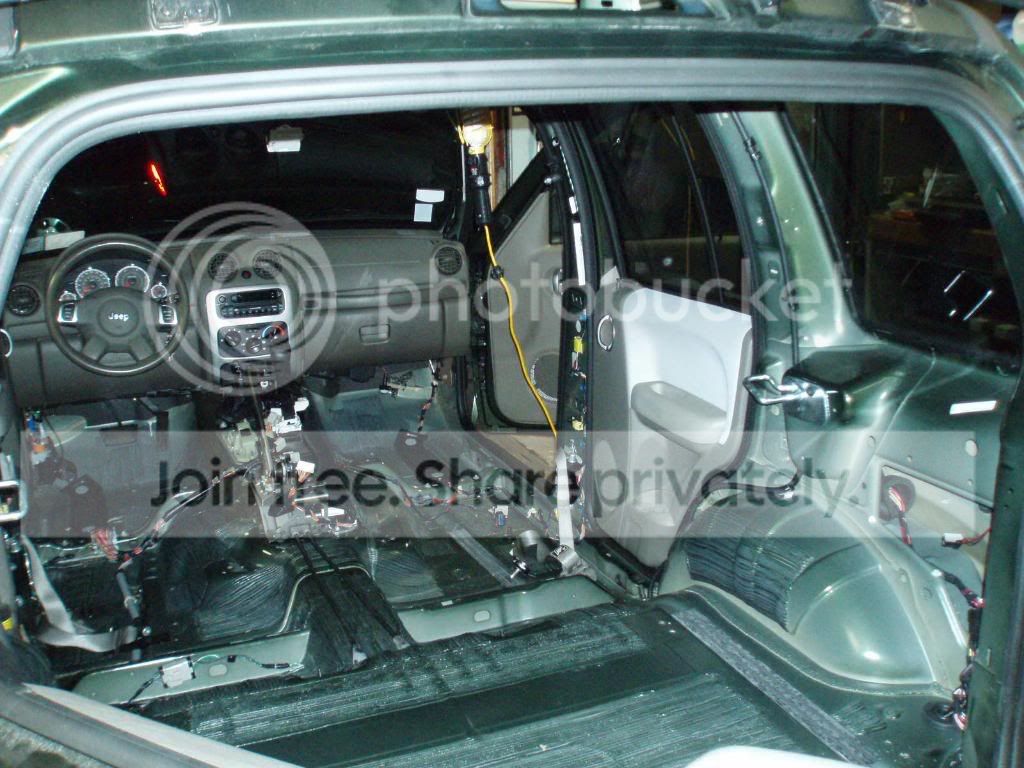
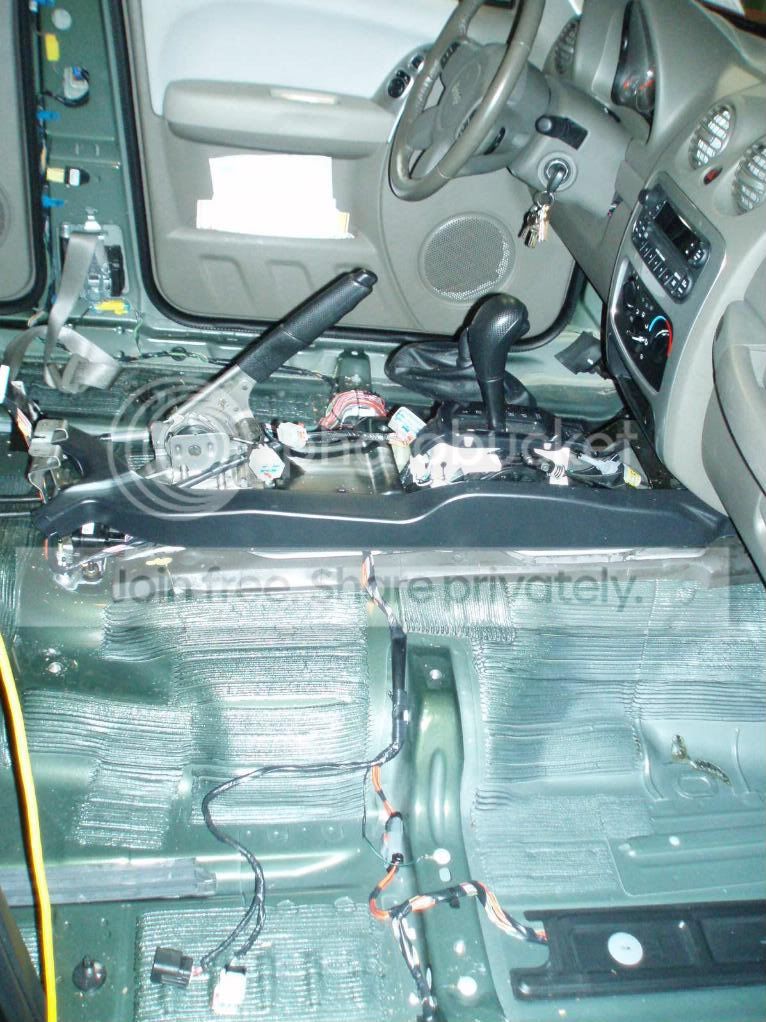
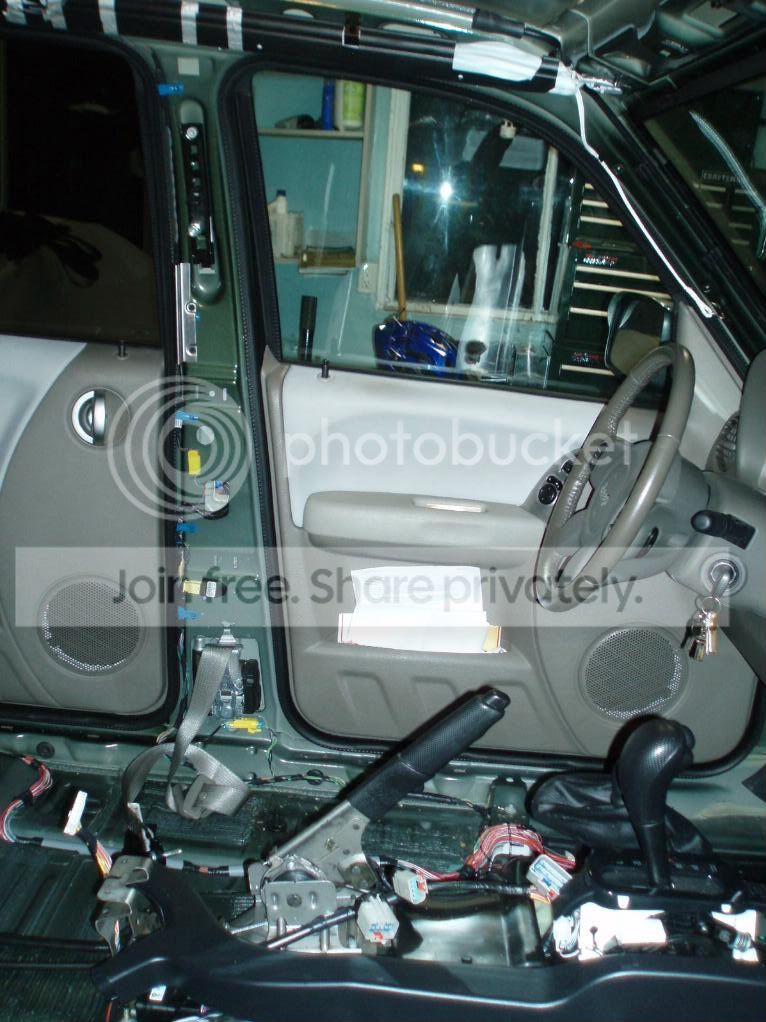
BTW, here are some pics of the stripped interior in case anybody wants to see what it all looks like underneath the plastic and carpet. 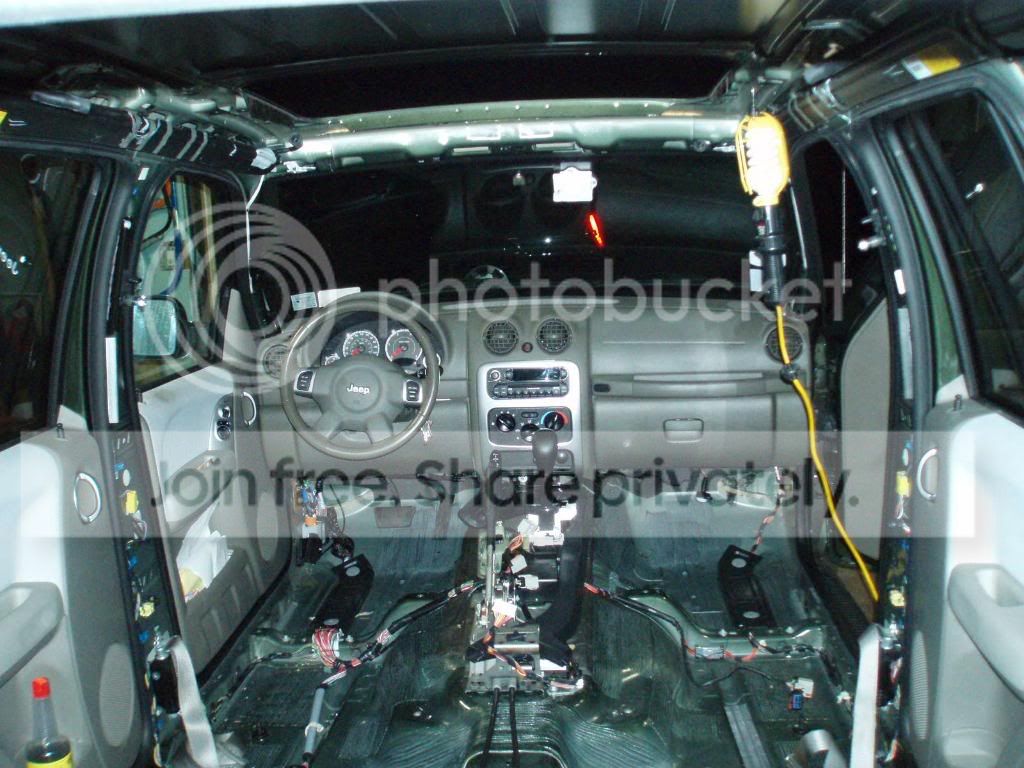
|
|
| Author: | riptricket [ Tue Dec 30, 2008 10:26 am ] |
| Post subject: | |
why are you going through all of that trouble to remove everything?? |
|
| Author: | SBosco [ Tue Dec 30, 2008 10:40 am ] |
| Post subject: | |
riptricket wrote: why are you going through all of that trouble to remove everything??
Because I have nothing better to do No, really...I am installing a sound system, and with it sound damping material to ensure I limit unwanted road noise and any rattles. Many refer to it as "dynamat" which is tar based, but I'm using Cascade Audio's mineral based sound damping material. It's more effective and lighter than dynamat. |
|
| Author: | SBosco [ Tue Dec 30, 2008 12:22 pm ] |
| Post subject: | |
haha...that's actually one of those switchable signs off an 18 wheeler that my brother "acquired" somehow and attached it to the garage door. When I loaded the photos, I noticed that and figured somebody would comment on it. Also, there is a reflective "Z28" badge, from my brother's camaro, sitting on the workbench which looks like it's on my passenger cargo window. I guess tinted windows still don't stop the flash |
|
| Author: | Frostednutz [ Tue Dec 30, 2008 4:03 pm ] |
| Post subject: | |
woo i win! make sure to use multiple layers to increase the dampening. specially on the rear tailgate. i used scoshe and i hated it. you really cant tell the difference until you drive around though. you can notice you no longer hear the tires on the road. and if you did the roof right the rain will be less noticible too! |
|
| Author: | SBosco [ Wed Dec 31, 2008 9:47 am ] |
| Post subject: | |
I already did the tailgate and doors a while ago. I used spray on sound damping (Mr. Gasket GMUFF) on the inside of the interior plastic panels, and inside the door and tailgate cavities. I then covered the whole naked door face with the sound damping sheet, and reinstalled the white plastic barrier over that. I will keep the multiple layers idea in mind...If I have any sheet left over after coating the rest of the interior I will probably use it on the roof. I am going to finish the interior off with more spray on damping, for any spots which are too difficult to cover with the sheet. Last night I finished running most of the wiring...is there enough room in the firewall to get two 4 gauge wires through? Or will I have to cut? |
|
| Author: | Tokyojoe [ Wed Dec 31, 2008 3:24 pm ] |
| Post subject: | |
Please take pictures throughout the whole process. I would love to see and hear about the whole thing. Do a full write-up for LOST. Would be much appreciated by all interested. How much is your cost going to be (excluding sound system)? I am sure you have to replace a lot of those plastic rivets. |
|
| Author: | Frostednutz [ Wed Dec 31, 2008 8:56 pm ] |
| Post subject: | |
i got 1/0 running through a hole just above the clutch pedal and to the left. i think i have 1/0 gauge and a couple 4 gauge going through it at one time when i didnt have the second battery. what amps/subs/speakers you going to run? |
|
| Author: | Hood297 [ Thu Jan 01, 2009 7:16 pm ] |
| Post subject: | |
Tokyojoe wrote: Please take pictures throughout the whole process. I would love to see and hear about the whole thing. Do a full write-up for LOST. Would be much appreciated by all interested.
How much is your cost going to be (excluding sound system)? I am sure you have to replace a lot of those plastic rivets. x2 |
|
| Author: | SBosco [ Fri Jan 02, 2009 12:42 pm ] |
| Post subject: | |
Tokyojoe wrote: Please take pictures throughout the whole process. I would love to see and hear about the whole thing. Do a full write-up for LOST. Would be much appreciated by all interested. How much is your cost going to be (excluding sound system)? I am sure you have to replace a lot of those plastic rivets. I haven't taken any pictures of the doors or tailgate when I did them, but the procedure is pretty much the same. I'll try and do a writeup after I finish everything. It's taking me a lot longer than I expected due to several factors such as: sub-freezing temps Fortunately, I was able to salvage all of the plastic clips/rivets. As I called the dealership before starting, in anticipation of needing replacements, and they wanted around $4 per clip!!! However, the pop-rivets holding the rear cargo tie down cleats had to be drilled out. I think I will replace them with riv-nuts, so the cleats would be easier to remove if I ever have to again. In case you didn't know, riv-nuts are very similar to pop-rivets but after installed, they have threads on the inside for a bolt to pass through. There is also a blue flexible foam block which was glued between the roof and sunroof carriage assembly. I used a scraper to remove it from the roof and will glue it back on later. In dropping the headliner, I had to cut the washer line for the rear windshield both in the front by the passenger A-pillar and in the rear right in back of the nozzle. I plan on using really tight fitting male to male unions because I really don't want to have to deal with leaks under the roofliner! Frostednutz wrote: i got 1/0 running through a hole just above the clutch pedal and to the left. i think i have 1/0 gauge and a couple 4 gauge going through it at one time when i didnt have the second battery. what amps/subs/speakers you going to run?
Right now I have the power wires routed in the v-shaped which runs in the middle of the passenger side and will see if I can get them over to the driver's side by snaking them underneath the dash. These are all of the components for the sound system: Pioneer DEH-9600MP head unit Pioneer TS-D720C 6.5" component speakers for front and rear Pioneer TS-SW841D 8" shallow subwoofers JBL GTO5355 5-channel amp TKO BH-CAP54D 1.5 farad capacitor PAC SWI-PS wired remote interface for Steering wheel audio controls distribution blocks, batt terminals, 80A circuit breaker Wire sizes as follows: Power wire to amp (positive and negative): 4 ga. Speaker wire from amp to crossovers: 10 ga. Speaker wire from crossovers to speakers: 12 ga. to mids, 16 ga. to tweeters RCA cables from head unit to amp for speakers and subs. Nothing crazy, just modest upgrades. |
|
| Author: | Frostednutz [ Fri Jan 02, 2009 7:45 pm ] |
| Post subject: | |
i suggest getting rid of the capacitor. all it does is make pretty lights and eventually takes power away from the system. you have basically pioneer all around why not a pioneer amp to push the subs and speakers? |
|
| Author: | SBosco [ Sat Jan 03, 2009 2:19 pm ] |
| Post subject: | |
The capacitor is a cheap way to protect/save the alternator. I wanted to run everything off of 1 amp to keep it as clean and simple as possible. Pioneer doesn't make any 5 or 6 channel amps. I actually didn't plan on the system ending up being predominantly pioneer brand...I just read reviews, keeping my price range in mind, and purchased piece by piece until I had everything I needed. |
|
| Author: | Frostednutz [ Sat Jan 03, 2009 10:34 pm ] |
| Post subject: | |
i'm not trying to make anybody mad but a capacitor is not a cheap way of saving or protecting the alternator. if the alternator cannot keep up with the amperage demand then all the capacitors in the world and keep a system stable. amps have there own built in capacitors for a pulse of amperage so adding an external one only delays the loss of healthy amperage draw. upgrading the alternator is the only way to properly feed an unfeed system. adding capacitors and batterys in the long run takes away needed amperage away from the amp if the alternator is not keeping up in the first place. keep in mind that if your voltage is dropping more than 1 volt (from a healthy 14.4v) this can cause lights to dim but dropping 2 or more volts can damage amps, speakers, subs, and even the head unit. you'll have to make the desicion to upgrade if your electrical is not sufficiant enough to keep up with the power demands. |
|
| Author: | MiniDevil [ Sun Jan 04, 2009 3:36 am ] |
| Post subject: | |
More pics of the progress!!!! |
|
| Author: | SBosco [ Mon Jan 05, 2009 9:31 am ] |
| Post subject: | |
I took pics after I ran and secured all the wiring. I will try and post them tonight. Progress update: As of yesterday I have the driver's area covered with damping material, and all of the interior plastic panels are backed with sound deadening spray, including the center console. Since I have everything else done now, I can really focus on installing the damping material into the jeep itself. |
|
| Author: | SBosco [ Mon Jan 05, 2009 10:27 am ] |
| Post subject: | |
Frostednutz wrote: i'm not trying to make anybody mad but a capacitor is not a cheap way of saving or protecting the alternator. if the alternator cannot keep up with the amperage demand then all the capacitors in the world and keep a system stable. amps have there own built in capacitors for a pulse of amperage so adding an external one only delays the loss of healthy amperage draw. upgrading the alternator is the only way to properly feed an unfeed system. adding capacitors and batterys in the long run takes away needed amperage away from the amp if the alternator is not keeping up in the first place. keep in mind that if your voltage is dropping more than 1 volt (from a healthy 14.4v) this can cause lights to dim but dropping 2 or more volts can damage amps, speakers, subs, and even the head unit. you'll have to make the desicion to upgrade if your electrical is not sufficiant enough to keep up with the power demands.
This is an anger-free post, lol. I certainly agree that if the alternator cannot supply enough power to the system that there's nothing you can do besides upgrading the electrical system. That being said, the way I learned it... a stiffening capacitor is meant as a buffer, like a sort of energy reservior for relatively short, high energy demand spikes. The more "steady state-like" operation of the alternator, the better it is for the alternator. By discharging it's charge instantaneously into the electrical system, the capacitor allows the alternator to recharge the capacitor more gradually than if the alternator had to supply the energy spike itself. Amplifiers may have small internal capacitors, but nothing on the scale of 1 farad or so. |
|
| Page 1 of 2 | All times are UTC - 5 hours [ DST ] |
| Powered by phpBB © 2000, 2002, 2005, 2007 phpBB Group http://www.phpbb.com/ |
|