It is currently Fri Jan 16, 2026 11:19 am

All times are UTC - 5 hours [ DST ]


Post new topic Reply to topic  [ 32 posts ]  Go to page Previous  1, 2
Author Message
 Post subject: Re: Diagnosing #4 leak and/or injector failure.
PostPosted: Tue Apr 29, 2025 12:37 pm 
Offline
LOST Newbie

Joined: Tue Mar 11, 2014 11:01 am
Posts: 81
Greatly appreciate the info, Layback,

Steve


Top
 Profile  
 
 Post subject: Re: Diagnosing #4 leak and/or injector failure.
PostPosted: Sun May 04, 2025 4:27 pm 
Offline
LOST Newbie

Joined: Tue Mar 11, 2014 11:01 am
Posts: 81
SJBrooks wrote:
Yea, WW, I wasn’t comfortable going above the established torque in the first place; cutting the seat is definitely the best way to go. Do you know the diameter of the injector bores? I want to make sure I get a kit with the proper cutter.

Thanks as always,

Steve


WW,

I know you’re intimately familiar with the CRD engine, so do you know what size of bore our injectors sit it? I want to make sure I get a kit that has the right size of reamer.

Thanks as always,

Steve


Top
 Profile  
 
 Post subject: Re: Diagnosing #4 leak and/or injector failure.
PostPosted: Sun May 04, 2025 6:22 pm 
Offline
LOST Junkie

Joined: Fri Mar 20, 2015 2:11 pm
Posts: 805
Location: markham, ontario
17x19mm is correct size flat reamer turns clockwise only.make sure lube it with wd 40 or similar.


Top
 Profile  
 
 Post subject: Re: Diagnosing #4 leak and/or injector failure.
PostPosted: Sun May 04, 2025 6:31 pm 
Offline
LOST Newbie

Joined: Tue Mar 11, 2014 11:01 am
Posts: 81
Thanks, Rankom.

Steve


Top
 Profile  
 
 Post subject: Re: Diagnosing #4 leak and/or injector failure.
PostPosted: Wed Dec 03, 2025 11:09 pm 
Offline
LOST Newbie

Joined: Thu Mar 24, 2011 9:48 pm
Posts: 33
Hi all,

I've got a few of questions related to the injector seat/seals. My #1 injector (I think it's #1 anyway, FWD, closest to the radiator) is puffing along with compression blow-by, as the engine runs. It looks like I can get the new copper washer and o-ring for a fair price, but I'm not sure exactly what's best for an injector puller and a seat cutter tool. Here's my questions.

1. When cutting the new seat, do you need to measure the depth prior to and also after cutting? And then worry about getting a thicker washer to keep the injector from sitting down too low into the combustion chamber?

2. What puller is recommended? The Chrysler special tool? Or some other aftermarket injector puller?

3. Same question for the seat cutter. I've seen a couple of different ones. What's best? Best price?

FYI, I have a 2006 Liberty CRD.

Thanks all,
Jimmy


Top
 Profile  
 
 Post subject: Re: Diagnosing #4 leak and/or injector failure.
PostPosted: Thu Dec 04, 2025 2:03 pm 
Offline
Moderator
Moderator
User avatar

Joined: Sat Aug 24, 2013 11:36 pm
Posts: 7387
Location: Central GA
Remove injector, use seat cutter tool to clean up seat area. Cut only enough until you have a good full shinny area visible for copper seal to seal on.
You can also anneal the copper sealing washers by heating them with a torch to make them more pliable for better sealing. See instructions for annealing below.
Quote:
Annealing copper involves heating it to a temperature between \(400^{\circ }C\) (\(752^{\circ }F\)) and \(1020^{\circ }C\) (\(1872^{\circ }F\)) until it turns dull red, and then allowing it to cool slowly. The purpose is to make the metal softer and more ductile by allowing the grain structure to recrystallize. The cooling method (slow air cooling or quenching in water) doesn't significantly affect the result for many applications. 

Seat cutter sets on Amazon or ebay are ok for the job. There average cost is around $50 :google:

Image

CLINK ON LINK:>>> https://www.ebay.com/itm/157356751432?c ... 47c6d56d2c

Image

_________________
Supporting Vendor and Moderator of LOST
05 Jeep Liberty CRD Limited :JEEPIN:
Ironman Springs/Bilstein/Shocks
Yeti StgIV Hot Tune
Week's BatteryTray
No FCV/EGR
Samcos/ProVent
SunCoast/Transgo
Carter Intank-pmp
2mic.Sec.Fuel Filter
Flowmaster/NO CAT
V6Airbox/noVH
GM11 Bld.fan/HDClutch
IronrockArms/wwdieselMount

98 Dodge Cummins 24 Valve


Top
 Profile  
 
 Post subject: Re: Diagnosing #4 leak and/or injector failure.
PostPosted: Wed Dec 10, 2025 11:04 pm 
Offline
LOST Newbie

Joined: Tue Mar 11, 2014 11:01 am
Posts: 81
Jimmy,

I posted earlier in this thread that I’ve got a leak past my #3 injector. I bought the reamer set suggested by WW but haven’t used it yet. If not too much to ask of you, when you do the remove/ream/reinstall job, plz post any lessons learned.

Thanks,

Steve


Top
 Profile  
 
 Post subject: Re: Diagnosing #4 leak and/or injector failure.
PostPosted: Wed Dec 31, 2025 3:10 pm 
Offline
LOST Newbie

Joined: Thu Mar 24, 2011 9:48 pm
Posts: 33
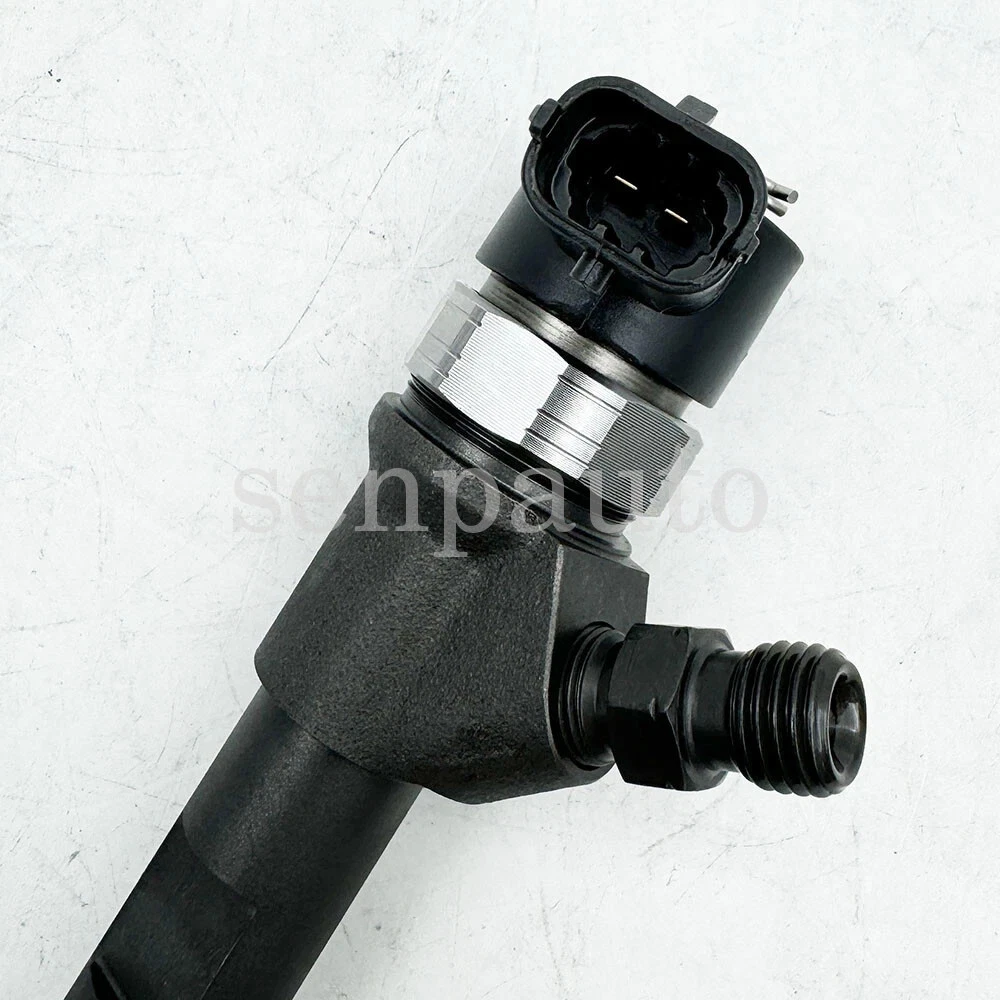
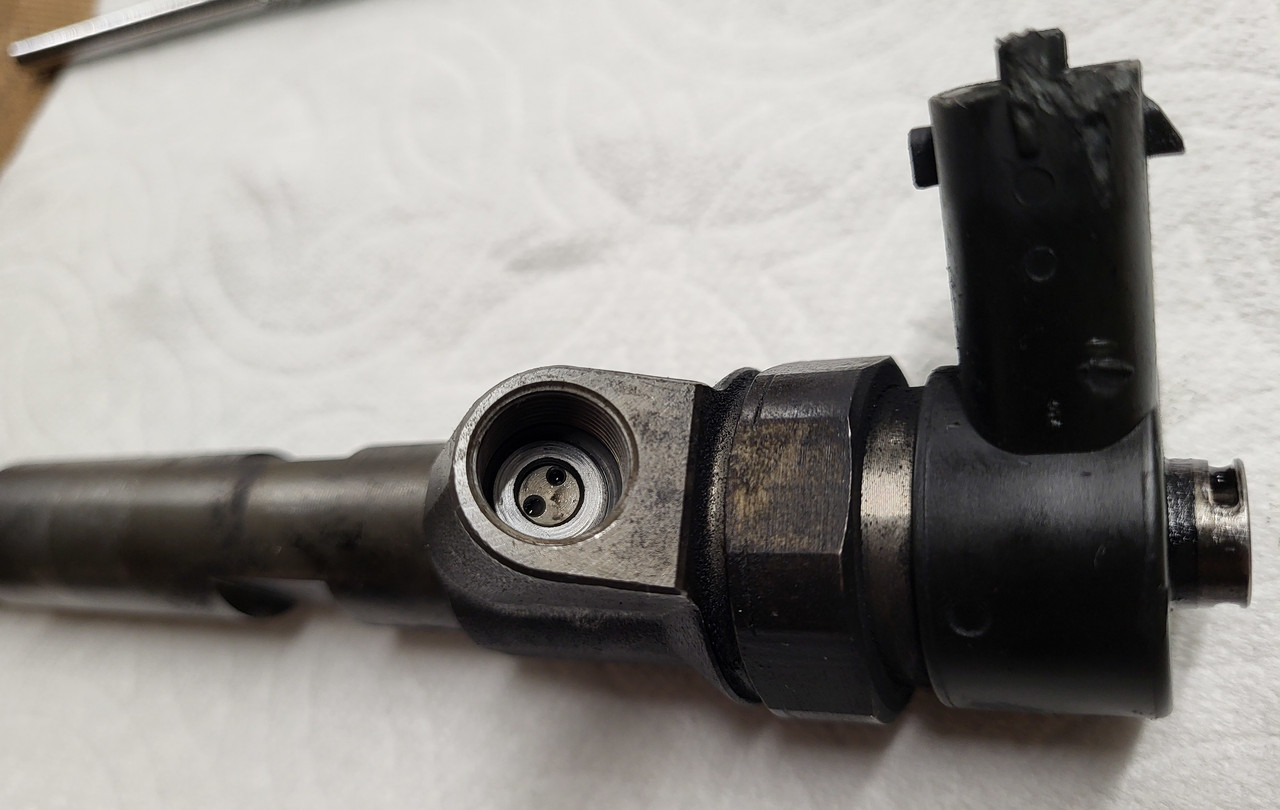
OK, new problem. What do I do if I’ve got a fuel leak now? I just finished the injector seat / seal replacement, and when I put it all back together, it started spraying diesel out of the threads at this fitting shown in the image here:

Image

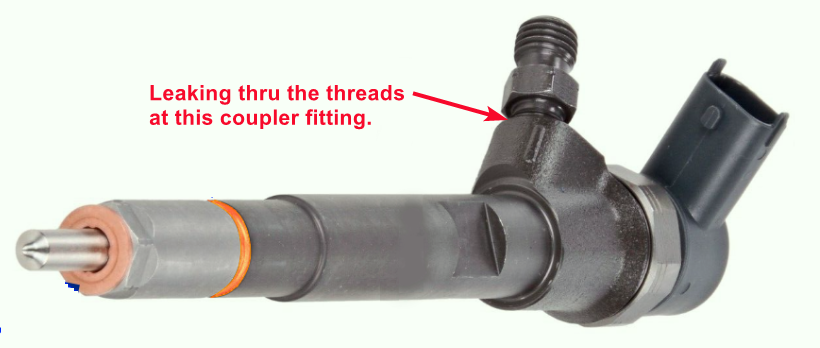
Does this mean I’m screwed, and now I need to buy a new injector? Or is there a way to seal these threads up? I’m just not sure what to do since this is on the high-pressure side of things.

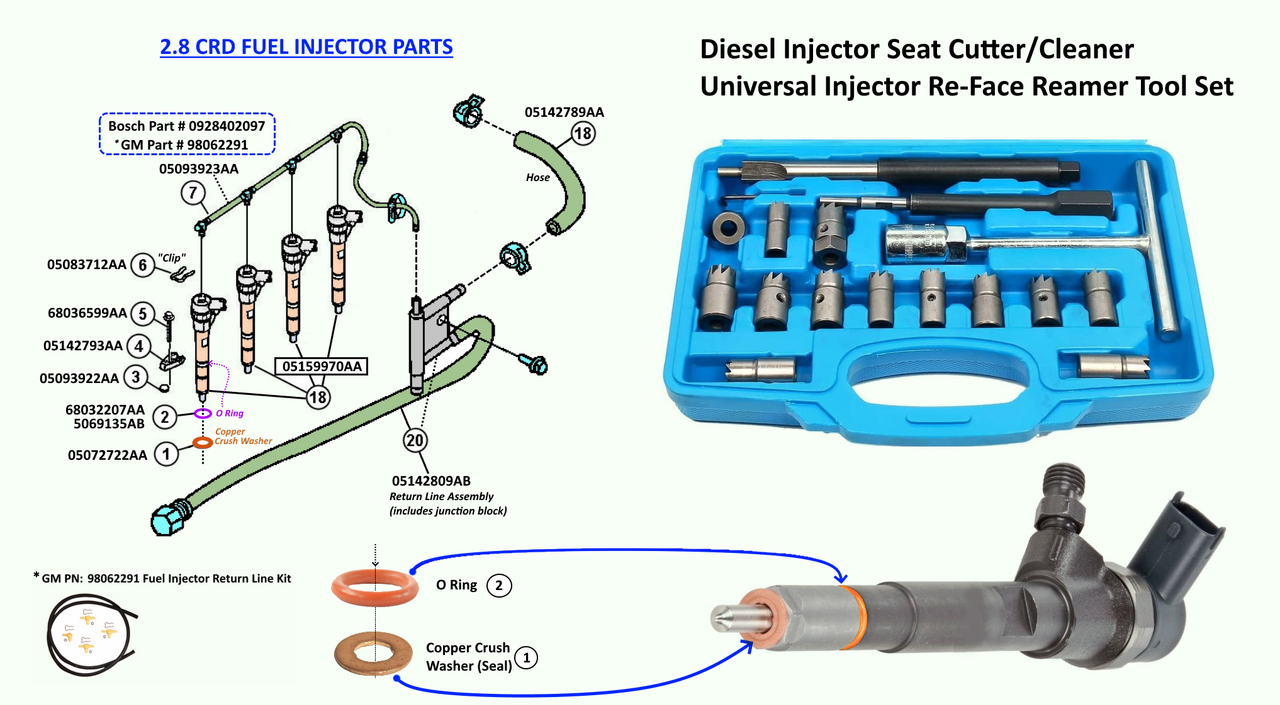
Here’s the background info for how the replacement went:

I rented the puller tool from IDParts, but it did not fit for me, unfortunately. The opening on the tool was just barely too small to span across and fit onto the flats of the injector. I’m not sure how it’s possible for the factory tool to not fit, but it just wouldn’t fit. (Also, I’m not trying to say anything bad about IDParts. I’ve purchased a bunch of parts and things from them, and I like those guys. I’m not trying to blame or disparage them at all for the tool not working.)

I was eventually able to use a 17mm wrench to hold the flats on the injector on either side of the fuel inlet connection area. (Basically, right around the area that’s now leaking.) My injector was super stuck in there, but I finally got it to rotate just a little bit. Then I could slowly rotate it back and forth a tiny bit with the wrench in my right hand, while also pulling upward on the injector itself with my left hand. This was a painfully slow process, but it worked. After a few minutes of rotating / rocking it back and forth while pulling, it finally worked its way up and out.

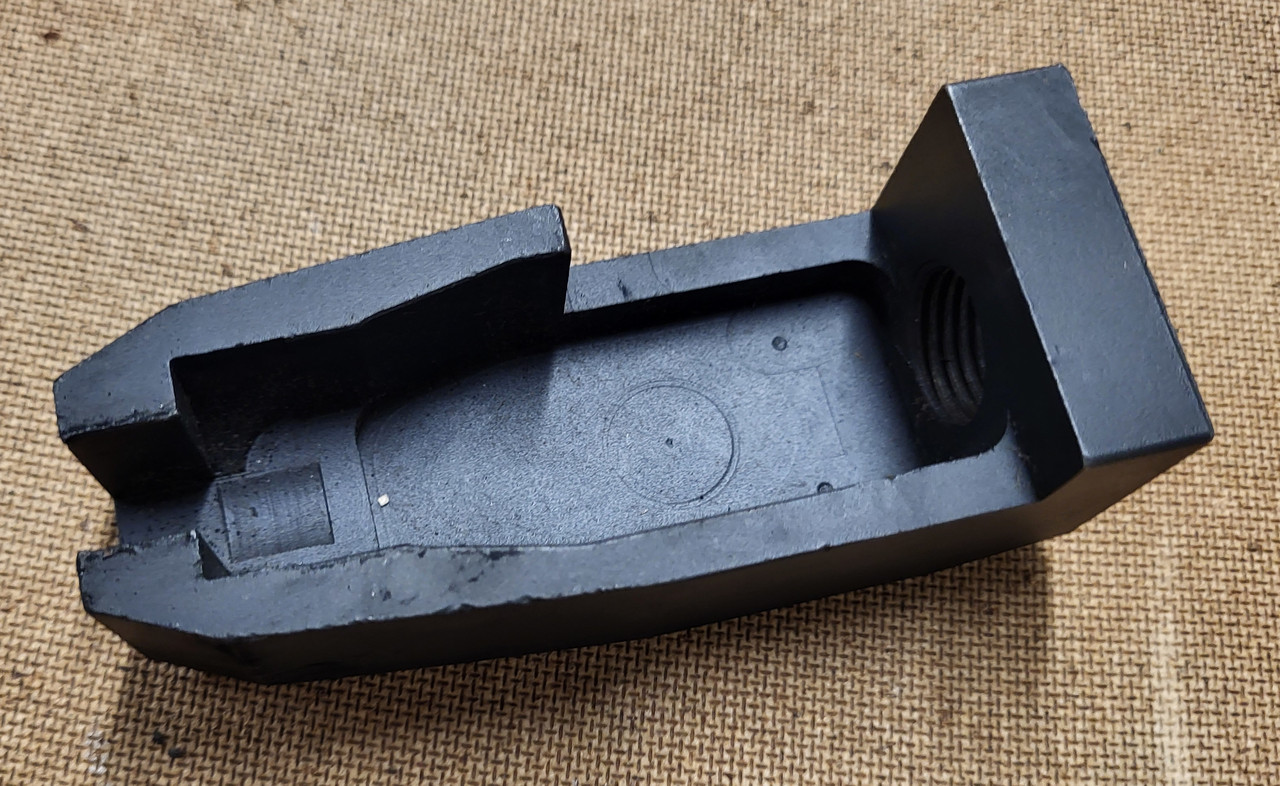
The whole injector well, and area around it, was disgustingly dirty and caked up with diesel soot. I ended up picking at the soot with a bamboo skewer while sucking up the dirt with my shop vac. That actually worked pretty well to break it up and get it out of there.

Once it was clean enough to see the bottom, I could tell that the old copper washer was still stuck at the bottom of the well. I tried to hook it with a small pick, but couldn’t get it to budge. But I found a piece of dowel that I had laying around that was almost the right size to fit into the washer. I had to sand down the tip of the dowel slightly, but then I was able to tap the dowel down into the washer, and that worked to grab it, and pull it up and out.

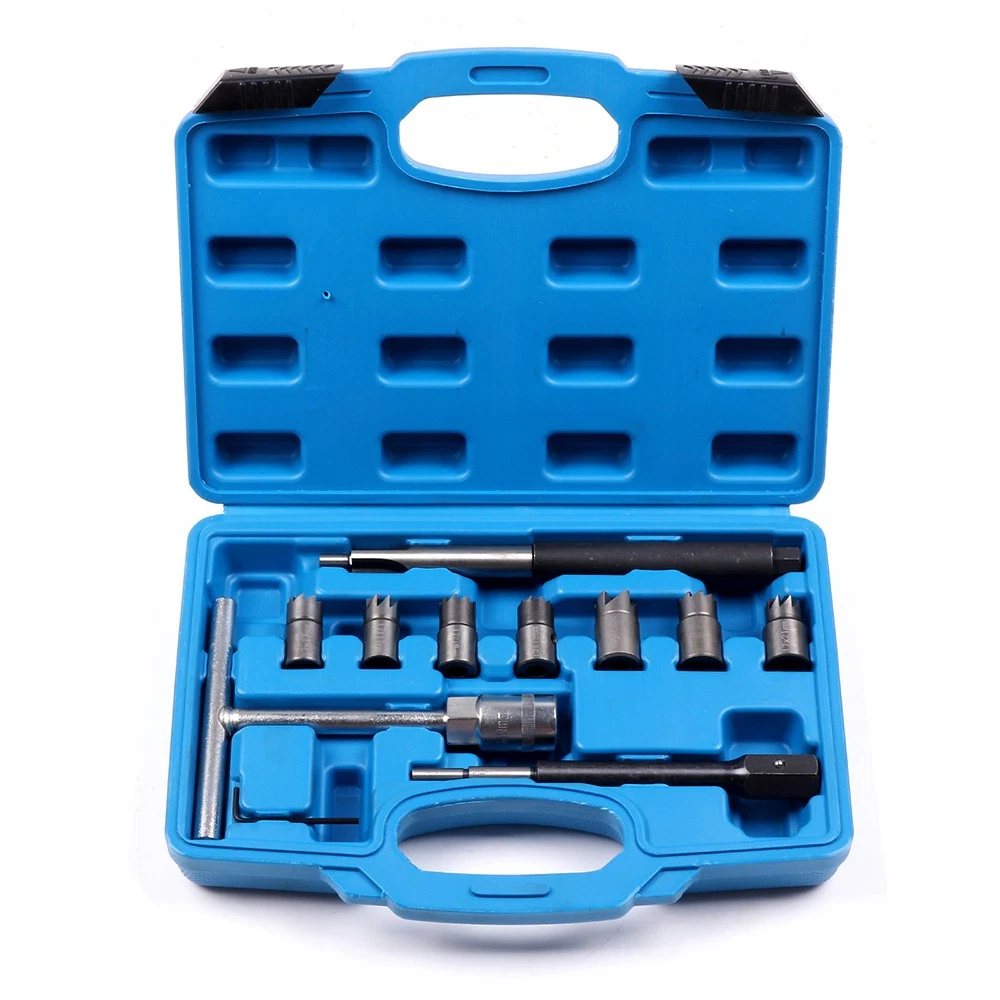
Then I was finally able to use the seat cutter tool. I dabbed the cutter head in grease (to catch the shavings) and then used it to smooth out the bottom of the well. (I used the 17 x 19 cutter head.) I put the tool in there 3 times. Each time I gave it about 5 or 6 turns while just barely keeping light pressure down on it. I also cleaned and re-greased the cutter head each time.

Once the bottom of the well looked all clean and smooth, I reassembled everything with the new copper washer and new o-ring on the injector. I also lightly greased the lower part of the injector before installing it.

The good news is that when I started the engine, there was no more blow-by. The new seat seal is working properly. But, like I said above, it’s leaking a bunch of fuel now. I also removed and reinstalled the fuel line again to try to re-seat all of those parts, but it’s still leaking from the same place. I’m not sure how to fix this problem.

Any help / advice is much appreciated. Thanks guys.


Top
 Profile  
 
 Post subject: Re: Diagnosing #4 leak and/or injector failure.
PostPosted: Wed Dec 31, 2025 4:59 pm 
Offline
Moderator
Moderator
User avatar

Joined: Sat Aug 24, 2013 11:36 pm
Posts: 7387
Location: Central GA
Obvious question, have you tried to tighten the coupling fitting?
Is the threads a tapered pipe thread fitting, or is it a reverse flare nut type fitting like used on some brake lines.
You could try putting some teflon tape on the threads and see if that helps.
Is the injector cracked where the fitting screws in?
If it is cracked, you have no choice but to replace the injector itself.

Never have removed one of these fittings. I got some injectors, I will have to remove the fitting and see what kind it is later today.
In looking at closeup pictures, it appears to be a reverse flare type fitting. But that is just a guess. Could not find just the fitting by itself listed anywere.

Image

_________________
Supporting Vendor and Moderator of LOST
05 Jeep Liberty CRD Limited :JEEPIN:
Ironman Springs/Bilstein/Shocks
Yeti StgIV Hot Tune
Week's BatteryTray
No FCV/EGR
Samcos/ProVent
SunCoast/Transgo
Carter Intank-pmp
2mic.Sec.Fuel Filter
Flowmaster/NO CAT
V6Airbox/noVH
GM11 Bld.fan/HDClutch
IronrockArms/wwdieselMount

98 Dodge Cummins 24 Valve


Top
 Profile  
 
 Post subject: Re: Diagnosing #4 leak and/or injector failure.
PostPosted: Wed Dec 31, 2025 9:02 pm 
Offline
LOST Newbie

Joined: Thu Mar 24, 2011 9:48 pm
Posts: 33
WWDiesel wrote:
Obvious question, have you tried to tighten the coupling fitting?

You could try putting some teflon tape on the threads and see if that helps.

Is the injector cracked where the fitting screws in?

For the first question: I'm afraid that I may have tightened it down too much when I reinstalled it. And that could've damaged the threads inside the body of the injector. As far as I could tell, there was no thread locker or sealant on there before.

For the second question: I thought about teflon tape, but wasn't sure if that was OK to be in contact with diesel fuel. I did some more research and it looks like maybe the yellow teflon tape could work. I guess the yellow is recommended for fuel contact situations. (I wasn't aware there was a yellow. I've only ever seen and worked with the white stuff before.) I also saw some Permatex products recommended and also Gasoila. I ended up finding and buying some of the Permatex High Temperature Thread Sealant. I guess I'll try that and see how it goes.

For the third question: I'm not sure right now. It's all still installed on the Jeep. I'll try to take more photos when I take it all apart again and I'll post an update afterwards. I really hope I didn't wreck the threads inside the injector. Looks like a new one is around $430. I definitely was not planning on spending that much on this job.

The fitting was loose when I first disconnected the fuel line nuts. I just unscrewed it and took it off to get it out of my way. That made it easier to get my 17mm wrench over that area, so it really helped to have it off while I was slowly working the injector out.

Does anyone know of a shop that works on injectors? I wonder if there's somewhere out there that could diagnose and possibly fix this, if the threads are somehow damaged.


Top
 Profile  
 
 Post subject: Re: Diagnosing #4 leak and/or injector failure.
PostPosted: Wed Dec 31, 2025 11:03 pm 
Offline
Moderator
Moderator
User avatar

Joined: Sat Aug 24, 2013 11:36 pm
Posts: 7387
Location: Central GA
Search for Authorized Bosch Rebuilders. If they are not Authorized Bosch Fuel Injector rebuilders, don't waste your time or money.
This one comes to mind, but there are others if you do a Google search for them in your area. :google:

Oregon Fuel Injection
Diesel Specialists – Local Service – Worldwide Sales
https://oregonfuelinjection.com/

_________________
Supporting Vendor and Moderator of LOST
05 Jeep Liberty CRD Limited :JEEPIN:
Ironman Springs/Bilstein/Shocks
Yeti StgIV Hot Tune
Week's BatteryTray
No FCV/EGR
Samcos/ProVent
SunCoast/Transgo
Carter Intank-pmp
2mic.Sec.Fuel Filter
Flowmaster/NO CAT
V6Airbox/noVH
GM11 Bld.fan/HDClutch
IronrockArms/wwdieselMount

98 Dodge Cummins 24 Valve


Top
 Profile  
 
 Post subject: Re: Diagnosing #4 leak and/or injector failure.
PostPosted: Sun Jan 04, 2026 10:21 pm 
Offline
LOST Newbie

Joined: Thu Mar 24, 2011 9:48 pm
Posts: 33
Update: That was a process, but I have it all back together now, with no leaks.

I found out that there’s a washer down in the injector body, where the fitting screws in. When I pulled it apart this time, the washer appeared to be off-center in there. And all of the threads on the fitting and in the injector body look good. So at least I didn’t damage anything the first time.

Now my theory is that the washer was not properly centered, so I think the fitting was not fully seating and sealing due to the washer being out of position. Then the fuel was leaking past or around the washer and finding its way up and out through the threads. And also, maybe it was still a bit loose as well. It felt like I was stripping threads before, but maybe it also just felt really strange because the washer wasn’t sitting in there properly.

This time when I reassembled the fitting to the injector body, I made sure to properly center the washer and then carefully seat the fitting all the way down before trying to put the injector back on the engine. Once it was in, I then lightly tightened down the fitting and the fuel line. On first startup, it was still leaking at the injector body, but only a little bit. So I tightened down the fitting just a bit more and tried again. And that took care of it. No more fuel leak. And I didn’t have to try to use the Permatex at all.

Here are some photos of everything.

The injector once I finally got it out and cleaned off a bit (when I first pulled it): Image

This shows the little washer in the injector body after I re-centered it: Image

Here’s a few of the fitting. These are all straight threads as well, not tapered. The more-fine threads go into the injector (left-side in the photo below). And the more-coarse threads hook up to the fuel hard-line (right-side in the photo below) Image

Image

Image

And then here are a few to show that special tool, and how it didn’t fit for me. The tool size was off by about 1mm: Image

Tool opening is 11.96mm: Image

My injector measured in at 12.91mm. Image

It’s all good now. Running well, no leaks, no injector blow-by. I hope this info can help someone.
Thanks for all of the help and advice.
Jimmy


Top
 Profile  
 
Display posts from previous:  Sort by  
Post new topic Reply to topic  [ 32 posts ]  Go to page Previous  1, 2

All times are UTC - 5 hours [ DST ]


Who is online

Users browsing this forum: No registered users and 64 guests


You cannot post new topics in this forum
You cannot reply to topics in this forum
You cannot edit your posts in this forum
You cannot delete your posts in this forum

Search for:
Jump to:  
Powered by phpBB © 2000, 2002, 2005, 2007 phpBB Group. Color scheme by ColorizeIt!
Logo by pixeldecals.com