It is currently Tue Apr 16, 2024 6:07 pm

All times are UTC - 5 hours [ DST ]


Post new topic Reply to topic  [ 654 posts ]  Go to page Previous  1 ... 28, 29, 30, 31, 32, 33  Next
Author Message
 Post subject: Re: It's 10pm - where's your lift pump?
PostPosted: Sat Mar 30, 2013 2:48 pm 
Offline
LOST Junkie
User avatar

Joined: Wed Apr 04, 2007 5:21 pm
Posts: 664
Location: Battle Ground, WA
And..HE.. SCORES!!! The Smilies go wild.. :BANANA: :pepper: :BINGO: :JEEPIN:

Take the win. Life is short.

:) Mark

_________________
--
2005 Liberty CRD
2004.5 Cummins 5.9L TD, F1s, NV5600 6-speed in a '93 GMC Suburban


Top
 Profile  
 
 Post subject: Re: It's 10pm - where's your lift pump?
PostPosted: Mon Apr 01, 2013 8:01 pm 
Offline
LOST Newbie

Joined: Mon Mar 25, 2013 12:47 pm
Posts: 4
Runs much better with in tank pump still stalls occasionally mostly after sat a while then goes about 6 blocks and stalls then run great rest of time. Primer pump is always hard when I check it now. Any Ideas


Top
 Profile  
 
 Post subject: Re: It's 10pm - where's your lift pump?
PostPosted: Wed Apr 03, 2013 1:52 pm 
Offline
Lifetime Member
Lifetime Member
User avatar

Joined: Wed Mar 08, 2006 6:15 pm
Posts: 2733
Location: Atlanta GA
Carterhouch wrote:
Runs much better with in tank pump still stalls occasionally mostly after sat a while then goes about 6 blocks and stalls then run great rest of time. Primer pump is always hard when I check it now. Any Ideas


How old is your fuel filter? You might have plenty of pressure and fuel volume for small demands, but limited flow if it's clogged or partially obstructed.

Dan

_________________
Image
2005 Silver CRD Limited :JEEPIN:
245/75R16 GoodYear Duratracs
Fumoto drain | ProVent CCV Filter
Stanadyne FM100 filter | Cummins fuel pump
GDE Eco | SEGR | BoulderBars | FrankenLift | Frankenskids


Top
 Profile  
 
 Post subject: Re: It's 10pm - where's your lift pump?
PostPosted: Tue Jun 25, 2013 5:48 pm 
Offline
LOST Junkie

Joined: Sat Jun 01, 2013 12:39 pm
Posts: 626
Location: North east-central Illinois
So is the Airtex E7181M the desired lift pump?

Where is the best place to purchase the pump?

Is this what I want to buy? Airtex E7181M Fuel Pump Strainer
by Airtex
Be the first to review this item
Price: $129.22 & FREE Shipping. Details

Ships from and sold by Amazon.com. Gift-wrap available.
Airtex E7181M Fuel Pump Strainer [Automotive]

http://www.amazon.com/automotive/dp/B0027I5GE8

_________________
2006 Jeep Liberty CRD 142,000 miles New engine 2-2014, Green Eco tune, FS2500 bypass filter Weeks elbow, European Torque converter, brakes front UCA's wheel bearing and front hubs. Front hitch OEM lift pump
98 K2500 Suburban 6.5td
96 K1500 " 6.5td
95 2 door Tahoe 6.5td
94 K3500 cc srw 5 speed 6.5td
91 International Model 6 speed spicer 4700


Top
 Profile  
 
 Post subject: Re: Fuel sender level adjustment via adjustable resistor
PostPosted: Fri Feb 07, 2014 12:04 pm 
Offline
LOST Newbie

Joined: Mon Apr 16, 2012 10:13 pm
Posts: 24
Bill.Barg wrote:
I installed a variable resistor inline with the fuel gauge signal wire (brown.green).

see

http://picasaweb.google.com/bill.barg/J ... 1012296898

Just a $3, 32 turn, 0 to 200 ohm "dashpot". Adjusted with a tiny flat head driver.

I adjusted the resistance to bring the fuel level indication lower. With a full tank, I adjusted the resistance until the needle indicated full, not pegged. I believe this was an additional 20 ohms or so.

The electronic damping of the siganl means you need to wait 10 seconds to see any chage in resistance show up at the gauge needle.

The variable resistor is under the rear seat, accessible by pulling up the carpet, without removing the seat.

I suppose you could install this in the engine compartment , but I just did not want to put in the time to get the right wire at the ECM.

Anyway... it works fine.

I plan to run the tank empty and then fine tune the resistance to give me 2.5 gallons (50 miles) after the "low level" light comes on.


I installed an Airtex pump in my CRD a few weeks ago and it makes a HUGE difference. I am so much happier with how it runs and no longer stalls. However, my fuel gauge now shows the tank is still half full when it is in fact nearly empty. I am having to use my odometer to remind me to fill up every 400 miles or so. I would really like to do this mod, but the picasa album is gone. Can anyone offer any help/photos on doing this? Thank you.


Top
 Profile  
 
 Post subject: Re: It's 10pm - where's your lift pump?
PostPosted: Fri Feb 07, 2014 4:40 pm 
Offline
LOST Junkie
User avatar

Joined: Mon Oct 20, 2008 12:24 pm
Posts: 977
Location: Victoria, Canada
<Picture from first page of this thread>
Image

He probably cut into one of these lines.
I have a 2006 and the fuel gauge wires are brown (so it is different from this).
You should check with the service manual wiring diags.

A resistor in series on either of these wires should work BUT ..
I found that the empty mark is about right and it reads fuller than it should. I only care about the empty mark really.

Did you swap the float arms or bend the original or nothing?


Top
 Profile  
 
 Post subject: Re: It's 10pm - where's your lift pump?
PostPosted: Sat Feb 08, 2014 10:18 am 
Offline
LOST Newbie

Joined: Mon Apr 16, 2012 10:13 pm
Posts: 24
Thank you for the reply. I did swap the arms, but I am guessing I did something wrong. That is assuming with the arms swapped, the gauge should work normally without anything else being done. I am more worried about the empty reading than the full reading.


Top
 Profile  
 
 Post subject: Re: It's 10pm - where's your lift pump?
PostPosted: Sat Feb 08, 2014 12:27 pm 
Offline
LOST Junkie
User avatar

Joined: Mon Oct 20, 2008 12:24 pm
Posts: 977
Location: Victoria, Canada
Could the float be hanging up? Not hitting bottom.

It may not be obvious but could the gauge stop at mid point (with a half a tank) and stay there until empty?


Top
 Profile  
 
 Post subject: Re: It's 10pm - where's your lift pump?
PostPosted: Wed Feb 19, 2014 3:36 pm 
Offline
LOST Junkie

Joined: Sat Jun 01, 2013 12:39 pm
Posts: 626
Location: North east-central Illinois
http://www.auerbach.ca/kj/lift_pump/

Airtex E7181M In-tank Lift Pump

2005 Jeep Liberty CRD


Total time: 20 hours

For someone with more luck and skill it might take less time, but for me it took about 20 hours spread over 4 days. I'm sure it can be done in 19.

A big thanks to all the L.O.S.T. KJ contributors to these threads:

It's 10pm - where's your lift pump?

my jeep has factory wiring for a lift pump!

And especially: gmctd, dgeist, bill.barg, crdjon and ripster.


Parts List


In-tank Pump

So you want to buy a lift pump? Not so fast mister. There are (were) 3 to choose from:

Dodge 3500 Cummins 5143160AA
Airtex E7181M
Spectra Premium SP7181
I believe all 3 are discontinued awaiting a redesign from Dodge.

Some of the Cummins and the Airtexes might still be available. It took 7 weeks for my Airtex to get to me from Auto Parts Giant back in August 2008, but I only paid $131.71 delivered.


Wiring harness

or

Rewire existing

2006, 56047848AB ~ $52

2005, 56050284AB ~ $36

or

$5


All-weather, cold-shrink tape This tape doesn't stick to anything but itself.

Additional
Connector
terminals (pins)
FCI Apex 2.8mm terminals from NTI. $25 minimum order.

54001800 (female) and 54001801 (male).

You'll need 2 female and one male pin. Hardly a $25 order, but consider ordering some of these high quality, weather tight connectors and parts to use elsewhere.

Order the extraction tool, too. Part 5400ext. For $5 it's one of the handiest tools I have. It's not made by FCI so you might be able to find it elsewhere as, White Products Div (J. R. Greenleaf & Co).

You can order with a credit card, but NTI requires a shipping account. (Easy to set one up for free at UPS.com).


1/4" x 1/2" Bolt w/ Washer & Lock Washer
$1

Milk Crate
Who "buys" these?

Cooler
You've got one already. Not an excuse to get the stainless steel one.
Step 0: Prep

Clean the underside of the carriage before starting. I wish I had.
Make sure your vehicle is safe to work under by reading and following all instructions that came with any lifts, jacks or ramps.
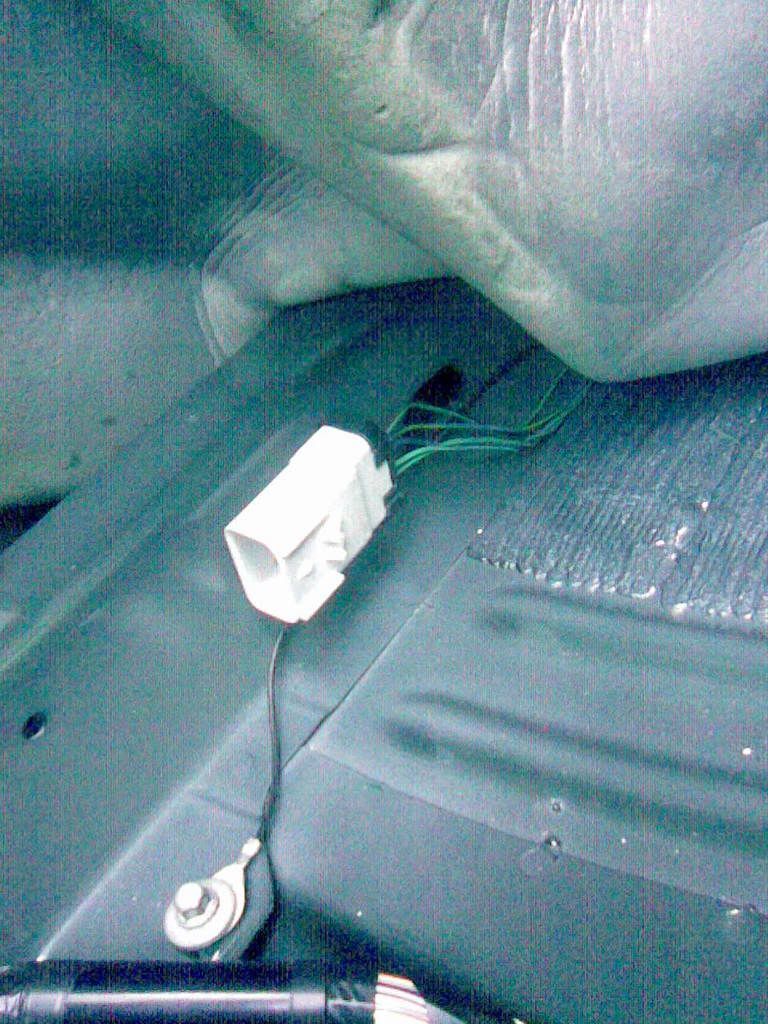
Step 1: Lift Up Rear Seat and Pull Up Carpet

Better pictures than I have can be found here from dgeist.

And a good slide show of the whole process from Bill.Barg here.

Under the soundproofing layer you will find the connector with the pump wire.

The relay and fuse were already installed at the factory.

Step 2: Unplug Connector

Slide the red locking tab over.
Depress the latch, and
Pull apart.
Push the harness out through the floor pan.

Step 3: Disconnect Fuel Lines

First release the fuel lines from the fuel line hanger. I found this very hard to do even after I'd figured out the release mechanism. Basically you drive something to the left of the right-most opening in the top of the fitting. This will release the tab and allow you to pull the two halves apart.


But if the hanger was hard, I found the fuel line "quick disconnects" anything but quick. The tiny "button," flush with the connector, must be depressed fully as shown in this image.


Worse, they are rotated away from you under the chassis, so you have to feel around with your finger tip to locate them. This is hard to do on your back with big, fat, cold fingers and when the connectors are dirty. It took me near an hour to manage the two of them..


Step 4: Disconnect Vehicle Speed Sensor (VSS)

And any other connectors on your harness.

Slide red tab back fully..
Depress release tab fully.
Pull.
Step 5: Disconnect Fuel Filler Tube & Vent

I made the mistake of thinking the weight of the tank would pull the hose off the inlet. Not! Disconnect the inlet as soon as you can.

There is also a vent tube to disconnect. Below is a picture shot below and behind the left rear wheel well. As you can see, it's all open. The connector to undo is just out of view in the channel to the right.


Step 6: Release Tank Straps & Drop Fuel Tank

I have the factory tow package and I was able to undo the bolts without removing the hitch using a "wobble" extension on my socket wrench. I was also able to bend the straps to clear the bumper.

I supported the tank on two jacks (a cradle of some kind would be superior).

I then released only the rear bolts holding the straps on.

This allows the tank to "ride" down on the straps to the ground.


I made a number of mistakes:

Too much fuel in the tank (about 8 gallons).
Didn't release filler hose before trying to drop the tank. I thought the weight of the tank would pull the loosened hose right off, it didn't.
I didn't undo the vent tube.
Tankless


Step 7: Add Wires or Modify "Gasser" Harness

There seem to be 3 approaches to the wiring:

Use the harness from a gas model Liberty and rearrange the pins. Here's a link to how to do that from gmctd.
Pull the wires from the gasser harness and transplant them into the existing harness. Here are crdjons' pictures.
Add two new wires.
I chose to simply add two new wires because I found a vendor for the connector (FCI Apex 2.8mm terminals available from NTI). I'd already ordered the harness, but I noticed it had an extra connector. Since it's a 2005, I also have the 5" problem. All-in-all I thought it would be easier to simply add the two wires to the existing harness.


This involves partial disassembly of the harness by removing the hangers and untaping the loom.

Below illustrates two things.

One, using a pick tool to release the binding on a wire hanger, and
Two, why one should wash the undercarriage first.


Here are the two ends of the harness rewired. I used 18 gauge wire; gray for hot and black for ground. As you can see, the 10-pin connector (right) is marked with pin #2 (the pump hot side). It goes to pin #4 on the 4-pin connector that connects to the tank.

The black ground wire terminates in the passenger area and does not use the 10-pin connector.


crdjon has excellent photos of how to add the wire here.

Bill.Barg here.

Ripster too here.

The Apex official instructions are here.

Rewired harness shown below.


Step 8: Reinstall Harness

You will need to connect the ground wire to the chassis. A ground point is provided. I tapped mine out to take a 1/4" fine thread bolt, but you could probably use a self-tapping screw. The metal is soft and I threaded it without cutting oil and only a pair of Vice Grips to hold the tap.


I added a quick disconnect because I didn't leave enough wire.

Step 9: Remove Old In-tank Unit & Swap Float Arms
SAVE O-RING & FLOAT

Swapping floats will ensure your fuel gauge reads correctly.


Step 10: Modify Index Tab

While the tab issue has mostly revolved around the fuel level readings being correct, to me the bigger issue is keeping the same orientation so the pre-formed, plastic fuel lines aren't stressed or rub upon reinstall.

At left below is the new unit. I snipped off the area in red using wire cutters. This works, allowing precise alignment, but the tab is now smaller than the slot. When I hammered the retaining ring back in, it drifted counter clockwise.

Ideally it would help to somehow move the piece or otherwise restore the tab on the other side as shown in blue. Or reduce the size of the slot with epoxy putty or something. The solution to this part is left as an exercise for the reader.


Step 11: Install Lift Pump

The main problem here was that I couldn't get the retaining ring to rotate back into the second notch (i.e. compress the new o-ring).


The new unit came with a shiny new o-ring. I dutifully replaced the old green one, but as hard as I drove the ring with a hammer and screwdriver, I could not get it to seat back in the middle slot.

It is obvious that these rings are not set at the factory with a hammer and screwdriver, so I called the dealer to see if there was a special tool. Indeed there is and even on a Friday afternoon they would let me pop on over and compress the seal for me.

I drove over (did I mention not to start this project without having a spare car?) and after some discussion, because it's a diesel, shepherded me to a back garage. A diminutive older guy with a club foot eyed me wearily. He must be named "Crusty." I told him my problem. "Let's see what we can do," he said turning away and limping off to get what I imagined was the factory tool. I followed him to a tool chest where he slid open a lower drawer to reveal...hammers. Hammers! I almost burst out laughing. "We have the tool, but it doesn't work as well." He held up the hammer and out of no where a towering assistant appeared to take it. "Hammer the ring in for this gentleman would you Igor." [I made up the Igor part].

Well no matter how hard Igor hit the ring it wouldn't seat. They concluded the ring was too fat and suggested I use the old one. This I did and the ring seated with a few taps.

In hindsight I should probably have tried softening the new ring in warm water.

gmctd added....

The correct method of installing the clamp ring with a hammer and drift driver is to triangulate the thrust and parry, which keeps the ring centered: select any slot, tap it, then move to any of the other two slots at 120* angle from the first, alternating the hits between the three slots at 0°, 120°, 240°, 0°, etc, keeping the clamp centered in the tank ears and on the module - can also do 4 slots at 0°, 180°, 90°, 270°, 0°, etc - just takes a little more time - and, since these CRD KJ's are less than three years old, reusing the original gasket is a good option, making installation even easier - the Miller SPX #9340 tool is also easier, tho requiring two people, one to hold the tank, one to compress and manipulate the 1/2" drive break-over bar.


Step 12: Test Unit

Since I had too much fuel in the tank I used the new pump to pump it out. I was thus able to verify that the fuel gauge works correctly. It does. Even with the float misaligned, but float arms swapped.


Step 12: Reinstall Tank

It ain't pretty and it ain't fast...


This was tedious work. The more so because I thought I might break the plastic fuel lines, so I didn't put them on until the tank was half way up. A difficult task in tight space.

Reconnect and re-hang:: Filler Hose, Vent Hose, Fuel Lines, Fuel Pump, VSS.

Step 13: Prime System

Turn key to the "ON" not "Start" then to "OFF". This initiates 20-seconds of pump time. You should hear it whirring away.
Repeat.
Check to see if there is any air to purge from the fuel filter head.
If yes, purge manually.
If no, start your engine
Step 14: Test Drive & Leak Check

Postscript

It works and runs great. My motor used to go "takatakataka." Now it goes "tikatikatika." As other have also reported my FM reception is greatly improved and my bald spot is growing back in. A highly recommended mod.

_________________
2006 Jeep Liberty CRD 142,000 miles New engine 2-2014, Green Eco tune, FS2500 bypass filter Weeks elbow, European Torque converter, brakes front UCA's wheel bearing and front hubs. Front hitch OEM lift pump
98 K2500 Suburban 6.5td
96 K1500 " 6.5td
95 2 door Tahoe 6.5td
94 K3500 cc srw 5 speed 6.5td
91 International Model 6 speed spicer 4700


Top
 Profile  
 
 Post subject: Re: It's 10pm - where's your lift pump?
PostPosted: Mon Mar 03, 2014 2:16 pm 
Offline
LOST Newbie

Joined: Mon Apr 16, 2012 10:13 pm
Posts: 24
Squeeto wrote:
Could the float be hanging up? Not hitting bottom.

It may not be obvious but could the gauge stop at mid point (with a half a tank) and stay there until empty?


I guess that is theoretically possible. However, when I looked inside the tank during the pump installation, I didn't see anything inside on which it could hang. The tank is completely empty without the pump installed. What could it be hanging on?


Top
 Profile  
 
 Post subject: Re: It's 10pm - where's your lift pump?
PostPosted: Mon Mar 03, 2014 2:18 pm 
Offline
LOST Newbie

Joined: Mon Apr 16, 2012 10:13 pm
Posts: 24
jrsavoie wrote:
http://www.auerbach.ca/kj/lift_pump/


Yes, jrsavoie, that is the tutorial I followed.


Does anyone have a comparison photo showing the position of the OEM float versus the Airtek float? Maybe I need to adjust my float position? But I need a reference point as a guide. Thank you all for your help.


Top
 Profile  
 
 Post subject: Re:
PostPosted: Wed Jan 28, 2015 1:04 pm 
Offline
LOST Member

Joined: Wed Nov 19, 2014 4:52 pm
Posts: 133
gmctd wrote:
We have the Jeep p\n catalog, but not one for the Dodge - and all my 'friends' at Dodge in the big city are fair-weather types: money talks

We'll soon know, fer sure - #2 son is on his way - do hope his Jeep has the service port in the rear floorpan - manual sez some do, some don't.

SO I ORDERED OEM 514316AA LIFT PUMP AND 06 GASSER HARNESS,.FOR MY 06 LIBBY CRD,.I have a concern for fuel line extensions, should i have ordered them too??also is this as plug and play with harness changeout?will i have to add a fusible link to it?or is the gasser option already in my crd just unused? :juggle:


Top
 Profile  
 
 Post subject: Re: Re:
PostPosted: Wed Jan 28, 2015 1:08 pm 
Offline
LOST Member

Joined: Wed Nov 19, 2014 4:52 pm
Posts: 133
highironcrd wrote:
gmctd wrote:
We have the Jeep p\n catalog, but not one for the Dodge - and all my 'friends' at Dodge in the big city are fair-weather types: money talks

We'll soon know, fer sure - #2 son is on his way - do hope his Jeep has the service port in the rear floorpan - manual sez some do, some don't.

SO I ORDERED OEM 514316AA LIFT PUMP AND 06 GASSER HARNESS,.FOR MY 06 LIBBY CRD,.I have a concern for fuel line extensions, should i have ordered them too??also is this as plug and play with harness changeout?will i have to add a fusible link to it?or is the gasser option already in my crd just unused? :juggle:

also you mention fuel bubbling on the tank return for this model,....is there a modification or would you recommend a cooler in the fuel return


Top
 Profile  
 
 Post subject: Re: Re:
PostPosted: Wed Jan 28, 2015 1:39 pm 
Offline
Lifetime Member
Lifetime Member

Joined: Tue Sep 18, 2007 7:21 pm
Posts: 3092
Location: Texas
highironcrd wrote:
highironcrd wrote:
gmctd wrote:
We have the Jeep p\n catalog, but not one for the Dodge - and all my 'friends' at Dodge in the big city are fair-weather types: money talks

We'll soon know, fer sure - #2 son is on his way - do hope his Jeep has the service port in the rear floorpan - manual sez some do, some don't.

SO I ORDERED OEM 514316AA LIFT PUMP AND 06 GASSER HARNESS,.FOR MY 06 LIBBY CRD,.I have a concern for fuel line extensions, should i have ordered them too??also is this as plug and play with harness changeout?will i have to add a fusible link to it?or is the gasser option already in my crd just unused? :juggle:

also you mention fuel bubbling on the tank return for this model,....is there a modification or would you recommend a cooler in the fuel return

I did the original R&D on this install - read this link for more professional and easy-to-follow procedures, with pics and part numbers
http://www.auerbach.ca/kj/lift_pump/

The return-fuel cooler is more suitable to southern climes where temps are warmer with rare excursions below ~40*F, but may be required if much towing is in your future

_________________
'05 CRD Limited
Pricol EGT, Boost
GDE Hot '11; EDGE Trail switched
SEGR; Provent; Magnaflow;
Suncoast T\C, Transgo Tow'n'Go switch;
Cummins LP module, Fleetguard filter, Filterminder
2.5" Daystar f, OME r; Ranchos; K80767's, Al's lifted uppers
Rubicons, 2.55 Goodyears
Four in a row really makes it go


Top
 Profile  
 
 Post subject: Re: It's 10pm - where's your lift pump?
PostPosted: Sun Feb 01, 2015 10:37 am 
Offline
Lifetime Member
Lifetime Member
User avatar

Joined: Wed Mar 08, 2006 6:15 pm
Posts: 2733
Location: Atlanta GA
Some additional pics from my install (back 8 years ago when you could actually get the cummins pump..):
http://kj.polter.net/pics/cummins_pump/index.html

Dan

_________________
Image
2005 Silver CRD Limited :JEEPIN:
245/75R16 GoodYear Duratracs
Fumoto drain | ProVent CCV Filter
Stanadyne FM100 filter | Cummins fuel pump
GDE Eco | SEGR | BoulderBars | FrankenLift | Frankenskids


Top
 Profile  
 
 Post subject: Re: It's 10pm - where's your lift pump?
PostPosted: Sun Feb 01, 2015 11:57 am 
Offline
Lifetime Member
Lifetime Member

Joined: Tue Sep 18, 2007 7:21 pm
Posts: 3092
Location: Texas
dgeist wrote:
Some additional pics from my install (back 8 years ago when you could actually get the cummins pump..):
http://kj.polter.net/pics/cummins_pump/index.html

Dan

Good stuff - one caveat, here:
- this is an '05 install - '05 has RW-ABS so the connector is 4-wire
- 4W-ABS was optional on some '05's, so may have 10-wire connector
- '06 has 4W-ABS so the connector is 10-wire: requires 2-wires for each rear wheel sensor
- remainder of install is identical, '05 and '06

_________________
'05 CRD Limited
Pricol EGT, Boost
GDE Hot '11; EDGE Trail switched
SEGR; Provent; Magnaflow;
Suncoast T\C, Transgo Tow'n'Go switch;
Cummins LP module, Fleetguard filter, Filterminder
2.5" Daystar f, OME r; Ranchos; K80767's, Al's lifted uppers
Rubicons, 2.55 Goodyears
Four in a row really makes it go


Top
 Profile  
 
 Post subject: Re: It's 10pm - where's your lift pump?
PostPosted: Mon Mar 30, 2015 3:14 pm 
Offline
LOST Newbie

Joined: Wed May 07, 2014 10:07 am
Posts: 3
How are the pump top and bottom connected? Couldn't one just switch the tops?

_________________
2005 CRD 102,000++ miles (I love this car!)


Top
 Profile  
 
 Post subject: Re: It's 10pm - where's your lift pump?
PostPosted: Thu Apr 02, 2015 4:57 pm 
Offline
LOST Newbie

Joined: Sat Feb 02, 2013 1:51 am
Posts: 25
Just ordered the Carter in tank pump. Does anyone have extra Apex 2.8mm male and female terminal ends I can buy. Most places want you to buy bulk of the terminals. Or current part Numbers for the terminals and a where to source them. I really do want to roll around in the oily mud at my local junk yard to pull a harness.
Thanks


Top
 Profile  
 
 Post subject: Re: It's 10pm - where's your lift pump?
PostPosted: Sun Apr 12, 2015 4:20 pm 
Offline
LOST Newbie

Joined: Fri Feb 06, 2015 8:32 am
Posts: 47
Location: Quebec, Canada
Just install the Carter in-tank fuel pump today, took me 5 1/2 hours and that is with fixing my mistake and trouble shooting. It now sounds way better. For the Apex terminal, you can always go to a junkward and cut a plug from a liberty and dismantle it to use the terminal, that is what a did and it worked perfectly.

_________________
06 Jeep Liberty CRD limited, GDE hot tune, Samco hoses, V6 air box mod, AFE air filter, Carter in-tank fuel pump, model 101 thermostat, EGR delete kit with glow plug, 205 000 km;


Top
 Profile  
 
 Post subject: Re: It's 10pm - where's your lift pump?
PostPosted: Mon Apr 13, 2015 11:08 am 
Offline
Moderator
Moderator
User avatar

Joined: Sat Aug 24, 2013 11:36 pm
Posts: 7171
Location: Central GA
FYI:
Mouser part numbers??
For the male, 14-16 gauge wire, order part no> 649-54001441
alternate part no. with tin plating instead of gold> 10762803-L
http://www.mouser.com/Connectors/Automo ... 41&FS=True

For the female, 14-16 gauge wire, order part no> 649-54001403RWC
alternate part no. with tin plating instead of gold> 54001401RWC
http://www.mouser.com/Search/Refine.asp ... d=54001403
:google:

_________________
Supporting Vendor and Moderator of LOST
05 Jeep Liberty CRD Limited :JEEPIN:
Ironman Springs/Bilstein/Shocks
Yeti StgIV Hot Tune
Week's BatteryTray
No FCV/EGR
Samcos/ProVent
SunCoast/Transgo
Carter Intank-pmp
2mic.Sec.Fuel Filter
Flowmaster/NO CAT
V6Airbox/noVH
GM11 Bld.fan/HDClutch
IronrockArms/wwdieselMount

98 Dodge Cummins 24 Valve


Top
 Profile  
 
Display posts from previous:  Sort by  
Post new topic Reply to topic  [ 654 posts ]  Go to page Previous  1 ... 28, 29, 30, 31, 32, 33  Next

All times are UTC - 5 hours [ DST ]


Who is online

Users browsing this forum: Majestic-12 [Bot] and 24 guests


You cannot post new topics in this forum
You cannot reply to topics in this forum
You cannot edit your posts in this forum
You cannot delete your posts in this forum

Search for:
Jump to:  
Powered by phpBB © 2000, 2002, 2005, 2007 phpBB Group. Color scheme by ColorizeIt!
Logo by pixeldecals.com