LOST JEEPS
http://www.lostjeeps.com/forum/phpBB3/

McNally gauges in pillar pod - install details
http://www.lostjeeps.com/forum/phpBB3/viewtopic.php?f=5&t=62144
Page 1 of 1

Author:  CATCRD [ Thu Aug 18, 2011 11:41 pm ]
Post subject:  McNally gauges in pillar pod - install details

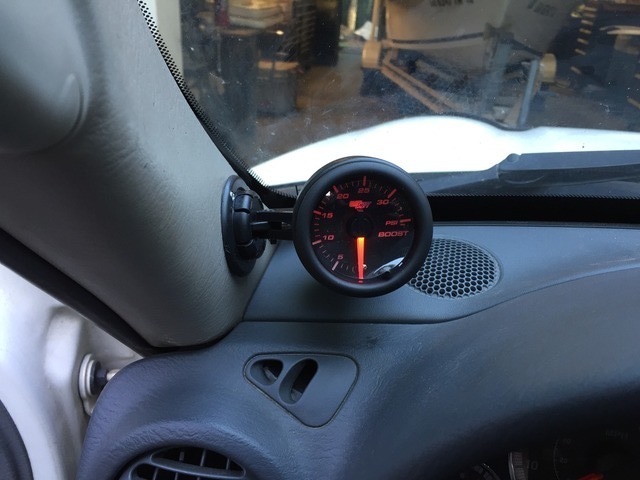
Last weekend I installed a pair of gauges in a Lotek A pillar pod. I like these Mcnally gauges because they can show 2 things at once. One reading on the dial and one on the digital display. They are all electrical and self dimming via a photo sensor in the face, so you don't need to find a dimmer wire to splice into.
http://www.mcnallyelectronics.com

Here is the boost/egt gauge.
Image
And the oil pressure/temp gauge. Reading degrees C at the time of the picture.
Image

These are kind of cool because they have a peak recall feature where you just tap the button in the face and it zooms to the last high readings since restarting. Tap once more and it shows current battery voltage. The dials also do a cool dance when you key on, that is very sci-fi.
Image

So far the highest egt I saw just fooling around a little was 715F. Normal driving is like 500F. Highest boost was 21psi with the GDE hot tune.

I got two parts from Dieselmanor.com. One is just a fitting to T a thermocouple into a transmission fluid line. That way I won't have to take my pan off again and drill that. This is a fitting you could build yourself with parts from mcmaster.com but oh well. The part I really wanted from there was the boost bolt, which they make to replace a bolt in a cummins manifold. It's drilled through and has 1/8" NPT female at the top end for your sensor.
http://www.dieselmanor.com/dm_products/FTG-MFD.asp
http://www.dieselmanor.com/dm_products/DM-BSTBLT.asp

Here is the Boost Bolt from Diesel Manor.
Image

I unscrewed one of the posts that holds the factory engine cover, which I don't use. This has the same threads as the boost bolt. It's a little long for the hole that's already in the valve cover, and I didn't want to drill and tap for that, or deal with cutting the bolt, so I just used a nut to space it a little.
Image

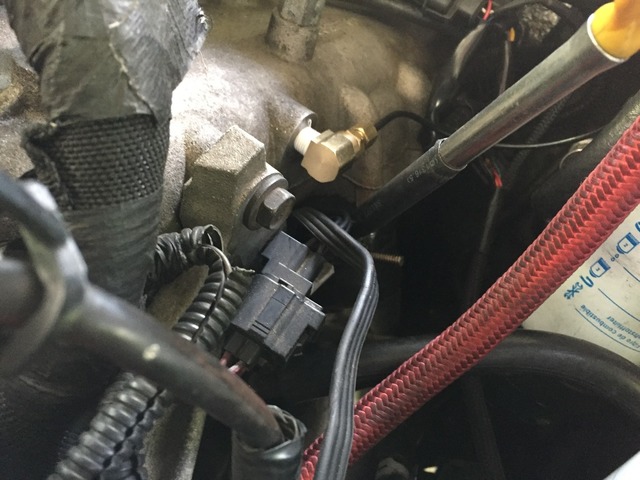
I drilled the manifold with a 5/64 bit, put some pipe dope on the threads and installed the boost bolt. I snugged the nut downward to keep it tight. The Mcnally MAP sensor is installed with some pipe tape. I used wire conduit for everything for a factory look. You can hardly pick out the new sensors in the engine bay.
Image

Here you can barely see the hole I cut in the turbo heat shield to pass the thermocouple wire through. It goes in to a 1/8 NPT compression fitting where I drilled and tapped the manifold in the same way as warp2diesel. (Thanks for posting that diagram). I didn't run the engine while drilling or anything like that. just a shop vac right near the hole and a small magnet down in afterwards.
Image

This is a shot of the oil pressure sensor which is Teed in with the factory oil pressure switch, which just happens to be 1/8" NPT. I got a male-female-female brass tee from Mcmaster.com
Image


Credit goes to a couple people including warp2 and Glend whose writeups I modeled mine on.
viewtopic.php?f=5&t=32256
http://www.ausjeepoffroad.com/forum/sho ... hp?t=92305
http://www.cumminsforum.com/forum/acces ... berty.html

Author:  racertracer [ Fri Aug 19, 2011 4:34 am ]
Post subject:  Re: McNally gauges in pillar pod - install details

Looks good, nice work.

Author:  jinstall [ Fri Aug 19, 2011 6:58 am ]
Post subject:  Re: McNally gauges in pillar pod - install details

OK why is it that your photos never upload and if I click on them and it redirects I can only see them?

Author:  CRD Joe [ Fri Aug 19, 2011 12:15 pm ]
Post subject:  Re: McNally gauges in pillar pod - install details

Great looking gauges. Question, how can that boost/egt gauge work when the egt only uses three digits? Egt's go into the thousands.

Author:  CATCRD [ Fri Aug 19, 2011 2:48 pm ]
Post subject:  Re: McNally gauges in pillar pod - install details

CRD Joe wrote:
Great looking gauges. Question, how can that boost/egt gauge work when the egt only uses three digits? Egt's go into the thousands.


When it gets above 1000 it just truncates the last digit, so 1200 would show as 120, but without a decimal pont. 120F shows up with a decimal point.

jinstall, are you viewing the web page through a company firewall or something? That keeps the imageshack pictures from showing up if I'm at work.

Author:  Sir Sam [ Fri Aug 19, 2011 4:52 pm ]
Post subject:  Re: McNally gauges in pillar pod - install details

jinstall wrote:
OK why is it that your photos never upload and if I click on them and it redirects I can only see them?


Are you using internet explorer?

Author:  jeepdan [ Fri Aug 19, 2011 5:02 pm ]
Post subject:  Re: McNally gauges in pillar pod - install details

Nice work, I have been wanting a oil pressure gauge. Where did you put the oil temp probe?

Author:  CATCRD [ Fri Aug 19, 2011 5:21 pm ]
Post subject:  Re: McNally gauges in pillar pod - install details

jeepdan wrote:
Nice work, I have been wanting a oil pressure gauge. Where did you put the oil temp probe?


I have actually not installed it yet. If I had gotten the 4" thermocouple probe I could stack another brass T in with the pressure sensor and install the probe so it would reach right into the filter head. The 2" one I have won't reach into the actual flow. Otherwise I might drill the pan.

Author:  JeepinJarhead03 [ Fri Aug 19, 2011 6:53 pm ]
Post subject:  Re: McNally gauges in pillar pod - install details

those gauges are slicker than a recreational area.. roger that?

real nice!

Author:  Joe Romas [ Sat Aug 20, 2011 7:00 am ]
Post subject:  Re: McNally gauges in pillar pod - install details

Sir Sam wrote:
jinstall wrote:
OK why is it that your photos never upload and if I click on them and it redirects I can only see them?


Are you using internet explorer?


Sam
I'm running IE9 64 bit and have the same problem :dizzy:
Some times, rarley, it works. Like once you "testing" your intercooler for leaks showed up but only once.

Any idea what setting e/I need to change?

Joe

Author:  racertracer [ Sat Aug 20, 2011 7:52 am ]
Post subject:  Re: McNally gauges in pillar pod - install details

jinstall wrote:
OK why is it that your photos never upload and if I click on them and it redirects I can only see them?


1st check that your antivirus isn't blocking JPG's for some reason.

If that is ok then try this:

If the Show Pictures option in Internet Explorer is turned off, you won't see pictures on a webpage. Here's how to make sure it's turned on:

1.Open Internet Explorer by clicking the Start button , and then clicking Internet Explorer.

2.Click the Tools button, and then click Internet Options.

3.Click the Advanced tab.

4.Scroll to the Multimedia section, and then select the Show Pictures check box.

5.Click OK.

Also try this if your using Internet explorer 9, turn on compatability view.

Test running your browser in compatibility view.

Internet Explorer Compatibility view:
http://support.microsoft.com/default.aspx/kb/956197/

Or try this if your using window defender.

Go to Start-Control Panel-Windows Defender.

Click on Tools at the top, then select Options.

Look on the left side and click Real Time protection.

Uncheck the box and click Save.


Or you may need to download and install flash player to see some pictures.

http://get.adobe.com/flashplayer/

Author:  Joe Romas [ Sat Aug 20, 2011 9:36 am ]
Post subject:  Re: McNally gauges in pillar pod - install details

Racetracker.

With trouble I was finally able to get adobe 10. whatever versionb to install but still no joy.
I also tried the other things you listed.
Now when I click in the link that appears instead of the picture I could previously get I get this
Error: Object doesn't support property or method 'getContext'
I think it's some kind of java error so I'm off to the Windows7 forum.
The last time I checked, a couple of months ago, Adobe didn't have a 64 bit IE9 version so I may need to figure how to get back to the 32 bit version.

Thanks
Joe

Author:  papaindigo [ Sat Aug 20, 2011 9:45 am ]
Post subject:  Re: McNally gauges in pillar pod - install details

Something happened with pictures with the upgrade to IE9. They worked fine in IE8 but I've never been able to get them to appear on their own in IE9. Tried all of racertracer's fixes with no success. About all I can add is if I open a chat with pictures in IE9 and immediately "hover" the cursor over the little yellow picture square I see a "loading" message but nothing loads and the message eventually stops appearing. I also can see the link to the picture appear at the bottom of the screen and I can right click on the yellow picture square and open the picture by selecting one of the 3 "open" options.

Frankly I gave up on IE9 for the LOST site and just use Firefox as the pictures load just fine in Firefox.

Nice install which I've saved for possible future use.

Author:  Joe Romas [ Mon Aug 22, 2011 6:40 am ]
Post subject:  Re: McNally gauges in pillar pod - install details

UPDATE
I loaded Google Chrome and can now see the pictures.
I have no Idea what version of IE it's using :juggle:

Nice dual function gauge :SOMBRERO:

Author:  tvince0913 [ Sun Oct 01, 2017 5:19 pm ]
Post subject:  Re: McNally gauges in pillar pod - install details

So I've been looking through many of the gauge install posts on the forum, and decided on this method with the Lotek pillar 2 gauge pod. I would like to install a boost gauge using CATCRD's method with the Cummins boost bolt in one of the unused bosses in the intake manifold. However, I would also like to continue to use the engine cover to retain the factory look. Anyone know what type of 90 degree adapter that would allow a configuration with the adapter first > boost bolt > sender? In my mind this would allow the setup to lay flat and route under the factory engine cover vs. CATCRD's pics with the boost bolt > sender going vertical. I will most likely be using an inexpensive mechanical 30 or 35 psi Glowshift gauge to start, with one of the more expensive McNally combination oil pressure/temp gauges to come later. Thanks for any recommendations.

Author:  WWDiesel [ Sun Oct 01, 2017 8:44 pm ]
Post subject:  Re: McNally gauges in pillar pod - install details

This is what I did!
I drilled a 1/8 hole into the intake through the boss pictured below and then tapped it out to 1/8 pipe threads and installed a 90 deg. fitting!
It feeds a Glowshift gauge mounted on the pillar and works great and fits below the OEM plastic engine cover with no issues...

See this post for full details:> viewtopic.php?f=98&t=84670&hilit :wink:

Image

Image

Author:  tvince0913 [ Tue Oct 03, 2017 3:23 pm ]
Post subject:  Re: McNally gauges in pillar pod - install details

WWDiesel wrote:
This is what I did!
I drilled a 1/8 hole into the intake through the boss pictured below and then tapped it out to 1/8 pipe threads and installed a 90 deg. fitting!
It feeds a Glowshift gauge mounted on the pillar and works great and fits below the OEM plastic engine cover with no issues...

See this post for full details:> viewtopic.php?f=98&t=84670&hilit :wink:

Image

Image
Great! So your method eliminates the need for the boost bolt? Just the 1/8 npt 90 deg fitting then boost sender installed directly into the fitting? Thanks for the update.

Sent from my XT1650 using Tapatalk

Author:  uncaged [ Wed Oct 11, 2017 9:24 pm ]
Post subject:  Re: McNally gauges in pillar pod - install details

The McNally Boost/EGT gauge is great, mine is mounted in the Sasquatch vent pod. Love it.

Image

Notice the lack of decimal point, hehe. Guess that was a warm pull.

Page 1 of 1 All times are UTC - 5 hours [ DST ]
Powered by phpBB © 2000, 2002, 2005, 2007 phpBB Group
http://www.phpbb.com/