Interested! Please post the details
I've been using the inline thermostat until spring when its warm enough for a new t-belt...really want to have a better thermostat solution by then...watching this closely.
| LOST JEEPS http://www.lostjeeps.com/forum/phpBB3/ |
|
| new design thermostat using orignal parts http://www.lostjeeps.com/forum/phpBB3/viewtopic.php?f=5&t=81036 |
Page 1 of 4 |
| Author: | dh100m [ Tue Jan 06, 2015 12:37 pm ] |
| Post subject: | new design thermostat using orignal parts |
hi folks I have been using this in my jeep since 10/30/2013 with no trouble at all using original housing and hose with little skill and time can be done at home in 1hr only requires 2 machined parts and new stat if interested will post discription of work http://i46.photobucket.com/albums/f121/ ... eb0f76.jpg |
|
| Author: | ArmyChief [ Tue Jan 06, 2015 2:41 pm ] |
| Post subject: | Re: new design thermostat using orignal parts |
Sure, be interested |
|
| Author: | gmctd [ Tue Jan 06, 2015 3:09 pm ] |
| Post subject: | Re: new design thermostat using orignal parts |
dh100m wrote: hi folks I have been using this in my jeep since 10/30/2013 with no trouble at all using original housing and hose with little skill and time can be done at home in 1hr only requires 2 machined parts and new stat if interested will post discription of work http://i46.photobucket.com/albums/f121/ ... eb0f76.jpg Very good idea, dude - was headed in that direction, myself, if\when the t-stat failed, and if\when I ever get back to completing repairs begun back in ought 11 And, tnx for posting the pic - I suspected as much, and the pic does reveal the two-level t-stat usually used in Diesel service for proper initial recirculation and flow into normal thru-radiator cooling at increasing temperatures Also shows a boss where I wanted to drill\tap for a screw-type bleeder to bleed-off trapped air - the t-stat housing is the highest point in the coolant system, and we all know what trapped air can cause between engine and the much lower radiator - particularly so if the trapped air is in the t-stat area - hot air don't carry no weight, eh........ |
|
| Author: | RJM [ Tue Jan 06, 2015 6:56 pm ] |
| Post subject: | Re: new design thermostat using orignal parts |
Great idea, I'm interested. |
|
| Author: | slvdc1 [ Wed Jan 14, 2015 2:56 pm ] |
| Post subject: | Re: new design thermostat using orignal parts |
Interested! Please post the details I've been using the inline thermostat until spring when its warm enough for a new t-belt...really want to have a better thermostat solution by then...watching this closely. |
|
| Author: | dirtmover [ Wed Jan 14, 2015 3:13 pm ] |
| Post subject: | Re: new design thermostat using orignal parts |
Yeah, extremely interested in what you've come up with. If my current OE one fails on schedule I should be replacing some time later this year. |
|
| Author: | dh100m [ Wed Jan 14, 2015 4:41 pm ] |
| Post subject: | Re: new design thermostat using orignal parts |
thank you for your interest i am in the process of making one from scratch and document with pics so far the machine parts material $15.00 max labour 1 hr $35.00 for time . you do the rest hope to have demo ready in 3 weeks after you see demo you will be able to tell your skill level thanks again hope to help someone |
|
| Author: | dirtmover [ Wed Jan 14, 2015 7:21 pm ] |
| Post subject: | Re: new design thermostat using orignal parts |
So how do you split that housing without damaging it too much? I got a core ready to go. |
|
| Author: | WWDiesel [ Wed Jan 14, 2015 8:03 pm ] |
| Post subject: | Re: new design thermostat using orignal parts |
I'm in, certainly most interested in a more cost efficient alternative... |
|
| Author: | thermorex [ Wed Jan 14, 2015 8:21 pm ] |
| Post subject: | new design thermostat using orignal parts |
The idea is very cool, but please don't mind me one concern. If you or machine shop does not cut "perfectly" the unit and welds "perfectly" the housing pieces (with studs and the cap) then the thermostat inside won't work properly as it would be on an angle and not straight, or will leak inside. Obviously if this is done right it has chances to be a very good alternative. My question would be how much cheaper will this be versus turbo diesel freak unit, considering not everybody has access to a machine shop and argon tig/mig welder. By all means I congratulate the op for having the tenacity and idea, I just wonder those things as a legit person that would want to go this way. |
|
| Author: | gmctd [ Wed Jan 14, 2015 9:45 pm ] |
| Post subject: | Re: new design thermostat using orignal parts |
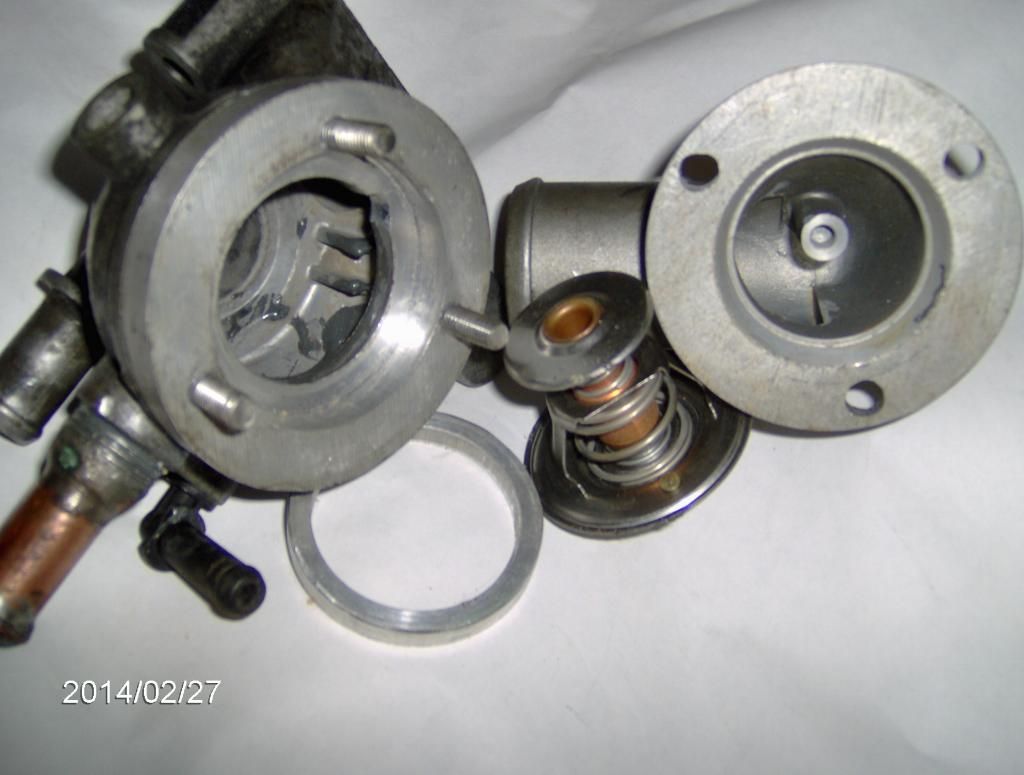
You doubters need to take a closer look at your t-stat housing - it is two (count'em: 2) piece assembly, cast in aluminum upper and lower pieces - the main lower casting has a raised lip which precisely locates the.... - top casting's outer slightly tapered diameter which precisely centers as it is being inserted onto.... - the t-stat which has a slit rubber seal-ring around it's circumference - the raised lip of the lower casting is then swaged inward around the upper casting, which.... - swaged taper securely locates and retains the upper casting against.... - the rubber seal-ring around the t-stat To modify: - mark the three new retaining holes for drilling - drill and tap the holes for suitable stud fasteners - remove (hacksaw? file? universal tool from Harbor Freight? Dremel? etc?) the swaged lower lip to separate the two casting halves - may be possible to leave part of the lower lip to accurately locate the upper casting during t-stat replacement - GM and others use that same t-stat in their cooling schemes - can be had in several temperature ranges And, btw and fyi: it would serve this modification well to drill and tap that boss inside the upper casting for an air bleed valve, such as the GM t-stat housings are factory-equipped |
|
| Author: | thermorex [ Wed Jan 14, 2015 10:57 pm ] |
| Post subject: | Re: new design thermostat using orignal parts |
Never said this idea is not good. Just said that to do it right, you need better tools than what you buy at harbor freight. It is simple on paper but harder to do it. If you plan on cutting it with dremel or hacksaw, I wish you luck, lol, you'll never cut it perfectly straight. |
|
| Author: | gmctd [ Thu Jan 15, 2015 12:44 am ] |
| Post subject: | Re: new design thermostat using orignal parts |
Intent is awareness, dude - his pic is apocalypse (revelation, for you non Greek-speaking members): you'll just be removing the thin crimped flashing part of the lower casting to allow separation - the lower\upper mating surfaces are finished |
|
| Author: | dirtmover [ Thu Jan 15, 2015 9:48 am ] |
| Post subject: | Re: new design thermostat using orignal parts |
gmctd wrote: Intent is awareness, dude - his pic is apocalypse (revelation, for you non Greek-speaking members): you'll just be removing the thin crimped flashing part of the lower casting to allow separation - the lower\upper mating surfaces are finished Yep, this is exactly what I'm seeing. I was never motivated to try opening a failed one because I realised that finding an appropriate replacement stat, putting it back together again and ensuring it all works correctly was going to be the challenging part. |
|
| Author: | CIMARRON13 [ Thu Jan 15, 2015 9:58 am ] |
| Post subject: | Re: new design thermostat using orignal parts |
I like it. I kept my failed one in case I wanted to try something like this. Now just need to find where I put it. |
|
| Author: | racertracer [ Thu Jan 15, 2015 1:17 pm ] |
| Post subject: | Re: new design thermostat using orignal parts |
I like it also. Pre-drill and tap into the circumference of the body, at equal distance with 5 small screws or bolts and then make the cut. If the cut is not perfectly perpendicular, it will not matter. A paper gasket with a dab of silicone on both sides should seal it. 1/8" dia. hardened self tapping screws may work too. I like a quick remedy to a long drown out issue. |
|
| Author: | flman [ Thu Jan 15, 2015 1:29 pm ] |
| Post subject: | Re: new design thermostat using orignal parts |
Looks like a good idea, I would lke to see how it goes through a couple of hot summers before I chance another warped head. 
|
|
| Author: | WWDiesel [ Thu Jan 15, 2015 1:36 pm ] |
| Post subject: | Re: new design thermostat using orignal parts |
gmctd wrote: - GM and others use that same t-stat in their cooling schemes - can be had in several temperature ranges Anyone got the part numbers for the replacement thermostats for future reference?? |
|
| Author: | gmctd [ Thu Jan 15, 2015 2:18 pm ] |
| Post subject: | Re: new design thermostat using orignal parts |
I've got'em here somewhere from back in the 90's - jrsavoie is still running the GM 6.5's, so he might also have some numbers -also dh100m, the original poster |
|
| Author: | rancherman [ Thu Jan 15, 2015 3:04 pm ] |
| Post subject: | Re: new design thermostat using orignal parts |
gmctd wrote: You doubters need to take a closer look at your t-stat housing - it is two (count'em: 2) piece assembly, cast in aluminum upper and lower pieces - the main lower casting has a raised lip which precisely locates the.... - top casting's outer slightly tapered diameter which precisely centers as it is being inserted onto.... - the t-stat which has a slit rubber seal-ring around it's circumference - the raised lip of the lower casting is then swaged inward around the upper casting, which.... - swaged taper securely locates and retains the upper casting against.... - the rubber seal-ring around the t-stat To modify: - mark the three new retaining holes for drilling - drill and tap the holes for suitable stud fasteners - remove (hacksaw? file? universal tool from Harbor Freight? Dremel? etc?) the swaged lower lip to separate the two casting halves - may be possible to leave part of the lower lip to accurately locate the upper casting during t-stat replacement - GM and others use that same t-stat in their cooling schemes - can be had in several temperature ranges And, btw and fyi: it would serve this modification well to drill and tap that boss inside the upper casting for an air bleed valve, such as the GM t-stat housings are factory-equipped I agree. Mine was actually loose when I replaced it this fall. I could turn the top 1/2 inch in either direction.. Which told me it probably wasn't welded. Besides, Ultrasonic welding is for very thin material. (up to .020 or .030 inch) even these bodies would be far too thick. I just threw mine in the 'to-do' box, thinking the exact same thing that OP has done.. kudos! I'd take a hack saw, and score the outside diameter almost as deep as the wall appears.. maybe midway down. A small chisel should pop the 'ring' right off, if not at least in pieces. Aluminum will break away pretty easily. Shoot, you'd probably only need to do the 'easy to reach' part of the housing, just to remove the 'lip'. After the top is off, going back in with a file or dremel tool will make short work of the remaining lip.. Just stay away from the 'flat' sealing surface. |
|
| Page 1 of 4 | All times are UTC - 5 hours [ DST ] |
| Powered by phpBB © 2000, 2002, 2005, 2007 phpBB Group http://www.phpbb.com/ |
|