LOST JEEPS http://www.lostjeeps.com/forum/phpBB3/ |
|
head bolt sequence http://www.lostjeeps.com/forum/phpBB3/viewtopic.php?f=5&t=87367 |
Page 1 of 2 |
Author: | jimstrax [ Tue Oct 31, 2017 11:43 am ] |
Post subject: | head bolt sequence |
Hi..I've been working/overhauling engines for 45 years and I have never seen a tightening sequence as shown in the 2006 liberty factory manual. Saying that...The factory manual that I got off of Ebay ($225) is very incomplete. It leaves out a lot of things so I'm concerned about the sequence. AND it doesn't tell you where to start the sequence in foot pounds.. I sure would like some information from some of you engine builders. I've bought everything new for this engine. ($big bucks) liners, pistons, seals, gaskets,timing belt, crank turned, bearings,(mains and rods), Tnx Jim |
Author: | WWDiesel [ Tue Oct 31, 2017 12:11 pm ] |
Post subject: | Re: head bolt sequence |
jimstrax wrote: Hi..I've been working/overhauling engines for 45 years and I have never seen a tightening sequence as shown in the 2006 liberty factory manual. Saying that...The factory manual that I got off of Ebay ($225) is very incomplete. It leaves out a lot of things so I'm concerned about the sequence. AND it doesn't tell you where to start the sequence in foot pounds.. I sure would like some information from some of you engine builders. I've bought everything new for this engine. ($big bucks) liners, pistons, seals, gaskets,timing belt, crank turned, bearings,(mains and rods), Tnx Jim The factory service manuals are online at:> http://www.colorado4wheel.com/manuals/Jeep/KJ/ They cover the head bolt tightening sequence, see section 9, pages 1616 & 1617 in the 2006 online FSM. > http://www.colorado4wheel.com/manuals/J ... -KJ-SM.pdf ![]() 
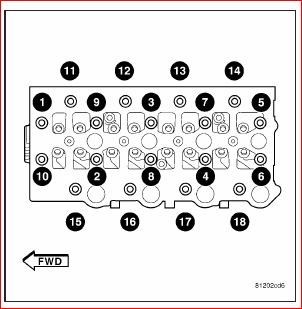
This is what the FSM says: Cylinder Head Bolt Torquing Procedure 1. Tighten all cylinder head bolts starting from the center bolts, following the cylinder head scheme and the following sequence: 3-2-1-10-9-8-7-6-5-4-11-12-13-14-15-16-17-18. 2. Without loosening any bolts, starting from the center bolts, tighten each bolt an additional 75° in the following sequence: 10-9-8-7-6-5-4-3-2-1. 3. Tighten the lateral cylinder head bolts an additional 50° in the following sequence: 11-12-13-14-15-16-17-18. 4. Finally tighten all bolts an additional 75° in the following sequence: 10-9-8-7-6-5-4-3-2-1-11-12-13-14-15-16-17- 18.. If you are using ARP Studs, this is the install torque for them came up by one of the members of LOST. (LMWatBullRun) Use the same sequence as outlined in the FSM! torques as follows: torque to 100 fp in three steps. then torque all of the studs to 115 fp in FSM order. then do one last pass and torque the inner bolts to 130 fp, and the perimeter bolts to 120 fp in FSM order. 130 lb-ft for the bolts directly bordering the cylinders (two center rows) and 120 lb-ft for the outside rows. |
Author: | jimstrax [ Tue Oct 31, 2017 12:47 pm ] |
Post subject: | Re: head bolt sequence |
Thanks... but I already have that info in my FSM. But what torgue setting should I start with? And whats with the crazy tightening sequence? Every head I have ever torqued down started in the middle and worked toward the ends of the head. Kinda scares me. Jim |
Author: | flash7210 [ Tue Oct 31, 2017 2:27 pm ] |
Post subject: | Re: head bolt sequence |
I believe that the initial torque for all the bolts is 30Nm or 22ft/lbs. After that, tighten the prescribed number of degrees following the sequence. However, I gotta say that if you are doing a fresh engine build you should go with the ARP head studs. Yes, its more money, but good for longevity. For the studs, the sequence is the same. Just incrementally increase torque until you get to 130 inner and 125 outer. In ft/lbs of course. Yes, the torque sequence is different from old iron head V8 engines. This is one of those fancy new-fangled aluminum head DOHC diesel engines. (being that I too am more used to the old iron head V8 engines, I HATE torque to yield bolts) |
Author: | jimstrax [ Tue Oct 31, 2017 5:22 pm ] |
Post subject: | Re: head bolt sequence |
Thanks flash and wwdiesel. well... it's torqued. but I'm worried, 3 of the brand new stretch bolts gave up early at 115fp. I think if I get the arp studs I could take out one stretch bolt at a time and replace it with the stud starting in the middle so I wouldn't have to buy another head gasket. What do you guys think? Does IDParts have the studs? Thanks again Jim |
Author: | WWDiesel [ Tue Oct 31, 2017 10:20 pm ] |
Post subject: | Re: head bolt sequence |
jimstrax wrote: Thanks flash and wwdiesel. well... it's torqued. but I'm worried, 3 of the brand new stretch bolts gave up early at 115fp. I think if I get the arp studs I could take out one stretch bolt at a time and replace it with the stud starting in the middle so I wouldn't have to buy another head gasket. What do you guys think? Does IDParts have the studs? Thanks again Jim Quite a few on this forum have replaced the OEM TTY head bolts with the ARP studs doing them one at a time while never pulling the head or replacing the head gasket with great success! The studs are a little pricey, but they are well worth the price and are so much better than the stupid TTY bolts. The bolts can be replaced with ONE STUD AT A TIME! Be sure and use the ARP lube! The most often used methodology for installation when replacing one head bolt with a stud one at a time process is: With a lubed nut, washer lubed on nut side, and the fine threads end assembled so the nut is flush with the top of the stud, leave the course thread end of the stud DRY, no lube required on that end! Use an allen key to screw the stud to finger-tight contact in the head. Then you can torque the nut directly to full torque, 130 for the center rows (1-10 on the diagram), 125 on the outer rows (11-18). |
Author: | jimstrax [ Thu Nov 02, 2017 9:10 pm ] |
Post subject: | Re: head bolt sequence |
Thanks again guys...Ordered studs today..5 to 7 days before they get here. I'll let you guys know how it goes. You've been great. Jim |
Author: | jimstrax [ Wed Nov 08, 2017 3:47 pm ] |
Post subject: | Re: head bolt sequence |
OK guys... Engine is together with studs torgued to 130fp in center and 120fp on sides, I left the injectors out so that I could crank it over with the starter while it is still on the stand. I cranked it, and cranked it. No oil pressure. (I did put oil in it BTW). It is a positive displacement pump, I shouldn't have to prime it...right? I'm wondering if the by-pass valve is stuck open. I have to admit that I didn't check it whilst building the engine. And as nasty as the engine was, I should have. Any Ideas would be helpful. Thanks again. Jim |
Author: | WWDiesel [ Wed Nov 08, 2017 4:18 pm ] |
Post subject: | Re: head bolt sequence |
jimstrax wrote: OK guys... Engine is together with studs torgued to 130fp in center and 120fp on sides, I left the injectors out so that I could crank it over with the starter while it is still on the stand. I cranked it, and cranked it. No oil pressure. (I did put oil in it BTW). It is a positive displacement pump, I shouldn't have to prime it...right? I'm wondering if the by-pass valve is stuck open. I have to admit that I didn't check it whilst building the engine. And as nasty as the engine was, I should have. Any Ideas would be helpful. Thanks again. Jim How fast are you able to spin it over on a stand??? ![]() |
Author: | flash7210 [ Wed Nov 08, 2017 5:21 pm ] |
Post subject: | Re: head bolt sequence |
The oil pump is geared to the crankshaft. The only way to prime it is by turning the crank. Where is your oil pressure gauge hooked up to? The oil flow path is somewhat long. It goes: oil pan pickup -> up to the oil cooler -> down to the oil filter -> then back up to the oil pump. If the oil filter was empty it can take quite a bit of cranking just to get it filled. |
Author: | GordnadoCRD [ Wed Nov 08, 2017 6:38 pm ] |
Post subject: | Re: head bolt sequence |
How did you time the cams on a stand? If you spun it over with a starter without having the cams timed, it could have done damage. If you spun it over without having cams in it, then the oil passages to the cams (through the valve cover) would be wide open and you couldn't make pressure anyway. |
Author: | jimstrax [ Thu Nov 09, 2017 7:02 am ] |
Post subject: | Re: head bolt sequence |
Good morning Flash..Well, I drained the oil and getting ready to pull the pan and check the relief valve that should've been done when the block was stripped. I kinda figured the oil path was long as the galleries are large and as you described long. When we cranked it we must have, (didn't time it) cranked it 5 or 6 times at maybe 15 seconds each time. I would have thought that would be enough to get oil to the input of the turbo. We didn't use a pressure gauge...we just cracked the incoming side of the turbo to see oil. When that didn't happen we took off the filter and it only had what oil I put in it. It should have been full with all that cranking. So what I'm thinking is that the relief (by-pass valve) is stuck open and the oil is going to the least path of resistance back to the pan. I'm going crazy here..lol But haven't given up yet. thanks again Jim |
Author: | jimstrax [ Thu Nov 09, 2017 7:18 am ] |
Post subject: | oil pressure |
Hello Gordnado I pinned the cams and flywheel with the engine at 90 degrees ATC. The engine is completely assembled. I just didn't want to keep cranking on assembly grease. Read the post I just sent to Flash7210 so I don't have to type it over again. Thanks for all your input guys.Jim |
Author: | flash7210 [ Thu Nov 09, 2017 10:03 am ] |
Post subject: | Re: head bolt sequence |
Let us know what you find. I've never dug that deep into the engine. From the pictures I've seen, the oil pump just looks like a pump. No visible relief valve. Unless maybe the relief valve is in the block. On the other hand, a bad oil pump seal/gasket could allow the pump to just suck in air instead of pumping oil. |
Author: | GordnadoCRD [ Thu Nov 09, 2017 11:57 am ] |
Post subject: | Re: head bolt sequence |
OK, my bad. Had something else pictured. Waiting for the next installment... ![]() |
Author: | WWDiesel [ Thu Nov 09, 2017 2:42 pm ] |
Post subject: | Re: head bolt sequence |
Oil flow circuit is kinda convoluted on these engines! ![]() ![]() |
Author: | flash7210 [ Thu Nov 09, 2017 2:50 pm ] |
Post subject: | Re: head bolt sequence |
That’s a good diagram. Thanks for posting. I couldn’t find it. Had to try from memory. |
Author: | WWDiesel [ Thu Nov 09, 2017 3:01 pm ] |
Post subject: | Re: head bolt sequence |
flash7210 wrote: That’s a good diagram. Thanks for posting. I couldn’t find it. Had to try from memory. Yea, I had to doctor it up a little and add some color!!! ![]() |
Author: | geordi [ Thu Nov 09, 2017 3:24 pm ] |
Post subject: | Re: head bolt sequence |
Interesting that the graphic doesn't show any oil path to the rod bearings on the crankshaft - Not sure how the oil gets there, but it definitely does or the rods wouldn't survive 5 minutes. |
Author: | flash7210 [ Thu Nov 09, 2017 3:29 pm ] |
Post subject: | Re: head bolt sequence |
Oil get to the rods through the crankshaft. By way of the main bearing supply. |
Page 1 of 2 | All times are UTC - 5 hours [ DST ] |
Powered by phpBB © 2000, 2002, 2005, 2007 phpBB Group http://www.phpbb.com/ |