| LOST JEEPS http://www.lostjeeps.com/forum/phpBB3/ |
|
| Head Gasket replacement procedures http://www.lostjeeps.com/forum/phpBB3/viewtopic.php?f=5&t=89415 |
Page 1 of 3 |
| Author: | DieselJeepLuvr [ Tue Nov 06, 2018 11:02 pm ] |
| Post subject: | Head Gasket replacement procedures |
Is there a writeup or video somewhere detailing the head gasket replacement procedures? I've started on this and looking for tips and tricks. Thanks all! |
|
| Author: | krb [ Wed Nov 07, 2018 5:36 am ] |
| Post subject: | Re: Head Gasket replacement procedures |
If there is, I've not found it. I'm using the threads for TB replacement & rocker arm replacement from Colorado 4x4 in the sticky and then the FSM I guess. |
|
| Author: | krb [ Wed Nov 07, 2018 7:11 am ] |
| Post subject: | Re: Head Gasket replacement procedures |
These from Sir Sam at least show what the guts look like going in and some good tips: https://www.youtube.com/watch?v=J0CBbEK ... Zfl81yBIIV |
|
| Author: | DieselJeepLuvr [ Thu Nov 08, 2018 1:18 am ] |
| Post subject: | Re: Head Gasket replacement procedures |
Never mind. Got it done. Only issues I had were where to start... Tricks I used were: I pulled the fan, shroud Then the radiator and intercooler out (as a unit) which required me to disconnect the one AC line that would not move. needed to unhook the lower radiator hose and tranny cooler line on the bottom passenger side so it would slide back and out. Probably could have left all that in but I wanted to make sure my intercooler was free from oil on the inside and it and the radiator fins were clean. Next I worked on what ever it takes to get to the timing belt. Since I was removing the head I didn't bother with worrying about preserving the original time (which wasn't correct in my case anyways) I just made sure the crank locating pin (I used a 1/4" drill bit) was in place (the notch on the crankshaft hub should be in the 3 o' clock position and once the belt is off there is a notch on the IP gear that should point at the almost indistinguishable mark under a case bolt at the 9'ish o'clock position. As for the two cam gears, make darn sure you use some kind of tool to hold them secure when you loosen the bolts DO NOT use the locating pins! They will just shear off. Some idiot used an impact driver to reinstall mine on the last timing belt change so I needed to use a 3 ft breaker bar to break them loose (my 1/2" air impact driver could not break it free). Just goes to show you how stupid some people can be and this was a dealership's diesel mechanic. Then I just started on removing everything from the exhaust side. I had an oil leak on the turbo drain line that I wanted to fix anyways so I removed both the oil intake and drain lines. This is when I stopped for the night. I wanted to remember what took place next and thought if I continued it would be lost in the fog. Have you ever drove from one end of the continent to the next and woke up somewhere thinking "Where the f**k am I? and how the F**k" did I get here????" Ya that... Next I started unhooking all the electrical crap from the intake and injectors (there is a ship load) The only one I couldn't get is the rail pressure sensor by the firewall which I waited until the rail was disconnected to do it. piece o cake. Then removed the injector return lines. Next I removed the fuel rail and fuel lines from the IP forward. For the injectors you will need to remove the keepers then put a socket where those were and use a 3/4" open end wrench to pry up on the injector until it pops out. Now I can access the valve cover assembly for removal! Since this is a torque sequence item I all way loosen them in reverse order by breaking them loose completely then snugging them up again. Once they are done this way you can start removing them in reverse sequence order. (WARNING: not sure if this is necessary but I was taught this by my father who is a retired diesel mechanic with thousands of engines under his belt and zero failures!) With that out now you can unhook the glow plug wiring and plugs (If your careful you can wait and remove the glow plugs after the head is out but make dang sure you don't set the head down on top of the tips which extend past the plane of the head. Finally take the head and intake (with new valves and cam seals) into your machine shop for cleaning. Crack open a cold one, take a couple of pain killers because it's all downhill from here! (unless you forgot how to put it back together... |
|
| Author: | WWDiesel [ Thu Nov 08, 2018 11:38 am ] |
| Post subject: | Re: Head Gasket replacement procedures |
Good job; hope you labeled all those electrical connections good. They can get fuzzy real quick and there are a several of them that are the same so they can be reconnected wrong. |
|
| Author: | vwroad87 [ Thu Nov 08, 2018 2:48 pm ] |
| Post subject: | Re: Head Gasket replacement procedures |
I put all the "same" kinda bolts in marked zip lock bags, this was nice when re-assemble time came and I had parts everywhere in the shop. And the part about the stealership mech using a impact gun on the cam sprockets is why "if I can't fix it I won't own it". It was never like this before, mechs used to have enormous pride in there work, now they just wanna get home to the TEEVEE, beers and more meds it seems. |
|
| Author: | DieselJeepLuvr [ Fri Nov 09, 2018 5:03 pm ] |
| Post subject: | Re: Head Gasket replacement procedures |
WWDiesel wrote: Good job; hope you labeled all those electrical connections good. They can get fuzzy real quick and there are a several of them that are the same so they can be reconnected wrong. This is the one thing I didn't do but I was pretty sure any that were near one another were of a different type... If I run into trouble though, you know where I will go to ask for help.
|
|
| Author: | DieselJeepLuvr [ Sat Nov 17, 2018 5:49 pm ] |
| Post subject: | Re: Head Gasket replacement procedures |
H |
|
| Author: | WWDiesel [ Sat Nov 17, 2018 9:52 pm ] |
| Post subject: | Re: Head Gasket replacement procedures |
Photos must first be posted on a photo sharing site like https://postimages.org/ or https://imgur.com/ Then copy the link provided by them and post it on LOST similar to this: [url=https://NAME OF PICTURE[/img[/url] FYI, the turbo on these engines have no wastegate; it is a variable vane turbo that is controlled by the ECM via a vacuum modulator. |
|
| Author: | DieselJeepLuvr [ Fri Nov 23, 2018 6:40 pm ] |
| Post subject: | Re: Head Gasket replacement procedures |
Well I have another issue that I'm at a loss to resolve. The ARP head studs I ordered from ID Parts were apparently too long and the four outside ones on the exhaust side hit the cam journal support so hard it left an impression saying "ARP 2000" in the intake/valve cover assembly seizing the exhaust cam. seems to turn fine now the I/V assembly is off but I'm concerned it could have cracked the cam journals. See pics below![]()
|
|
| Author: | vwroad87 [ Fri Nov 23, 2018 8:03 pm ] |
| Post subject: | Re: Head Gasket replacement procedures |
That sucks! Did you mill the head? Did you put the studs in all the way? I've only done my own head with ARPs, New head, 2 hole gasket (that's what mine had) and didn't have this issue. |
|
| Author: | flash7210 [ Fri Nov 23, 2018 8:25 pm ] |
| Post subject: | Re: Head Gasket replacement procedures |
Contact IDparts so they can get you the correct studs. This issue had already been identified and I thought IDparts had corrected it. |
|
| Author: | DieselJeepLuvr [ Fri Nov 23, 2018 9:56 pm ] |
| Post subject: | Re: Head Gasket replacement procedures |
Yes I bottomed them out on stock heads. Still had 3-4 threads above the nut after torque. I never thought anything about it as this is the first I'd ever heard of the issue. Luckily I was able to get a hold of ID Parts and sent an email with the issue and was told to grind down the tops of the studs in question. Apparently they are still in process with ARP about getting a shorter stud. They told me that only the early intakes had this issue. Not so sure I would trust that assumption for anyone installing new studs. Would have been nice to have had a note in there saying to do the grinding prior... |
|
| Author: | geordi [ Sat Nov 24, 2018 12:44 am ] |
| Post subject: | Re: Head Gasket replacement procedures |
Leave the nuts ON the stud when you grind them, you will have to remove the entire hex socket on top of the stud to enable them to seat deep enough. When installing, do not fully bottom the studs. When they bottom, turn them back 1/2 turn so that all the force on the threads will be even - if they are bottomed, the studs can be slightly side-loaded and this can weaken the studs or the block threads. This is not an isolated issue, and your valve cover and cams will be fine. If you don't want to grind them, send me an email and we can talk about exchanging the studs - I have a limited supply of the shorter ones. |
|
| Author: | DieselJeepLuvr [ Sat Nov 24, 2018 1:14 pm ] |
| Post subject: | Re: Head Gasket replacement procedures |
geordi wrote: Leave the nuts ON the stud when you grind them, you will have to remove the entire hex socket on top of the stud to enable them to seat deep enough. When installing, do not fully bottom the studs. When they bottom, turn them back 1/2 turn so that all the force on the threads will be even - if they are bottomed, the studs can be slightly side-loaded and this can weaken the studs or the block threads. This is not an isolated issue, and your valve cover and cams will be fine. If you don't want to grind them, send me an email and we can talk about exchanging the studs - I have a limited supply of the shorter ones. Already ground down. Yes I left the nuts on (this is not my first rodeo). I've been using ARP studs for 30 years. I always back them off at least a quarter turn then snug them up with an open end wrench and allen socket but once you start going through your torque sequence they will always turn often bottoming themselves out anyway (if you don't believe me try marking the tops of the studs prior). The point is to get an even pull on all the threads. Using a bottoming tap on the block and cleaning the hole prior to installation helps with this as well (which I did) Thank you Geordi, by the way for ensuring this situation will not harm the valve cover. That was my big concern.
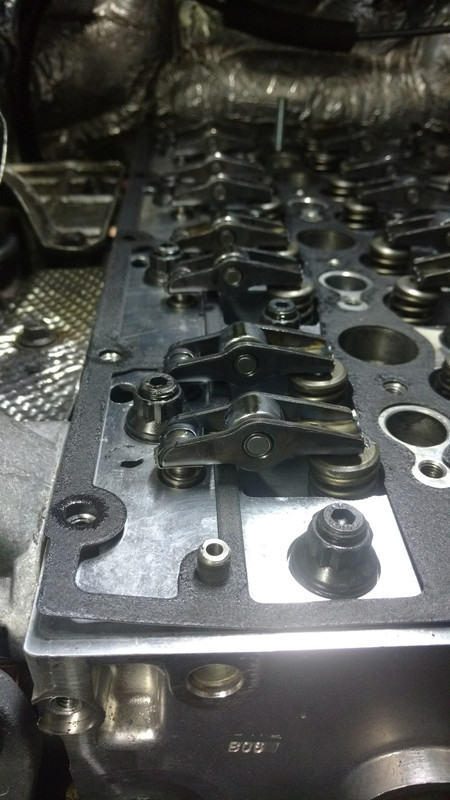
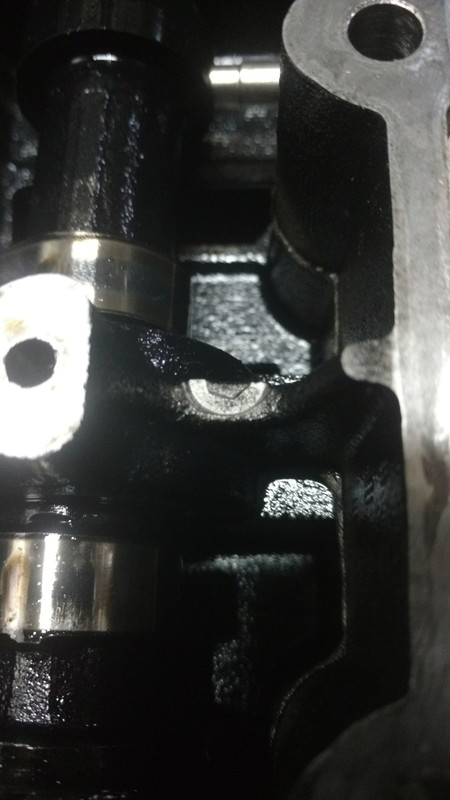
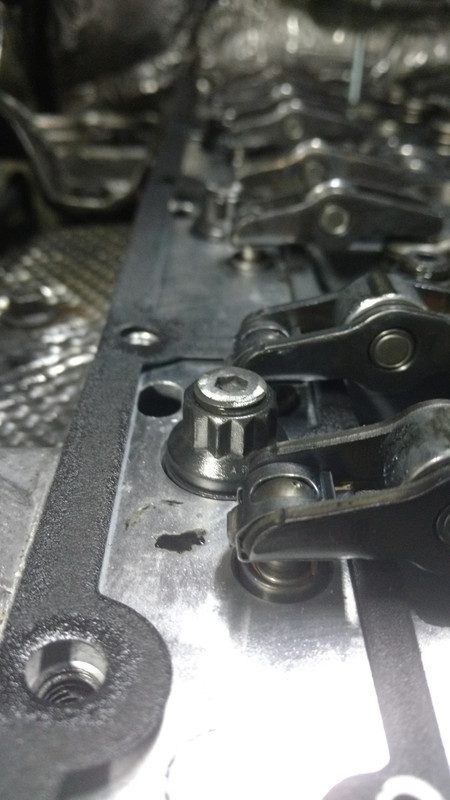
|
|
| Author: | DieselJeepLuvr [ Sat Nov 24, 2018 10:23 pm ] |
| Post subject: | Re: Head Gasket replacement procedures |
Update! She's alive! Got her all back together took her for a round the block run to check for leaks and to purge any air from the coolant system, refilled then road trip to town. About 20 miles and she is running smooth! Last thing to do is take it to the stupid dealership so they can program in the new injectors. Looking forward to seeing what my fuel economy improvement will be now that it's timed right... |
|
| Author: | geordi [ Sun Nov 25, 2018 1:37 am ] |
| Post subject: | Re: Head Gasket replacement procedures |
Save your money on the injector programming, GDE has said it isn't that important. I'd also be shocked if the dealer droids knew how to do it anyway. |
|
| Author: | krb [ Sun Nov 25, 2018 7:17 am ] |
| Post subject: | Re: Head Gasket replacement procedures |
Glad you got it whipped! What does "programming the injectors" theoretically do? And by the way, to pull the intake & head did you remove the wire loom or just pull it up enough to slide everything out from under? I've got everything from the front drivers side disconnected and am down to the starter and passengers side, didn't know what was "enough". |
|
| Author: | WWDiesel [ Sun Nov 25, 2018 12:52 pm ] |
| Post subject: | Re: Head Gasket replacement procedures |
krb wrote: What does "programming the injectors" theoretically do? Common rail diesel fuel injectors require calibration during manufacture or overhaul on a specialised diesel injection test rig to produce a data code relating to the characteristics of each individual injector (variances). This data code in most cases is referred to as the C2i code, IMA/IQA code or QR code depending on the injector manufacturer. Each injector is provided with a perspective data code corresponding to its individual flow characteristic as found during bench testing when either new or rebuilt. This data code is programmed into the engine control unit (ECM) identifying to which cylinder the injector is fitted. This data code allows the engine control module to correct the pulse duration applied to each individual injector to maintain optimum performance. Fitment of rebuilt injectors or new replacement injectors requires this information to be coded into the engine control unit. Bottom line: Basically it is fine tuning of the fuel injection event by the ECM to ensure each cylinder receives the optimal amount of fuel. Engine will still run and perform without the above data being programed, but may run a little more smoothly and achieve a little better fuel economy if it is done. Remember the ECM already has the data codes installed for the OEM injectors and the ECM will still use them on any replacement injectors if not reprogrammed with this information. Your choice as to do it or not....
|
|
| Author: | geordi [ Sun Nov 25, 2018 1:07 pm ] |
| Post subject: | Re: Head Gasket replacement procedures |
krb wrote: Glad you got it whipped! What does "programming the injectors" theoretically do? And by the way, to pull the intake & head did you remove the wire loom or just pull it up enough to slide everything out from under? I've got everything from the front drivers side disconnected and am down to the starter and passengers side, didn't know what was "enough". I usually just pull the harnesses out of the way and work under them, rather than disconnecting the entire engine bay. It is also easier to disconnect (if you are going that way) everything from the passenger side - that is less complex than the drivers' side. As far as the injector programming, yes what WW posted is factually accurate. However Keith at Green Diesel Engineering has said that the performance differences for the injector programming aren't that critical - and he's the one looking for that Nth level of performance out of the programming, as his guys wrote the original software. Obviously it is a decision you need to make for your own Jeeps, but I certainly defer to Keith on any questions of programming. He's the man. |
|
| Page 1 of 3 | All times are UTC - 5 hours [ DST ] |
| Powered by phpBB © 2000, 2002, 2005, 2007 phpBB Group http://www.phpbb.com/ |
|