It is currently Thu Apr 25, 2024 4:35 pm

All times are UTC - 5 hours [ DST ]


Post new topic Reply to topic  [ 335 posts ]  Go to page Previous  1 ... 6, 7, 8, 9, 10, 11, 12 ... 17  Next
Author Message
 Post subject: Re: Well, here I go... pulling the motor.
PostPosted: Mon Dec 23, 2019 11:46 am 
Offline
Moderator
Moderator
User avatar

Joined: Sat Aug 24, 2013 11:36 pm
Posts: 7176
Location: Central GA
krb wrote:
WWDiesel wrote:
thesameguy wrote:
You really should always replace the studs and nuts on the manifold with new... IMO that's absolutely critical of turbo cars, probably especially diesels with all the NVH. That hardware is very common - you can get it at any VW or Ford dealership, for instance.

My local Ace Hardware store actually stocks some good quality metric bolts and studs. I have bought quite a few 8mm x 1.25 nuts, bolts, and studs from them. They even have some 8mm locknuts. :D

That's my plan. Run to town today and visit the Ace Hardware store for some nuts and a couple studs to guide the intake on.
Hadn't considered replacing the exhaust studs but probably a good idea thesameguy. I was pleasantly surprised how easy it came apart after 14 years of heat cycles.
I did that to my 12 valve Cummins when I replaced the head gasket several years ago, but it had bolts originally and I switched it to studs.
I have some copper anti-seize I'm considering using but then that would affect the torque values I would think?

Anti-seize should not affect torque values, I use it on most everything I work on when comes to nuts and bolts and never had a problem.
No different than oiling the threads before torquing.

_________________
Supporting Vendor and Moderator of LOST
05 Jeep Liberty CRD Limited :JEEPIN:
Ironman Springs/Bilstein/Shocks
Yeti StgIV Hot Tune
Week's BatteryTray
No FCV/EGR
Samcos/ProVent
SunCoast/Transgo
Carter Intank-pmp
2mic.Sec.Fuel Filter
Flowmaster/NO CAT
V6Airbox/noVH
GM11 Bld.fan/HDClutch
IronrockArms/wwdieselMount

98 Dodge Cummins 24 Valve


Top
 Profile  
 
 Post subject: Re: Well, here I go... pulling the motor.
PostPosted: Mon Dec 23, 2019 12:36 pm 
Offline
LOST Junkie

Joined: Sat Oct 01, 2016 8:24 pm
Posts: 652
Anti-seize definitely affects torque values.... that's well documented:

https://www.antiseize.com/PDFs/torque_s ... ations.pdf

https://www.engineersedge.com/material_ ... _13389.htm

etc.

Virtually always published torque values assume dry threads, but there are some exceptions, such as historically head bolts (for example) are assumed to be installed with a thin film of oil, but that's not true of TTY bolts which MUST installed dry. Contaminated TTY bolts can have all manner of issues.

Personally I use anti-seize only on the head side of exhaust studs and not on the nut side. I don't care if the nut comes off the stud so long as the stud comes out of the head + the copper coating should be all the antiseize you need (which is why the factory nuts come off fairly easily...) + antiseize on the head side won't affect torque values.


Top
 Profile  
 
 Post subject: Re: Well, here I go... pulling the motor.
PostPosted: Mon Dec 23, 2019 12:39 pm 
Offline
LOST Junkie

Joined: Sat Oct 01, 2016 8:24 pm
Posts: 652
krb wrote:
Hadn't considered replacing the exhaust studs but probably a good idea thesameguy. I was pleasantly surprised how easy it came apart after 14 years of heat cycles.


Mine came out remarkably easily as well, although two studs could not be removed from the head. I let the machine shop handle that, but I randomly learned about this tool last night:

https://www.summitracing.com/parts/wmr-w83203/overview/

which I am definitely gonna pick up. How have I never heard of it?


Top
 Profile  
 
 Post subject: Re: Well, here I go... pulling the motor.
PostPosted: Mon Dec 23, 2019 4:47 pm 
Offline
LOST Junkie

Joined: Sat Oct 13, 2018 10:09 pm
Posts: 541
Location: Australia
thesameguy wrote:
krb wrote:
Hadn't considered replacing the exhaust studs but probably a good idea thesameguy. I was pleasantly surprised how easy it came apart after 14 years of heat cycles.


Mine came out remarkably easily as well, although two studs could not be removed from the head. I let the machine shop handle that, but I randomly learned about this tool last night:

https://www.summitracing.com/parts/wmr-w83203/overview/

which I am definitely gonna pick up. How have I never heard of it?


They are on ebay

_________________
Australian KJ CRD 2006


Top
 Profile  
 
 Post subject: Re: Well, here I go... pulling the motor.
PostPosted: Thu Dec 26, 2019 9:33 am 
Offline
LOST Member

Joined: Mon Jul 18, 2016 6:33 am
Posts: 412
Location: Central KY
So does it have jaws inside there or is it a spiral that grips the stud like a bolt remover?

_________________
2005 Liberty CRD, with 135,XXX miles. Rockers, exhaust valves, Provent, EGR block & butterfly delete & V6 air box at 100K

1998 XJ 4.0L, stock with 130,XXX miles

First Jeep: 1962 Willys CJ-3B


Top
 Profile  
 
 Post subject: Re: Well, here I go... pulling the motor.
PostPosted: Sat Dec 28, 2019 3:33 am 
Offline
LOST Addict
User avatar

Joined: Thu Sep 06, 2007 9:51 pm
Posts: 6297
Location: Somewhere between Heaven and Hell... But it is really hot here on Earth...
It has jaws inside, and is more than capable of twisting the studs off of the head and exhaust manifold.

Ask me how I know.

_________________
Proud supporting vendor of LOST Jeeps
TRAVELING CRD TECH. I come to you!
Need help? Just ask! I've taken it apart more than most.
Email jeep [at] maincomputer [dot] com - BOARD MESSAGING IS BROKEN
Over 125 CRDs currently driving with my timing belt, rockers, or ARP Studs.
Bad noises = REALLY bad things.


Top
 Profile  
 
 Post subject: Re: Well, here I go... pulling the motor.
PostPosted: Sat Dec 28, 2019 3:35 am 
Offline
LOST Junkie

Joined: Sat Oct 01, 2016 8:24 pm
Posts: 652
How do you know?


Top
 Profile  
 
 Post subject: Re: Well, here I go... pulling the motor.
PostPosted: Sat Dec 28, 2019 8:06 am 
Offline
LOST Junkie

Joined: Sat Oct 13, 2018 10:09 pm
Posts: 541
Location: Australia
thesameguy wrote:
How do you know?


I like people that always play a bluff.

geordi would not have expected that ! LOL

_________________
Australian KJ CRD 2006


Top
 Profile  
 
 Post subject: Re: Well, here I go... pulling the motor.
PostPosted: Mon Jan 20, 2020 1:10 pm 
Offline
LOST Junkie

Joined: Sat Oct 01, 2016 8:24 pm
Posts: 652
Well, I guess we'll never know. :(

After establishing my crank end play was well within spec, I went about putting the rear bearing carrier back together. It's fidgety assembly for sure - there is an o-ring that goes between the thrust washer and the crank that generally would prefer not to stay put. I used some sticky assembly lube to put it where it should be, and as far as I know, it stayed there. :) 
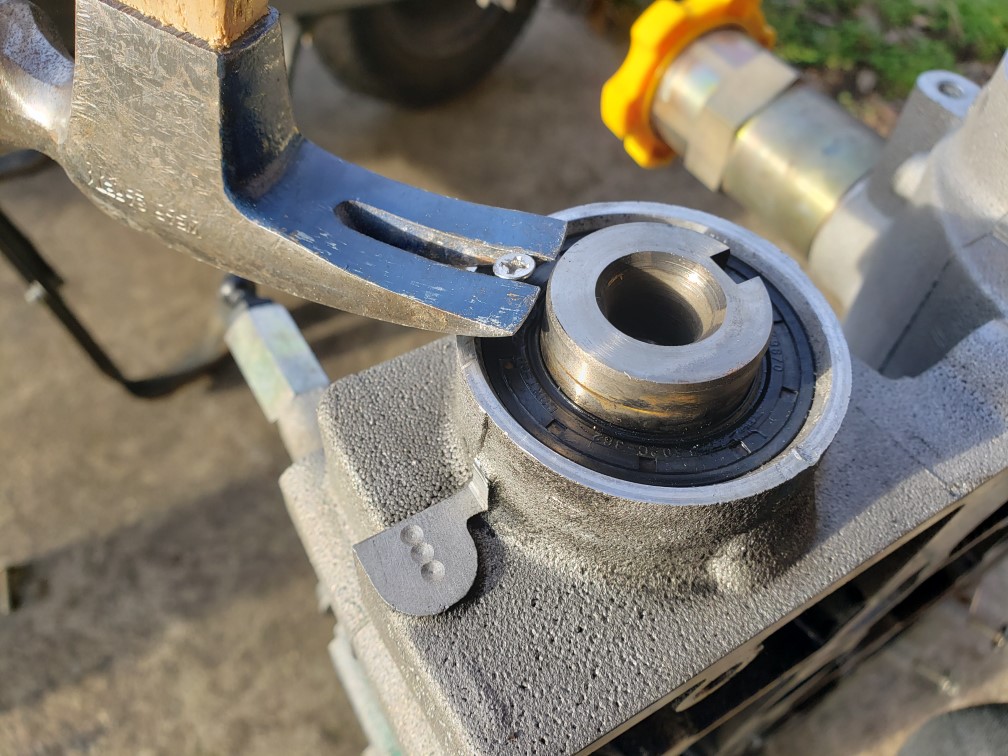
You can see the internal oil slinger on top - I used assembly lube to stick it in place as well.

Image

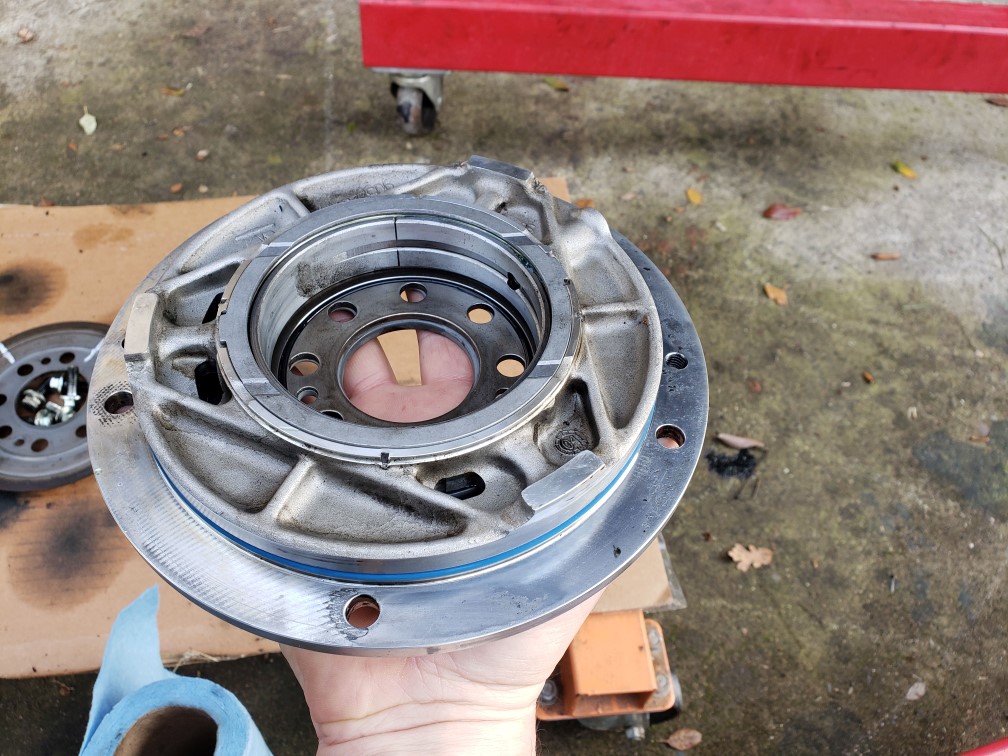
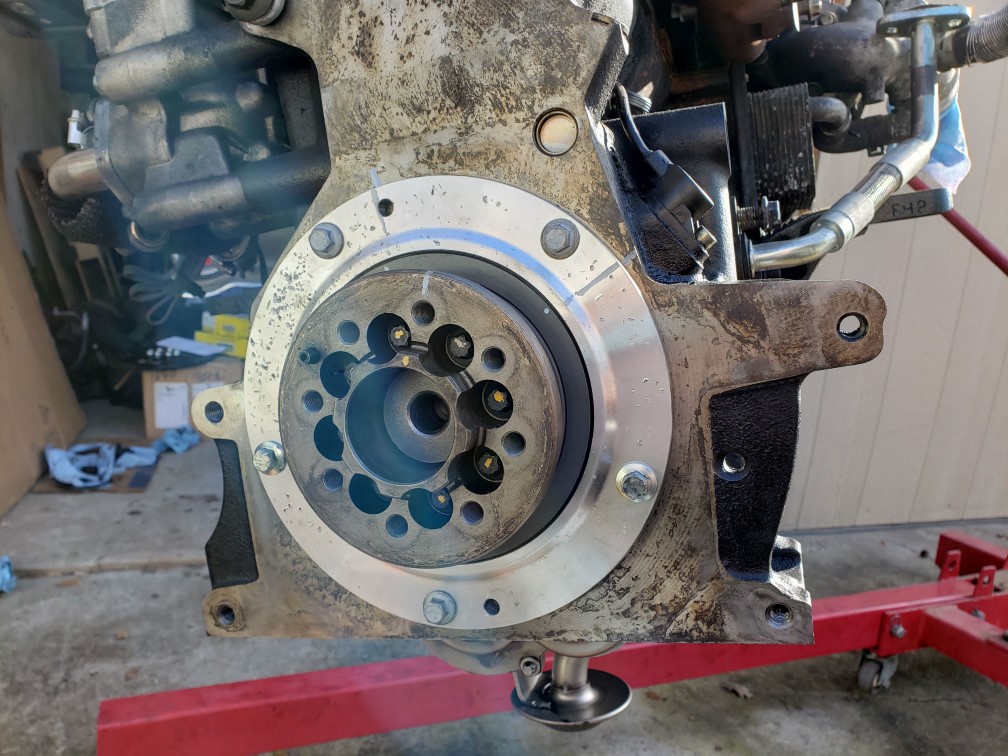
I used hose assembly lube (which is very slippery) on the o-ring around the circumference of the carrier to prevent the o-ring from binding and getting damaged, and the retaining bolts tightened criss-cross in sequence to gently pull it in. You can see the bearing's oil feed lined up with the oil gallery... this is important if you want your engine to work. :) The carrier isn't keyed in any way, so it can be installed incorrectly.

Image

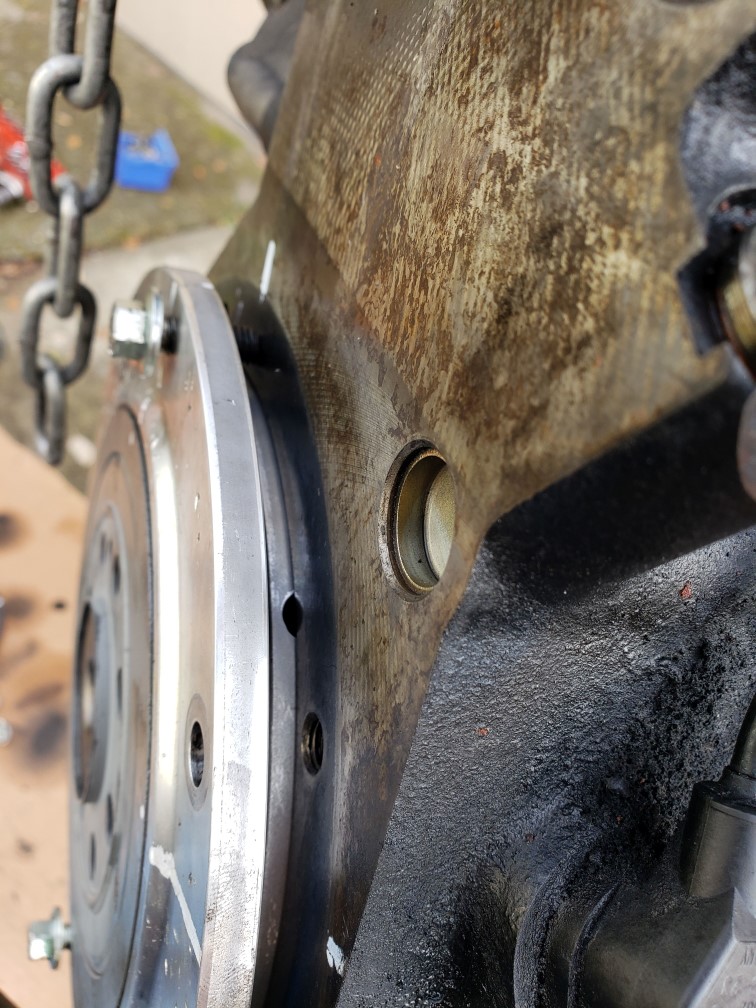
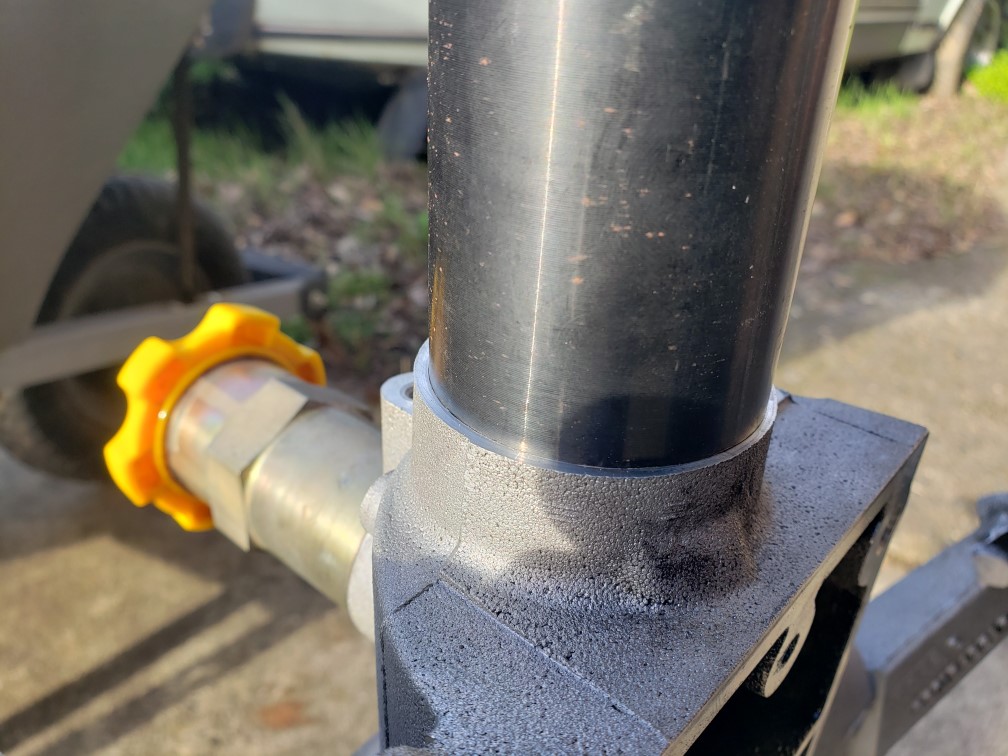
I used blue Loctite on the bolts to ensure they don't go anywhere this time. Spec on those bolts is 33lb ft, and I noticed that three of the bolts would not torque properly... pulling them back out, they were clearly stretched. I replaced them with new, and those torqued up properly. You more or less must install the flex plate adapter to ensure the RMS doesn't go anywhere, so that's on too. (That of course necessitated me buying longer bolts to secure the motor to my engine stand...)

Image

I'm still feeling nervous about carrier bolts, so before putting the motor back in I think I'm going to run over to a local speed shop and pick up ARP 761-1001, which is their stainless M8x20 bolt kit and just know I have nice, new hardware in there. Still turning it over in my head.

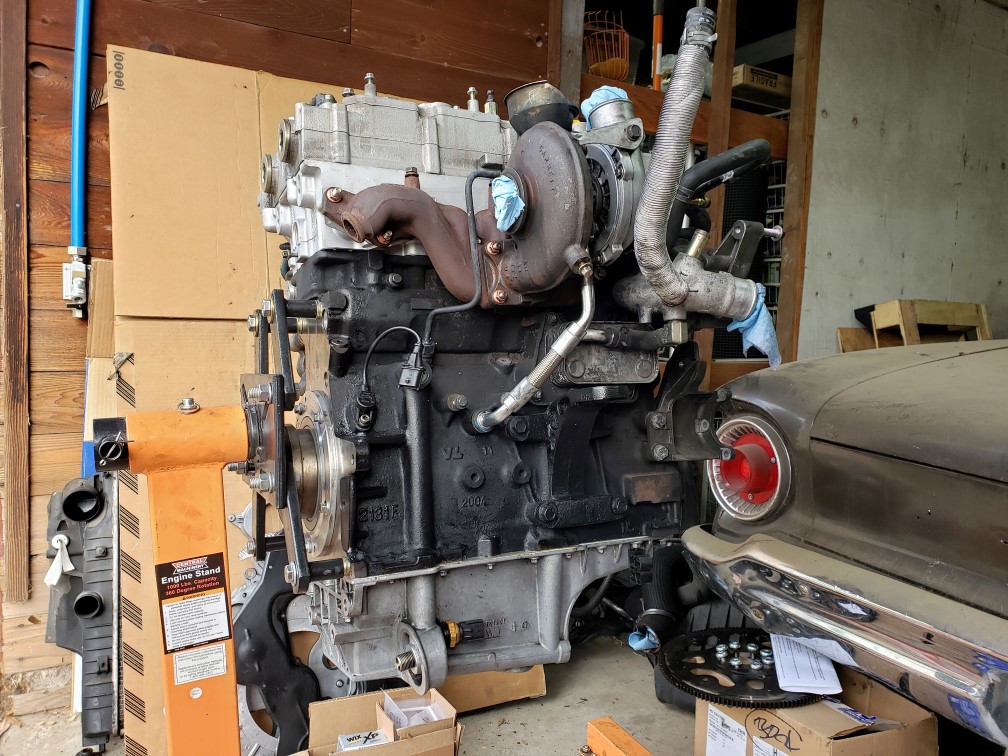
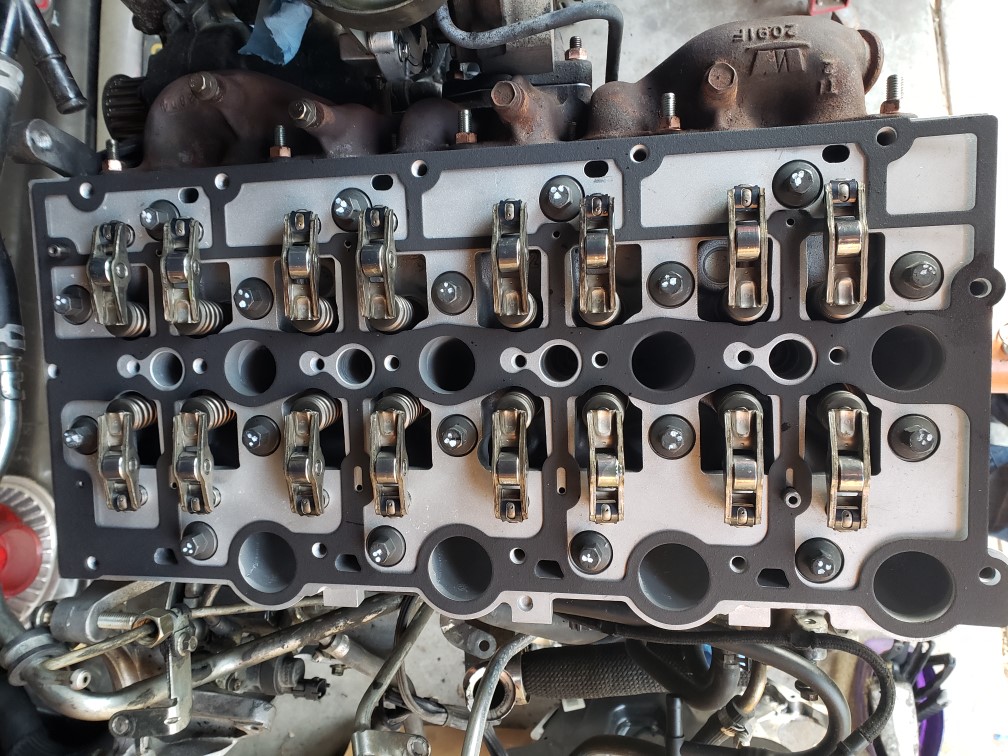
I ran out of time, but next weekend I will finally get the oil pan back on. Sometime this week I'll put the order in for the rocker arms and valve cover gasket. I'm ordering this stuff piecemeal in case I run into some major problem and need to abort, but pretty much at this point the sunk investment outweighs the remaining investment... it may be time to just getting all the remaining pieces queued up. IDK.


Top
 Profile  
 
 Post subject: Re: Well, here I go... pulling the motor.
PostPosted: Sun Jan 26, 2020 9:52 pm 
Offline
LOST Junkie

Joined: Sat Oct 01, 2016 8:24 pm
Posts: 652
Progress is slow, but there's a progress! :) It's been cold and wet here, plus CRDs are EXPENSIVE, plus every step takes an eternity due to the cleaning involved. This motor was NASTY.

Replaced O-rings on the oil pickup, got the pan on. Replaced hardware for the exhaust manifold and got that on. Replaced gasket & grommet for the turbo oil return and got the turbo on.

Image

Next up is ordering rockers & valve cover gasket... so probably another two weeks before I get anything else done. :(

While it was apart, I snapped a picture of the oil pump bypass as it came up earlier in this thread:

Image

In case anyone was curious where it was or how it worked. :)


Top
 Profile  
 
 Post subject: Re: Well, here I go... pulling the motor.
PostPosted: Mon Jan 27, 2020 10:24 am 
Offline
LOST Addict

Joined: Tue Dec 16, 2014 9:33 pm
Posts: 1128
Location: Jackson,TN
Great job. I suppose you found out that you didn't need the crank bearing carrier. Good luck with the rest of the build and reassembly. i know you will be very glad to get it finished and running.

_________________
05 Blu LIM, OME GDE Tbo, wk II 245/75/17, KC Lights, bull bar, 195K H TC
05 Blu Lim, Dayton, GDE HT, 255/75/18 , 210K , H TC
06 Bla Lim, GDE Eco, Destination AT 245/75/17, 151K, H TC
06 D Khaki Lim 126K wkII Eur TC
05 D khaki Lim 145k refurbishing
All CRDS: Fumoto, Lift , Fan Shroud mod, fuel head Gen II, SAMCOS,self TB, 2 Mic filt, Hayden


Top
 Profile  
 
 Post subject: Re: Well, here I go... pulling the motor.
PostPosted: Mon Jan 27, 2020 12:07 pm 
Offline
LOST Junkie

Joined: Sat Oct 01, 2016 8:24 pm
Posts: 652
I guess I don't know.... I just need to keep this going or I'll get frustrated abort and it'll sit for another two years. :(

I do need to find a turbo heat shield - mine is ripped where it attaches (attached...) to the compressor housing. I may just have to make one - I think I still have heat shield material left over from my Fiero project.

Image


Top
 Profile  
 
 Post subject: Re: Well, here I go... pulling the motor.
PostPosted: Mon Feb 17, 2020 1:37 pm 
Offline
LOST Junkie

Joined: Sat Oct 01, 2016 8:24 pm
Posts: 652
It's a slow roll, but it's still rolling... Turns out everything on a CRD costs a fortune! :D

Old cam seals come out easily using a claw hammer....

Image

New ones go back in easily using the factory tool... thank you Mountainman for recommending it. "Tap it til it bottoms out" is a lot easier than guessing!

Image

16 new $rockers$ installed, each smeared a bit with assembly lube to ease startup...

Image

And the valve cover goes on … at last!

Image

In retrospect, I wish I had done a better job cleaning the air path in the camifold, but it is what it is... and better than it was!

Need to do some shopping for an AC compressor, as I'm not putting a 180,000 mile old impossible-to-access compressor back in there!


Top
 Profile  
 
 Post subject: Re: Well, here I go... pulling the motor.
PostPosted: Mon Oct 12, 2020 7:03 pm 
Offline
LOST Junkie

Joined: Sat Oct 01, 2016 8:24 pm
Posts: 652
Well, I'm back. :)

I had to pause on this due for a bunch of reasons, not the least of which was employment worries, but so far so good and I think I'm ready to get back on the wagon.

I completely lost track of what I was doing or where I was, so I'm happy this thread was here to jog my memory.

In February, I left the motor like this:

Image

Which makes me think it's timing for the timing belt. I just ordered one from idparts.

I've got three questions:

1. This sounds crazy, but can anyone see anything I might be overlooking before that belt goes on?

2. Since the motor is on a stand, I cannot fit the tool that locks the crank at 90 ATDC. I'm positive it's very close to that position, but is there a trick to ensuring it's there without a flexplate installed?

3. I thought it was in the FSM, but I can't find it.... how best to time the fuel pump?

Thank you!


Top
 Profile  
 
 Post subject: Re: Well, here I go... pulling the motor.
PostPosted: Mon Oct 12, 2020 9:13 pm 
Offline
Moderator
Moderator
User avatar

Joined: Sat Aug 24, 2013 11:36 pm
Posts: 7176
Location: Central GA
Two thoughts:
First, Why not just install the flywheel (flexplate) then you could pin it and time everything correctly.
You should be able to install the flywheel while the engine is still on the engine stand well enough to utilize the alignment pin.

Second, have you replaced the water pump? If not now is the time to do it while you got everything apart.
All that is left is to pull the timing belt housing to change the water pump. :wink:

_________________
Supporting Vendor and Moderator of LOST
05 Jeep Liberty CRD Limited :JEEPIN:
Ironman Springs/Bilstein/Shocks
Yeti StgIV Hot Tune
Week's BatteryTray
No FCV/EGR
Samcos/ProVent
SunCoast/Transgo
Carter Intank-pmp
2mic.Sec.Fuel Filter
Flowmaster/NO CAT
V6Airbox/noVH
GM11 Bld.fan/HDClutch
IronrockArms/wwdieselMount

98 Dodge Cummins 24 Valve


Top
 Profile  
 
 Post subject: Re: Well, here I go... pulling the motor.
PostPosted: Tue Oct 13, 2020 12:13 pm 
Offline
LOST Junkie

Joined: Sat Oct 01, 2016 8:24 pm
Posts: 652
Appreciate the thoughts!

I think there isn't enough space between the stand and the crank adapter to install the flex plate.... I can get some longer bolts and use spacers, or if push comes to shove I can hoist it back onto the crane. I was just hoping there was some 3rd solution I'd overlooked. If these engines were more common, I'd buy a spare flex plate and mangle one just to set the cam timing! :D

I think it was the water pump that was throwing me for a loop... I clearly started to put things back together and then stopped. I suspect it's because I knew I had to replace the water pump. That's coming with the timing belt kit, so I think that's the next step.

Thank you!

I think the two remaining things to buy are thermostat and a new AC compressor, and then this whole thing can go back together. Assuming of course I figure out what these three mystery bolts are. I'm usually pretty organized, I'm really annoyed I've got these three bolts just hanging around with no obvious purpose. :(


Top
 Profile  
 
 Post subject: Re: Well, here I go... pulling the motor.
PostPosted: Wed Oct 14, 2020 4:00 am 
Offline
LOST Member

Joined: Mon Jul 18, 2016 6:33 am
Posts: 412
Location: Central KY
I was one bolt short when I did mine so we're averaging just 2 now.

With the tranny off & the motor out, can't you just visually align the flywheel?

_________________
2005 Liberty CRD, with 135,XXX miles. Rockers, exhaust valves, Provent, EGR block & butterfly delete & V6 air box at 100K

1998 XJ 4.0L, stock with 130,XXX miles

First Jeep: 1962 Willys CJ-3B


Top
 Profile  
 
 Post subject: Re: Well, here I go... pulling the motor.
PostPosted: Wed Oct 14, 2020 4:41 pm 
Offline
LOST Junkie

Joined: Sat Oct 01, 2016 8:24 pm
Posts: 652
I've got the alignment tools (the cams are locked in place...), but the flywheel is on the ground so there is nothing to align. :)


Top
 Profile  
 
 Post subject: Re: Well, here I go... pulling the motor.
PostPosted: Thu Oct 15, 2020 5:15 am 
Offline
LOST Member

Joined: Mon Jul 18, 2016 6:33 am
Posts: 412
Location: Central KY
Sorry, at 4:00 a.m. my fingers and mind weren't completely coordinating...

What I was thinking, but failed to convey, was if you indexed/scribed the flywheel before you took it off (don't know if it needs to be for this motor but assume so for the index hole to work), could you estimate where the flywheel hole should be and thus approximate the alignment? enough to tell you were at TDC?

_________________
2005 Liberty CRD, with 135,XXX miles. Rockers, exhaust valves, Provent, EGR block & butterfly delete & V6 air box at 100K

1998 XJ 4.0L, stock with 130,XXX miles

First Jeep: 1962 Willys CJ-3B


Top
 Profile  
 
 Post subject: Re: Well, here I go... pulling the motor.
PostPosted: Thu Oct 15, 2020 11:59 am 
Offline
LOST Junkie

Joined: Sat Oct 01, 2016 8:24 pm
Posts: 652
Oh, yeah, I think so.... that's where the motor is right now. I marked it before removing the flex plate and as far as I know the crank hasn't moved, but because so much was taken apart and put back together I can't quite be sure.

It's not a huge deal to just lift it off the stand again, but I wondered if there was another way. TBH, it seems kinda weird to have a simple cam pegging system built in, but being unable to do the same without bolting on a flex plate. I figured there had to be another way.... Guess not!


Top
 Profile  
 
Display posts from previous:  Sort by  
Post new topic Reply to topic  [ 335 posts ]  Go to page Previous  1 ... 6, 7, 8, 9, 10, 11, 12 ... 17  Next

All times are UTC - 5 hours [ DST ]


Who is online

Users browsing this forum: No registered users and 126 guests


You cannot post new topics in this forum
You cannot reply to topics in this forum
You cannot edit your posts in this forum
You cannot delete your posts in this forum

Search for:
Jump to:  
Powered by phpBB © 2000, 2002, 2005, 2007 phpBB Group. Color scheme by ColorizeIt!
Logo by pixeldecals.com