[Below are excellent detailed step-by-step instructions to R&R a front driveshaft and flanges, posted by Wasatch15 in 2007, thread title "New Front Drive Shaft"*]
So, there's a 4th repair/replace option; new shaft with standard U-joints, adios CVs. "Driveline Services" in Sparks, NV., offered me two options, in-stock:
A. Rebuilt stock drive-shaft w/CVs @ $340.
B. Custom shaft & flanges w/U-joints @ $565.
The tech @ DS Sparks emphasized that a lifted liberty would perpetually destroy the CV-equipped front shaft joints. Also, given the combined toll of personal trauma and jeep-retrieval cost outta' the backcountry, the upgrade was a no-brainer. Another factor: online cost for a stock CV-equipped replacement driveshaft is $525-up, excluding shipping.
I hope to finish the install today and report. If there's anything useful to add to Wasatch's excellent instructions, will do.
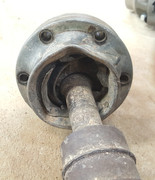
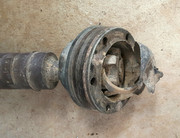
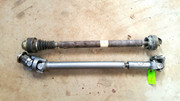
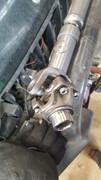
Here are pics of my original shaft w/failed CVs and the new shaft:
*"Jeep Liberty
Twenty Steps to a Stronger and Serviceable Front Drive Shaft
The Jeep this work was performed on is a 2002 Liberty Sport 4x4 with a NV3550 five speed manual transmission, NP231J transfer case, and a Dana 30A aluminum front differential.
Step One: Before you remove the original drive shaft mark it with line up marks at each end of the shaft and its matching companion flange. This will insure you will maintain shaft balance should you decide to return it into service.
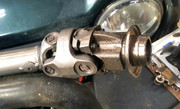
Step Two: Using an 8mm socket or wrench, remove six bolts connecting companion flange of front differential to front of drive shaft then do the same with the six bolts on the companion flange connected to the transfer case.
Step Three: The drive shaft is now loose and can be removed. I was able to maneuver it out without unbolting and moving the exhaust pipe, but you may be forced to unbolt the exhaust.
Step Four: Measure for the new driveshaft using a tape measure and record the length between the raised protrusions around the outside of the companion flange on the differential side and the outside rim of the companion flange on the transfer case.
TRANSFER CASE
Step Five: Drain fluid from transfer case.
Step Six: Using a 1 1/8” socket, remove nut securing companion flange on front output shaft of transfer case. You may want to replace this nut with a new one as it is a locking type nut, re-use is usually not recommended. (If you re-use the nut, use lock-tite upon re-installation). This is your decision.
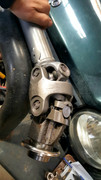
Step Seven: Use puller to remove companion flange from splined shaft. NOTE* if you haven’t drained the fluid from TC, it will leak out soon as you pull the companion flange from the splined shaft.
Step Eight: Carefully remove original front output shaft oil seal on transfer case and replace it with a new National 710046 oil seal. The oil seal surface on the new yoke is a smaller diameter then the original on the companion flange. That’s why the new oil seal is needed.
Step Nine: Lube the outside oil seal surface of the new Spicer 2-4-4341 splined yoke; install it on the splined shaft of the transfer case. Install new locknut or clean male threads and apply lock-tite to the shaft threads. Tighten lock nut securing new yoke.
Step Ten: Re-fill transfer case with 1.0L (2.2 pints) of ATF+4 fluid.
DIFFERENTIAL
Step Eleven: Since the original companion flange and new Spicer 2-4-6901 both have the same size oil seal diameter a new oil seal is not needed but mine leaked a short time later so I would recommend you install a new oil seal at this time. Oil seal is a Spicer 50619
Step Twelve: If replacing oil seal do this step, if not skip to step 15. Drain differential fluid.
Step Thirteen: Remove locknut with 1 1/8” socket and remove original companion flange using puller.
Step Fourteen: Remove old oil seal, replace with new Spicer 50619 oil seal.
Step Fifteen: If not replacing oil seal you will be able to quickly swap the original companion flange with the new Spicer 2-4-6901 yoke and lose minimal fluid, if you do it quickly. Place rag on cross member under pinion area of front differential to catch any fluid that escapes. Clean threaded area of pinion shaft and lube oil seal surface of new yoke. Install new yoke.
Step Sixteen: Install new locknut on pinion shaft or apply lock-tite if re-using old nut (your decision). Use 1 1/8” socket to carefully tighten locknut. Get all play out of yoke to shaft connection but be very careful not to over torque or you could compress the crush sleeve and change the original pinion setting **USE CAUTION AND CARE**
Step Seventeen: Compress new drive shaft enough to install it in the new yokes. Place front u-joint into new yoke on the differential side and install U-bolts. Tighten evenly.
Step Eighteen: Place rear U-joint into the new yoke on the transfer case side, install bolts and tighten evenly.
Step Nineteen: If you had to drain differential, re-fill it with 75W-140 synthetic gear lube.
Step Twenty: Check for leaks, Test drive at a slow speed, check for leaks, then test drive at highway speeds to check for any problems.
Part # Description Vendor Cost
35D131 Spicer Yoke (2-4-6901-1X) Tom Woods $55
50619 Spicer Oil Seal Six States $9.50
710046 National Oil Seal Six States $9.60
26ZCV131 Spicer Yoke (2-4-4341) Tom Woods $60
A2XC-131-131 Drive Shaft Tom Woods $299
Total $433.10
You will also have to pay shipping"