It is currently Wed Apr 24, 2024 7:31 pm

All times are UTC - 5 hours [ DST ]


Post new topic Reply to topic  [ 11 posts ] 
Author Message
 Post subject: essay no. 2....belly up skid....many more pictures
PostPosted: Wed Oct 15, 2008 7:45 pm 
Offline
Lifetime Member
Lifetime Member
User avatar

Joined: Thu Jul 07, 2005 12:26 pm
Posts: 174
Location: altamonte springs, fla. (orlando)
Okay, here's some more of my TJ story. A summary of the first chapter....I bought a stock '98 jeep TJ sport and drove it that way for 18 months while I read about the popular ways to modify it. During that time I gradually collected parts and stacked them in my garage. Included in those parts were a rear dana 44 TJ axle, and a front high pinion dana 30 axle from a XJ cherokee. I cleaned them up some so I could swap them into my jeep. I then took a week long vacation and spent it in my garage.

The point of this essay is how I installed a replacement belly skid. I ended up having to change several other aspects of the stock jeep to make the new skid work out. There's several paragraphs to start with here and it's pretty obvious stuff for most readers. But I didn't know much about any of this a couple years ago. I was hoping I could combine some of the common modifications into a "lesson" for fellas like me who are new to all this. I advise anyone who reads this to confirm my comments through your own efforts. I sometimes hardly know what I'm talking about....but the pictures are nice.

---------------------------------------------------------------------------------

The most common questions I see asked on the forums are about tires. How big a tire can be installed on a jeep? What kind? Big tires is a fundamental element, the hydrogen of the jeep universe. Most everything else revolves around tire sizes. Springs, gears, bumpers, brakes. Personally, I think you need to make a tire size choice before you spend much time on any other pages in the catalogs. So I looked at other jeeps in the local club to get some ideas. After I decided what size tire I prefered, then I started adding up the direct and incidental expenses to make them fit and function well. The bigger the tire size, the more issues you have to address.

I'm not qualified to advise others. I'm going to put 33" BFGoodrich mud tires on my jeep. Plain vanilla for many of you, but a good product and a sensible choice for a beginner in a florida jeep. This size isn't extreme by most standards and there are several affordable ways to make them fit on a jeep. You have to make room for them inside the wheel wells, especially when turning and when flexing the suspension. I picked a method that costs a little more but seems popular.

Once I made that decision, I was able to start purchasing some parts....


---------------------------------------------------------


One thing you'll notice on stock jeeps is the factory center skid and how it hangs down from the frame rails. When I first started talking to guys about getting a TJ, I liked the look of the minimal profile center skids used on long arm suspension kits. Those skids appeared much more functional than what I saw on stock suspension set-ups. As I learned more, I realized that a short arm suspension kit would be more suitable for what I wanted, but that I could still have an improved clearance center skid. And I could still have some of that "sleek" look that originally appealed to me.

This is the Teraflex brand "belly-up" skid. It replaces the factory center skid that supports the transmission and transfer case. Notice all the holes punched in it....especially along the two frame edges. At the end of all this, I'll mention them again. This piece of plate steel cost me several dollars....
Image

What I mean by "costs" is that in order to install it as recommended, I needed to purchase several other popular jeep modification products. This skid was one of the first things I purchased when I was just beginning to figure this hobby out. I occasionally read some complaints about Teraflex products but I don't know enough about them to add to that. I know now that there are other interesting "belly-up" designs/brands I could have considered.

The "belly-up" style center skid is designed with less pan depth than the factory skid, so you get a desirable few more inches of trail clearance. The transmission/transfer case sits on top of the skid. The almost flush mount to the frame necessarily raises the transmission higher into the frame/body tub cavity. While that effect is useful, it requires attending to several other consequential things. I want to put this belly-up skid on my jeep, so it was recommended I install a body lift kit, some motor mounts, a slip-yoke eliminator, and a transfer case shift bracket. All of these parts compliment each other in the following way.....

The new skid moves the bulk of the transmission/case up into a limited space under the body tub. My exhaust catalytic converter is supported at the transmission mount, so its also forced to move up. And, the transfer case shift linkage attached to the tub and to the transfer case is affected. A solution for these issues is to raise the body tub higher on the frame rails with a body lift kit so that additional room is created. And there are a couple options for insuring the shift linkage operates correctly.

A body lift creates a few small problems of its own depending on how much lift you install. The radiator and fan shroud moves out of position relative to the engine fan. The gas tank fill hose, the air condition lines, some brake lines may reach their limits of movement. A body lift kit can provide several inches of lift if you want it. Many fellas install them as an inexpensive way to clear more room in the wheel wells for larger tires. Other fellas have a strong dislike for them for safety reasons and simple aesthetics. A middle ground opinion is that a 1 inch body lift is useful and sensible.

The front of the jeep drivetrain is my 6 cylinder motor, with the transmission behind it. There are three mounting points for the whole thing. Two forward motor mounts, one on each side of the engine block, and the transmission mount in the center of the belly skid. You can install slightly raised motor mounts to lift the front of the drivetrain. This puts the fan back into the center of the radiator shroud, and it provides a slightly improved trail clearance for the oil pan.

Another issue affected by the belly-up skid is the stock rear driveshaft. It's attached to the transfer case with a splined sleeve on splined shaft. They call this a slip-yoke. Because the splined shaft is relatively long in comparison to the total length of the driveshaft, the rear driveline geometry is sensitive to any change from the factory design. Raising the transmission/case changes the angle that the slip-yoke operates at. By slightly raising the two forward motor mounts, the rear splined shaft tilts slightly down. This helps return the rear driveshaft to a better geometry.

If you are also planning to install a suspension lift kit (I was), the splined slip-yoke may have to be removed. An additional expense but important product is a fixed yoke at the rear of the transfer case to attach to a modified rear driveshaft. This slip-yoke eliminator will further correct any driveshaft problems caused by the raised center skid and suspension lift.


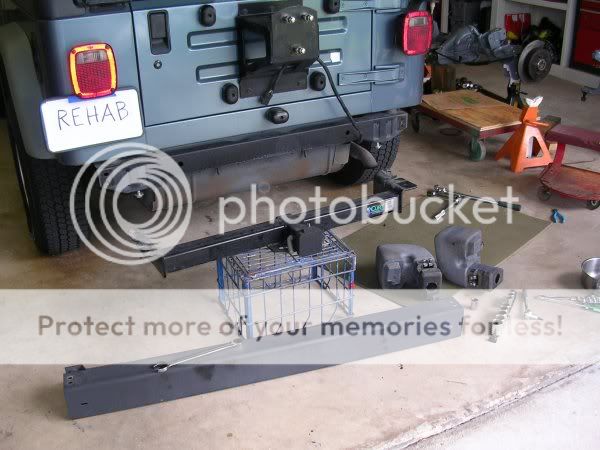
I pulled my rear hitch and bumper because of some other things I'm gonna be doing. But the 1" body lift kit is first.
Image

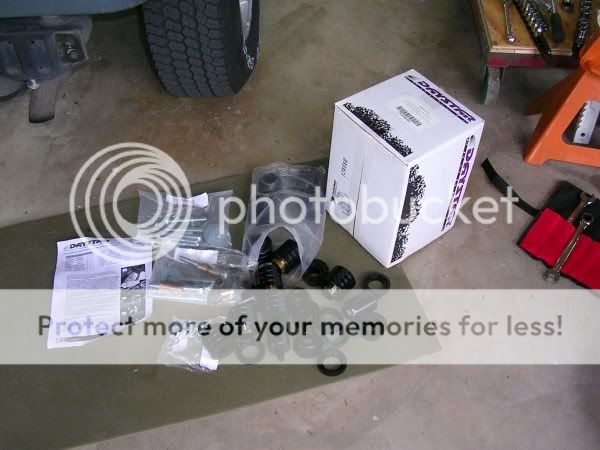
There are a few different body lift kit designs. This one replaces all of the factory mounts. You reuse a factory sleeve at each location to index the top of the new rubber. Daystar is a reputable company and the kit was suggested by someone I trust, so I really can't criticize it. Now that I know a little more, I might consider a kit that uses the factory set-up with additional spacers. The bolts and spacers and fender washers in this kit don't seem as solid as the factory mounts that came off. I saved all my old mounts in case I learn later that I want to try a different design.
Image

Image

Its pretty easy to install the body lift kit. Loosen all the mounts, remove some fan shroud bolts and the air intake tube, disconnect the transfer case shift linkage, unbolt the body mounts on one side completely, lift that side of the jeep with a jack, replace the mounts. Don't remove the bolts from the side you're not working on. That will keep the tub positioned correctly on the frame.
Image

Image

The front uses two rubber bumpers to support the radiator area. They have a nipple that pushes up into the front grill. I struggled with these. I tried stacking a couple bushing drivers under the rubber and lowering the body down to force the nipple to pop into place. That didn't work. Finally, I removed the headlights and reached my hand into the space and pulled the nipples through from above.
Image

This is the front center. When I lowered the tub back down on all the new mounts, this position did not contact the new mount. When I tightend the bolt, it just caved the thin fender washer. I ended up stacking some washers on top to fill the space. I later made a better spacer out of bar stock.
Image

The body lift project was step one and not too difficult. I sprayed bolts and nuts with PB blaster penetrating oil, but I didn't need it. My used jeep had no rust issues. I had a whole week of vacation ahead of me and thought I'd have plenty of time for other planned projects like the body lift. It turns out I'm pretty much the slowest mechanic I know. Good thing I get paid by the hour. You can see a little of the factory center skid at the bottom of this picture
Image

I should have disconnected the fuel fill hose. If the instruction sheet advised it, then I failed to read that step. The position of the two rear mounts above the fender wells is tight and I needed room to get the old rubber mounts out. I jacked the tub up too high and cracked the plastic fuel bezel. I stuck it back together with some epoxy but it cracked again when I tightened up the fuel fill hose. The bezel isn't expensive, but I'm looking locally for a used one before I purchase new. A lot of guys swap it out for a more expensive style.
Image

see the following post for more....motor mounts are next.

_________________
steve

'98 TJ sport gunmetal blue
33's with modifications to make them fit....still need a few more things....

first jeep....
'04 liberty sport 4x4 khaki
modified as recommended by L.O.S.T.....major fun on vacation....

L.O.S.T. (in fla.) #000496


Last edited by camper on Fri Jan 02, 2009 11:32 am, edited 1 time in total.

Top
 Profile  
 
 Post subject: ....motor mounts
PostPosted: Wed Oct 15, 2008 7:49 pm 
Offline
Lifetime Member
Lifetime Member
User avatar

Joined: Thu Jul 07, 2005 12:26 pm
Posts: 174
Location: altamonte springs, fla. (orlando)
okay, so I have the body lift in and now I want to replace the factory motor mounts. I used the "M.O.R.E." brand 1" motor mounts. They claim their use of torsion rubber provides more isolation from engine vibration than other aftermarket brands and is comparable to the factory mount. The Teraflex skid provides some thick bar-stock spacers that I could have placed under my factory mounts, but since those mounts were 9 years old, I didn't know how long I could expect them to last.

I also ordered a transfer case shift linkage bracket made by Advance Adapters. It mounts to the transfer case and replaces the tub mounted bracket. I picked up a replacement transmission mount, but it turned out that my factory one was fine so I ended up reusing it.

Image

Remember the drivetrain is supported at three points. The transmission mount is attached to the bottom center of the factory skid. I removed the nuts so that the transmission can shift if needed. You then have to access the bolts and nuts that secure the two motor mounts to the frame. You have to come at them from both the top and the bottom. I removed the passenger side air filter box and intake tube for convenience. I made sure I could break free any mount hardware on both sides before I raised the drivetrain. You have to adapt to limited space and a long ratchet extension is necessary. Sometimes a wrench works better than a socket.

I don't clearly remember now the sequences I took. I was on vacation, drinking beers, listening to the stereo, eating potato chips. I didn't know what day it was. I have a floor jack, a bottle jack, some 4x4s in various lengths. I supported the body of the transmission and removed the factory skid, removed the front and rear driveshaft, opened a new beer with the completion of each significant event.
Image

Image

Of course, at this point, I'm still on all four tires, but I've begun removing supports to the drivetrain. Rather that recreate how I used jacks and lumber to support everything, I should just say that it's very dangerous when working under a jacked-up vehicle and you're pulling a breaker bar or swinging a hammer. I backed up everything I did with my floor jack or stand in place with at least some load on it as a safety precaution. I have a good bottle jack that is very useful for making small changes in lift. And while I joke about the beer, I pay attention and have a respectful fear of being underneath the jeep.


This is the driver side mount. I had plenty of room to work. The through-bolt could be easily removed from either direction. This mount was easy to replace.
Image


This is the passenger side mount with the engine block bracket removed. I have air-conditioning components on this side, but even still I was able to remove the through-bolt and mount without removing the bracket. But when I installed the new mount and raised the motor to align the through-bolt, that raised the block bracket up 1 inch. A webbing in the casting (see screwdriver in picture) then interferes with the frame horn that the motor mount sits on. So I unbolted the engine block bracket so I could get a hacksaw blade on the frame horn.
Image

Image

Image

I never see anyone on the forum mention the need to do this. I don't know if they just don't notice it, or if I did something wrong. It may be that I shifted the motor when I installed the driver side mount. Anyway, after a few minutes of awkward cutting, I had plenty of room for the passenger side mount.
Image

Image

I will say, there is a "correct" sequence for which bolt or nut gets snugged down first when replacing the bracket and motor mount. If you don't get it right, you won't be able to get a socket or wrench on a nut that's still loose. I earned overtime pay on this side motor mount.
Image

next is the slip-yoke eliminator kit.....

_________________
steve

'98 TJ sport gunmetal blue
33's with modifications to make them fit....still need a few more things....

first jeep....
'04 liberty sport 4x4 khaki
modified as recommended by L.O.S.T.....major fun on vacation....

L.O.S.T. (in fla.) #000496


Last edited by camper on Fri Jan 02, 2009 11:39 am, edited 1 time in total.

Top
 Profile  
 
 Post subject: .....slip-yoke eliminator install
PostPosted: Wed Oct 15, 2008 7:50 pm 
Offline
Lifetime Member
Lifetime Member
User avatar

Joined: Thu Jul 07, 2005 12:26 pm
Posts: 174
Location: altamonte springs, fla. (orlando)
So, while I have unobstructed access underneath the jeep, I can install a "slip-yoke eliminator" kit in the transfer case. Attached to the transmission, the transfer case directs torque to the driveshaft. In normal driving, only the rear driveshaft is powered, but by pulling a lever, the front driveshaft is also engaged for 4 wheel-drive. 4WD only works when you want it so they call it "part-time" 4WD. The design is not intended for paved roads like the transfer cases in some of the classier SUVs like the grand cherokee.

I'm going to do this with the transfer case attached to the transmission. I didn't know if it would be worth taking it all out and working on the bench. It turned out to be not a problem the way I did it. While everything is still assembled, remove the front output yoke....pipe wrench and 3/4" breaker bar....I think it was a 1 1/8" socket.

(you can see in this picture the three threaded holes in the frame where the belly skid bolts up....they're actually welded inserts....on rusted jeeps, these threads can be a problem)
Image

A rear housing supports the long output shaft and positions the gear-driven speedometer sender. It will be discarded and replaced with a different housing. There's a metal cap (slinger) on the end of the tail housing that has to come off. Most instructions suggest a long jaw puller. I didn't have one that would work, so I gradually nudged it off by tapping it around the circumference with a punch. You won't reuse it, so as long as you can get it off, your good.
Image

There's some snap rings and seals to remove along the way. I made do with the snap ring and internal/external pliers I owned. I think there are better pliers. Working on the jeep wasn't always smooth sailing and I was frequently challenged. I had hoped to provide more pictures and instruction but sometimes when you're working, the time slips past. Later you think "man I wish I took a picture of that...". There are several internet write-ups for this job. All and all, this wasn't that difficult to do.
Image

The non-rubicon TJ model jeeps use a chain driven, two piece aluminum case model identified as NP231J. New Process Gear (NP) is the manufacturer (now called New Venture Gear - NV), 2 (two-speed case, high and low), 3 (strength rate, scale goes up to 7), and 1 (specifies part-time). J stands for jeep (D for dodge). It's considered a pretty good design with lots of previous history in the YJ and XJ jeeps.
Image

The rear output splined shaft is relatively long and requires a matching splined slip yoke on the driveshaft. The short output shaft in the picture is for the front yoke. Since that shaft also has to come out with the chain and gear, that's why you have to remove the front yoke in step one. You remove everything as a unit. If you have more experience, you could take the pieces out separately but you need to remember how they go back in.
Image

There are several brands of kits for changing to a conventional u-joint yoke. I suspect that some of these brands are supplied by only a few manufacturerers and just repackaged. And some of the kit designs use replacement output shafts of different lengths. I purchased my kit early on before I learned much about all this. It is a Teraflex "extreme" short-shaft kit that supposedly allows for the longest driveshaft length. If you believe what you read, Teraflex was involved early on in this kind of product and had some influence in the development of the TJ rubicon transfer case. This kit also replaces the gear-driven speedometer sender with a electronic sensor. If you match certain tire sizes with axle gear ratios, you don't need any other parts to get a good speedometer reading.

In this picture, you can compare the short length of the new output shaft. I have to swap the large gears from the old shaft to the new. This part is easy to do.
Image

It's a little more difficult to clean old rtv gasket off the machined gasket surface on the aluminum case half. The metal is soft and you don't want to ding it up. I use a green scotchbrite pad on the differential surfaces and it works pretty good for this also. You just have to take your time if you want to get it perfect. I'll use automatic transmission fluid (ATF-4) in the case. I had some leftover rtv labeled specifically for ATF that came with a transmission filter kit I had.
Image

There are some critical elements in putting it back together regarding the oil pump and pick-up tube. But my kit came with instructions and I had read several write-ups on the internet. One of the more difficult steps is placing the assembled shafts and chain back into position. You have to use both hands to support it and you're on your back under the jeep.
Image

And when you smear black rtv on the clean case half and try to position it without knocking the pieces out of place, it gets really fun....

This last picture is actually taken a while later after I had the new belly skid on. You can see the Teraflex name cast into the new tail housing. I wonder if they are a primary manufacturer and other brands repackage their product. The fixed yoke is a 1310 series, but it isn't spicer. It fit fine and I shouldn't poor mouth it but the quality of the casting doesn't compare to the factory differential pinion yokes I had recently been working with. I'll run 33" diameter tires and 4.10 gear ratio. According to a chart that comes with the kit, my speedometer should read accurate with the electronic sensor in the new tail housing.
Image

At this point, I'm committed to a different rear drive shaft because of the way it will attach at the transfer case, and because the distance between that end and my rear pinion yoke is now several inches longer than it was.

I'm getting closer to bolting up my belly skid.


more to follow....

_________________
steve

'98 TJ sport gunmetal blue
33's with modifications to make them fit....still need a few more things....

first jeep....
'04 liberty sport 4x4 khaki
modified as recommended by L.O.S.T.....major fun on vacation....

L.O.S.T. (in fla.) #000496


Last edited by camper on Fri Jan 02, 2009 11:42 am, edited 2 times in total.

Top
 Profile  
 
 Post subject: ....shift linkage bracket
PostPosted: Wed Oct 15, 2008 7:59 pm 
Offline
Lifetime Member
Lifetime Member
User avatar

Joined: Thu Jul 07, 2005 12:26 pm
Posts: 174
Location: altamonte springs, fla. (orlando)
(some of this gets confusing to read...it all works out okay though)


When I installed the slip-yoke eliminator kit, some of the shift mechanism comes out and goes back in. I didn't really know if I could accidently screw something up putting that all back together. The shift linkage for the transfer case was disconnected for the body lift project. The body lift kit included a drilled plate and some fasteners to modify the shift linkage but I didn't look at it carefully. I had this Advance Adapter bracket that I was going to use instead. I pulled everything out from under the jeep and set it aside. The adjustable set-screw on the far left is attached to the shift lever in the cab. The bracket on the far right was attached to the tub tunnel and will not be reused.
Image

I put an arrow in the picture above. The lever with the diagonal slot attaches to a sector shaft that comes out the side of the transfer case. You move that lever back and forth to move through 2hi, 4hi, neutral, and 4lo. As a test, I popped that lever loose from the linkage and slid it on the sector shaft to see if I could find four positions. The diagonal slot allows two ways to slip it onto the shaft, one correct, and the other 180 degrees off. I was laying under the jeep, reaching up into the tub tunnel and I chose the "wrong" orientation. It was only temporary to test the shift function and, without all the other linkage, it doesn't matter. I could feel the shift mechanism inside the transfer case move and find what felt like the proper positions. I then assembled the shift linkage and new bracket on the floor to understand how it worked.
Image

The instructions warn you that some of the linkage may have to be lengthened or shortened depending on your luck. So I figured it was like everything else I do and I would have to cut something. When I bolted the assembled set-up in place on the side of the transfer case, I didn't realize I put that sector lever on upside down again. The linkage wouldn't clear the adapter bracket in some of the shift positions. I was confused just long enough to take it all out and lighten the bracket.
Image

Image

This picture shows the correct assembly after I figured out my mistake. I had the sector shaft lever pointing up at first. With all the linkage connected, it won't work that way. Also, you can't see it in any of these pictures but there's an adjustable set-screw for one of the linkage shafts to set up correctly to get all the transfer case positions. That factory link for that adjustment turned out to be long enough. So I didn't really need to cut a clearance in the bracket and I didn't need to modify anything else to make this product work. You might wonder why I show my mistake, but it feels better to confess.
Image

I took these pictures a few days later....they're a little more focused....you can see the driveshaft is installed.
Image
You can also see where the new bracket was rubbing the tub tunnel. A few weeks later, I removed the bracket so I could swing a hammer. I peened the sheet metal back a little to create clearance for the bracket. It helped to get rid of some vibrations.
Image
...anyway, the shifter works great. It doesn't rattle and it works smoothly. I could install another one in a few minutes. Meanwhile, my "lightened" bracket is like a backpacker who is trying to save weight so he cuts his toothbrush handle.

I have the 5 speed ax-15 transmission. I ordered Redline transmission oil online from summit racing based on some comments I've read on the jeep forums. I can't tell any difference in how my transmission shifts. It's smooth and I don't have any complaints. There is some issue about using the correct gear oil for the "yellow" metal gears in the transmission, so you might want to search the internet about that topic. I purchased the valvoline ATF at the neighborhood auto parts store for the transfer case. I'm old....I like valvoline products.
Image

Image
All my pictures for draining the transmission came out poorly. The fill plug is high on the driver side. This was very simple to do with the center skid removed. Filling the transfer case is also very easy to do. At first I thought my transfer case was a little noisier/rawer sounding that it was before. I drove it around town for a couple months before I finally figured out the shift linkage bracket was vibrating against the tub tunnel. Once I hammered out some clearance, the vibration/roar went away.


Finally, I can bolt on the skid....

_________________
steve

'98 TJ sport gunmetal blue
33's with modifications to make them fit....still need a few more things....

first jeep....
'04 liberty sport 4x4 khaki
modified as recommended by L.O.S.T.....major fun on vacation....

L.O.S.T. (in fla.) #000496


Last edited by camper on Fri Jan 02, 2009 11:49 am, edited 3 times in total.

Top
 Profile  
 
 Post subject: the last part....transmission mount and belly-up skid
PostPosted: Wed Oct 15, 2008 8:02 pm 
Offline
Lifetime Member
Lifetime Member
User avatar

Joined: Thu Jul 07, 2005 12:26 pm
Posts: 174
Location: altamonte springs, fla. (orlando)
The factory transmission mount bolts up to a steel bracket that is bolted to the transmission. My old mount wasn't dried out or visibly damaged. It said "made in canada" so I reused it. The four studs pointing down go through the center skid. When the skid is bolted to the two frame rails, the transmission just sits on it for support. Out of the picture, I have the transmission temporarily lifted with a floor jack.

Notice the lowest point of the transfer case in the background....
Image


The factory skid uses a conical shank bolt to attach it to the frame rails. Three on each frame rail. On my '98 model, the frame threads are 1/2"-13 thread. I think they changed to metric thread on a later model year. I didn't like the look with the flat flange of the belly-up skid, so I picked up some different bolts. Six radial marks on the bolt head indicates "grade 8" hardware, good for automotive use. The skid has several holes on each side, but only three line up with the threaded holes in the frame rail.
Image


I kept the transmission supported on a floor jack while I worked on all this. This next picture shows the new skid snugged up, but the transmission is still supported by the jack. When I lowered the transmission onto the new skid and began tightening the bolts, I had some interference in a few places (see red arrows). The transmission bracket hits the skid before the transmission mount is tightened. Farther back on the pan, the transfer case rested on metal. I could drill new holes in each edge of the skid to slide it back a little. But it already has so many holes in it and I don't want to ruin the skid....and I would need to be pretty accurate to line up the new holes with the threads in the frame. Or I need a thicker transmission mount to lift everything off the top of the skid.
Image

so I made some spacers for the mount.....
Image

Image

Image

Image


Once I pulled the nuts down, I captured more thread than in this picture....enought to satisfy me. I couldn't put all the spacers under the rubber transmission mount because I wouldn't have enough thread left to bolt it to the skid plate. I will admit that I didn't know if this was going to work or not.
Image

This picture is taken from the driver-rear corner of the skid. The skid is bolted to the frame and I have a little clearance now. By raising the transmission/transfer case with spacers, I lost some of that down angle at the rear yoke that the 1" motor mounts were going to create.
Image


I took this picture several days later after I was driving the jeep again. I wanted to show that I had to use the extreme ends of the transmission mounting slots to align the skid. These slots are sloped so that the transmission sits a little higher as you move to far end of the slots. If I could have positioned the skid a little further back so that the transmission mount used the other end of these slots, it would have raised the transmission a little more off the bottom of the skid. As it is, the studs and nuts extend below the plane of the skid bottom. The frame mount holes only allowed me to bolt the skid in one position so I was stuck with this result. But by spacing the mount with the bar stock strips, I coincidentally reduced the stud theads exposure. Still, the back two nuts will take a beating if I use the skid on rocks.
Image

The Teraflex skid has more holes pre-punched in it than swiss cheese. For mounting to other model jeeps I guess. I almost wish it came with a paper template and I could drill only the holes I needed. It could be thicker plate and I wouldn't complain. And for the price, it could have been primed before they spit paint on it. Other than that, I like it.

I won't start another "reply" to show a "step back" picture of how the installed skid looks just yet. It isn't that profound anyway. I'll prepare some more pictures for the axle swaps and suspension install and you can see it in those. In case you don't remember, I finished all this stuff last year and I've been driving the jeep everyday. It's great....I love it....

thanks for looking....

_________________
steve

'98 TJ sport gunmetal blue
33's with modifications to make them fit....still need a few more things....

first jeep....
'04 liberty sport 4x4 khaki
modified as recommended by L.O.S.T.....major fun on vacation....

L.O.S.T. (in fla.) #000496


Last edited by camper on Fri Jan 02, 2009 12:01 pm, edited 2 times in total.

Top
 Profile  
 
 Post subject:
PostPosted: Wed Oct 15, 2008 8:26 pm 
Offline
LOST Addict
User avatar

Joined: Tue Sep 05, 2006 10:38 pm
Posts: 5334
Location: Biggest Little City
Good night you have informative posts! Keep it up!

What kind of paint did you use on the axles in the other post? Everything is looking great.

_________________
My Jeep Build ----> Big Black
Image


Top
 Profile  
 
 Post subject:
PostPosted: Wed Oct 15, 2008 11:23 pm 
Offline
Lifetime Member
Lifetime Member
User avatar

Joined: Sat Oct 21, 2006 11:03 pm
Posts: 765
Location: Homeless in Vegas
Wow serveral of the issues you ran into I sure didn't how much of a BL did you go with?

_________________
Jeep, its a way of life.

06 KJ Limited
10 JK Unlimited Rubicon
14 JK Unlimited Rubicon
14 KL Cherokee Trail Hawk


Top
 Profile  
 
 Post subject:
PostPosted: Thu Oct 16, 2008 11:53 am 
Offline
Lifetime Member
Lifetime Member
User avatar

Joined: Mon May 22, 2006 6:28 pm
Posts: 3880
Location: Wichita/ Pittsburg, Kansas
nice write-up as usually, especially with all the pics :D , cant wait to see you Jeep later on and see what all you have done to it

_________________
1980 Jeep CJ7 Buggy
SOA, D44/ FF14B, SBC 350, SM465, NP205, 108" WB, 37" MTs

http://www.dpgoffroad.com/
http://www.ucora.org/
http://www.christianoffroad.com/
http://jeepinbyal.com/


Top
 Profile  
 
 Post subject:
PostPosted: Thu Oct 16, 2008 5:14 pm 
Offline
LOST Member
User avatar

Joined: Sun Jul 17, 2005 8:57 pm
Posts: 402
Location: Southern, MD
If you still need the fuel filler thing I have one from when I changed mine to the best top type with a door. I will give it to you, you pay shipping and its yours if you need it.

_________________
Richey

0IIIIII0
2006 IMPACT ORANGE RUBICON
305 Mt/Rs MT Classic II's
2.5 lift
1.25 JKS BL
JKS quicker Discos


Top
 Profile  
 
 Post subject:
PostPosted: Thu Oct 16, 2008 8:28 pm 
Offline
Lifetime Member
Lifetime Member
User avatar

Joined: Thu Jul 07, 2005 12:26 pm
Posts: 174
Location: altamonte springs, fla. (orlando)
thank you fellas....kind of you to be supportive....

no sir, I no longer need a plastic fuel fill bezel. I purchased one (basic black plastic) some months back. thanks anyway.

the body lift is one inch and the gray paint was rustoleum "smoke gray" in a rattle can.

I'm going on a local jeep ride and overnight campout tomorrow, so I won't fool with the internet for a few days. The next story is the rear axle swap, with some other stuff at the same time.

_________________
steve

'98 TJ sport gunmetal blue
33's with modifications to make them fit....still need a few more things....

first jeep....
'04 liberty sport 4x4 khaki
modified as recommended by L.O.S.T.....major fun on vacation....

L.O.S.T. (in fla.) #000496


Top
 Profile  
 
 Post subject:
PostPosted: Thu Oct 16, 2008 9:16 pm 
Offline
Lifetime Member
Lifetime Member
User avatar

Joined: Mon May 22, 2006 6:28 pm
Posts: 3880
Location: Wichita/ Pittsburg, Kansas
so what else do you have planned for your Jeep?

_________________
1980 Jeep CJ7 Buggy
SOA, D44/ FF14B, SBC 350, SM465, NP205, 108" WB, 37" MTs

http://www.dpgoffroad.com/
http://www.ucora.org/
http://www.christianoffroad.com/
http://jeepinbyal.com/


Top
 Profile  
 
Display posts from previous:  Sort by  
Post new topic Reply to topic  [ 11 posts ] 

All times are UTC - 5 hours [ DST ]


Who is online

Users browsing this forum: No registered users and 19 guests


You cannot post new topics in this forum
You cannot reply to topics in this forum
You cannot edit your posts in this forum
You cannot delete your posts in this forum

Search for:
Jump to:  
Powered by phpBB © 2000, 2002, 2005, 2007 phpBB Group. Color scheme by ColorizeIt!
Logo by pixeldecals.com