It is currently Thu Apr 25, 2024 7:00 pm

All times are UTC - 5 hours [ DST ]


Post new topic Reply to topic  [ 6 posts ] 
Author Message
 Post subject: part 4 of '98 TJ story....front hp30 axle...lots of pictures
PostPosted: Fri Jan 02, 2009 1:28 pm 
Offline
Lifetime Member
Lifetime Member
User avatar

Joined: Thu Jul 07, 2005 12:26 pm
Posts: 174
Location: altamonte springs, fla. (orlando)
Okay....I've been posting a bunch of picture essays of the changes I did to my stock '98 TJ. I don't have a lot of other posts so you can easily find those essays by looking in this subforum for my user name. The last chapter I posted showed the install of the rear dana 44 axle.

my rear dana 44 swap essay


The stuff below is part 4 and will show the work on the front end....and a few other things I had purchased parts for. This one is really long, even by my standards. My thanks to anyone who will take the time to read it.

---------------------

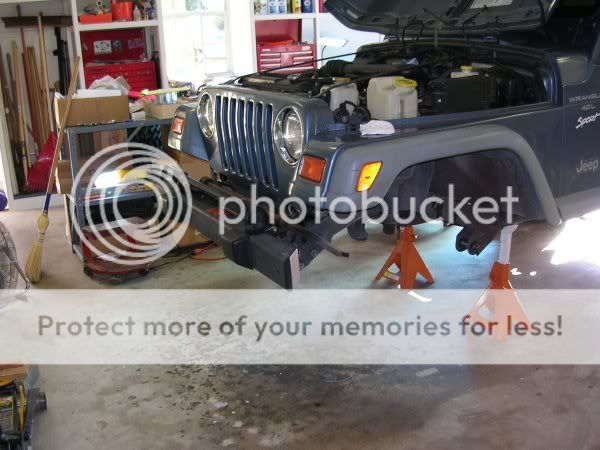
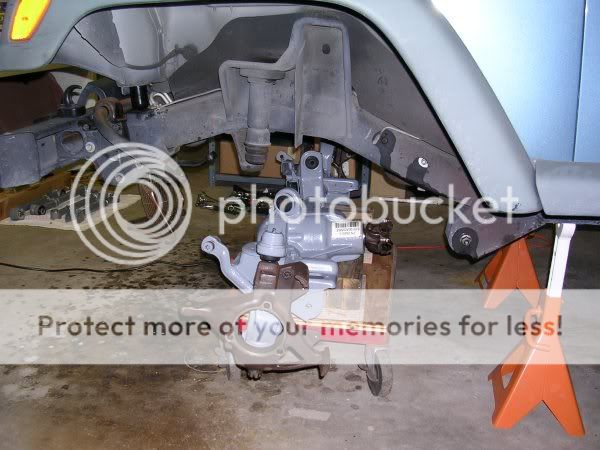
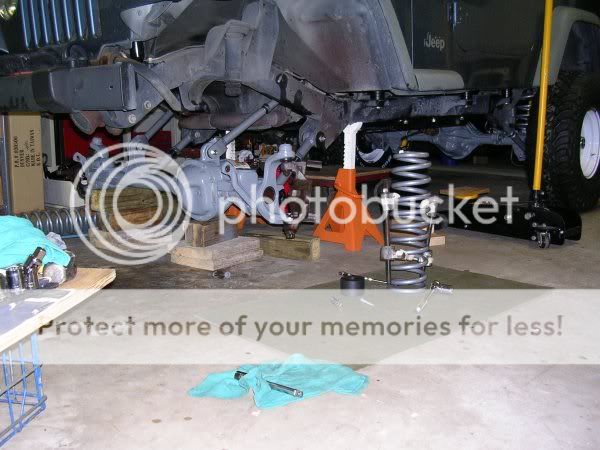
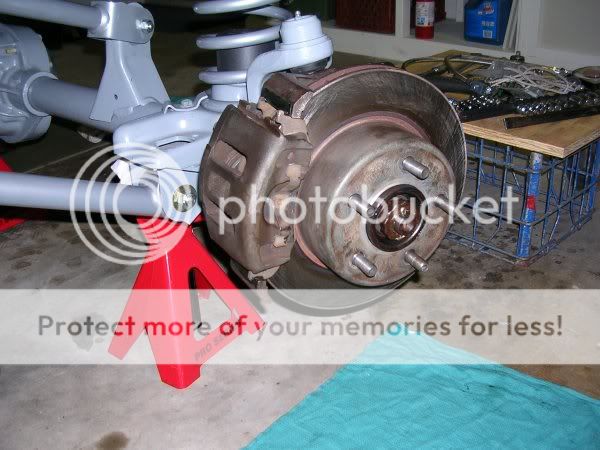
At this point in the story, I have the rear end of the jeep on the ground on the new 33 inch tires....the control arms are set roughly correct. But I haven't picked up the new rear driveshaft that I ordered at a local driveline shop. So I switched to the front of the jeep to work on that part. I put the frame on stands and pulled the tires. I have a dana high pinion 30 front axle assembly from a '99 XJ cherokee that will replace the factory front axle. There's more work in removing the front end than the rear. All the steering has to come loose. And I'm going to reuse the brakes so I'll go ahead and pull some of that stuff off while the axle is still bolted to the jeep frame.
Image

Image
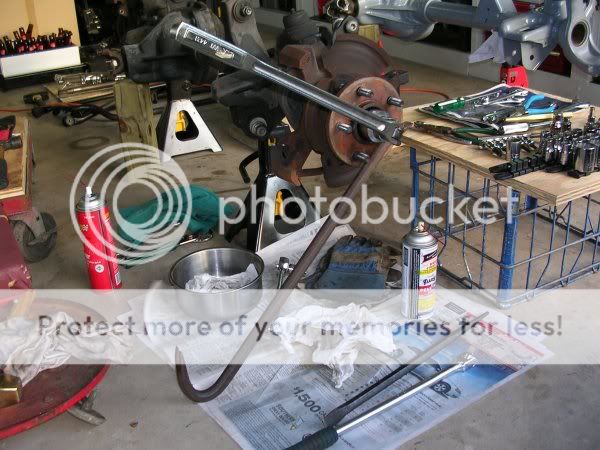
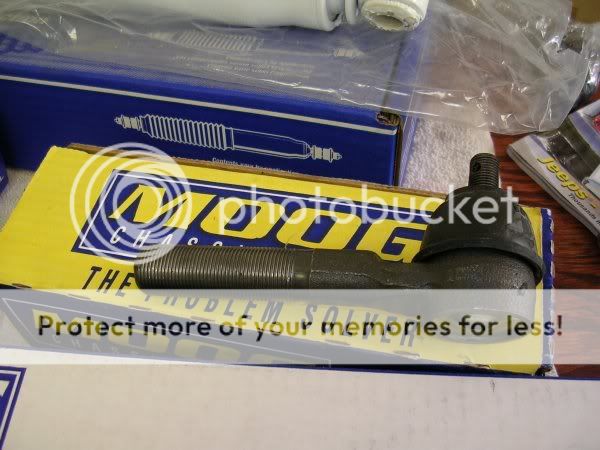
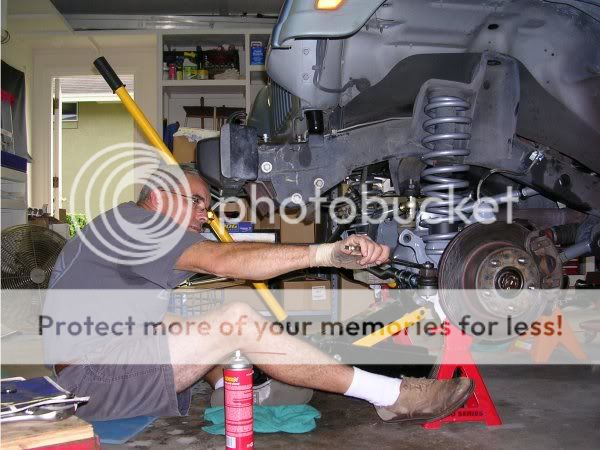
I have a couple different common styles of automotive "pullers" to use on the front steering linkage. Usually you can knock tie rod ends loose with a few hammer blows on the steering knuckle. The shockwave will pop the tapered shanks free. Just don't beat on the thread ends. But to get started, I had to use a tie rod pickle fork to detach the drag link end from the steering pitman arm. I didn't want to hit the pitman arm with a hammer and possibly damage the steering box with the shock. A pickle fork can tear the rubber boot on a otherwise good rod end and I was hoping not to ruin a useable drag link. I'll leave the factory pitman arm attached to the steering box shaft instead of using a "dropped" pitman arm. This advice is frequently discussed on the jeep forums.

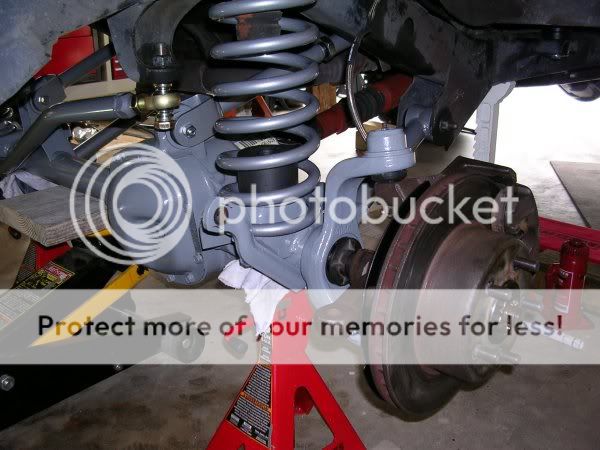
In the picture below, I've removed the rubber brake hose and let the brake fluid drain into a pan. I should have just left the brake hoses attached to the calipers until later in the project. At that time, I'll be using a longer braided hose with the suspension lift. I pulled the sway bar links, and disconnected the drag link at the pitman arm and at the steering shock/damper. I'll loosen the castle nut at the drivers tie rod end and smack the steering knuckle with a hammer to drop the rod end out. You can tell where I've sprayed penetrating oil on nuts and bolts.
Image
I'm sure I stand somewhere near the back of the class with respect to jeep experience. One of the main reasons I'm showing so many pictures is to offer something to the guys like me who are trying to learn how to fix up their jeep. I've been lurking here for a couple years looking for information. By reading the forums and "reading between the lines" I think I might be a little older than many of the fellas who post up. That doesn't mean I know much, but that I've maybe had a few more years to collect tools. I know my jeep modifications are common and easy for many of you, but I hope the pictures and preaching help somebody.

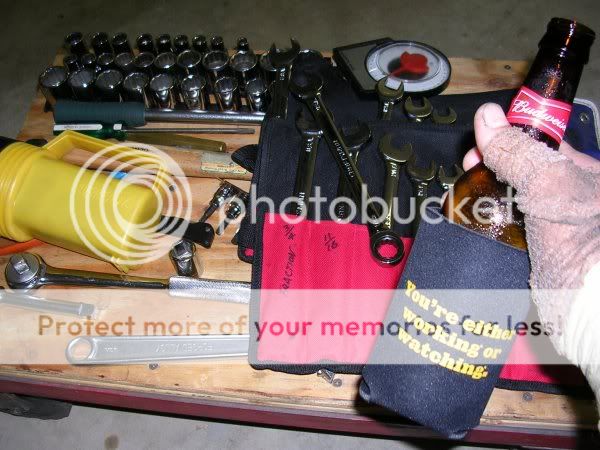
One of the common questions on the forums is what tools are needed to work on the jeep. My jeep requires both metric and fractional sized wrenches and sockets....and it'll keep you guessing the way it changes back and forth. Most starter tool boxes will have 3/8 inch drive sockets and they have their uses on smaller bolts. But a complete selection of 1/2 inch drive is really more useful for automotive work. And relatively new to the tool scene are ratchet wrenches, which I really like.

Invest in a good floor jack and bottle jack that holds pressure. You can't take a chance with safety issues. Add some assorted 4x4 lumber sections. A pair of 6 ton frame stands provide the height you'll need when you raise the suspension and run larger tires.

Air tools are useful if you're working on someone else's stuff and you're in a hurry. Otherwise they're not necessary. I'd rather break a nut loose with a breaker bar to get a feel for how tight it is. I own a couple good torque wrenches but I hardly ever use them. Unless I'm tightening bearing caps or a cylinder head, I don't worry too much about it. There's a reason a 7/16" wrench is shorter than a 1" wrench. Use the correct wrench for the fastener size and "tight enough" can be felt in your hands. You don't use a 1/2 drive ratchet to tighten a small brake caliper bolt. Gradually tighten wheel lug nuts in a star pattern using four or five cycles. Understand the limitations of threads in aluminum castings. Just my opinion. I'm not a big guy so usually "two grunts" is about right. You guys with cannons for forearms may need a torque wrench.

There's really no easy answer about needed tools. The more variety you have, the more fun it is to work on stuff. Most of my tools are sears craftsman or SK tools. A little snap-on....a little chinese. I'm not a mechanic and I don't have a mechanic's box of tools, but my dad taught me how to work on cars when I was a teenager. He taught me the value of good tools. I wish I had paid more attention. The list of stuff I don't know is long. Quality tools will last a lifetime and most mechanics understand the value of paying for something better than harbor freight. For an average guy in the suburbs, I have a pretty good collection of hand tools acquired over many years.

------------

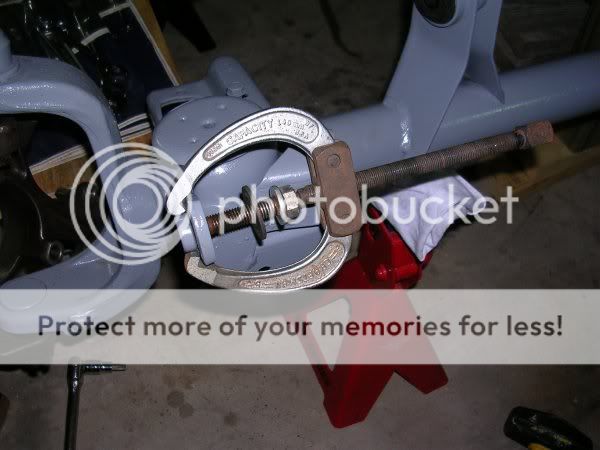
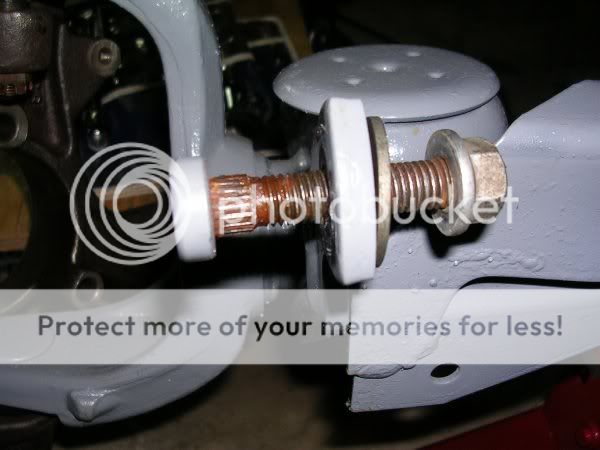
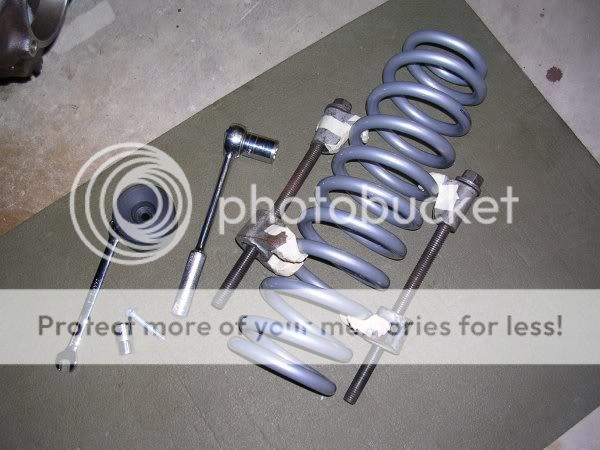
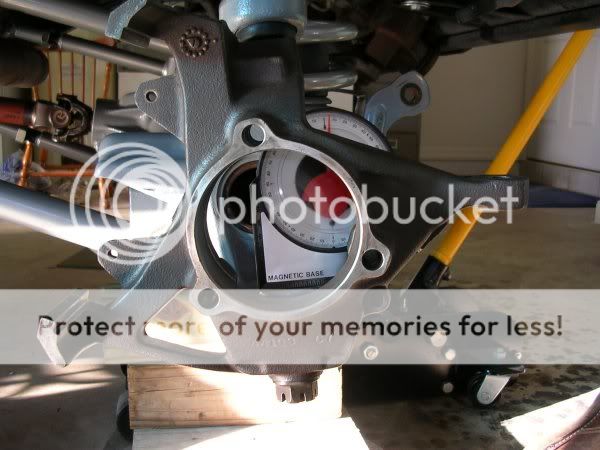
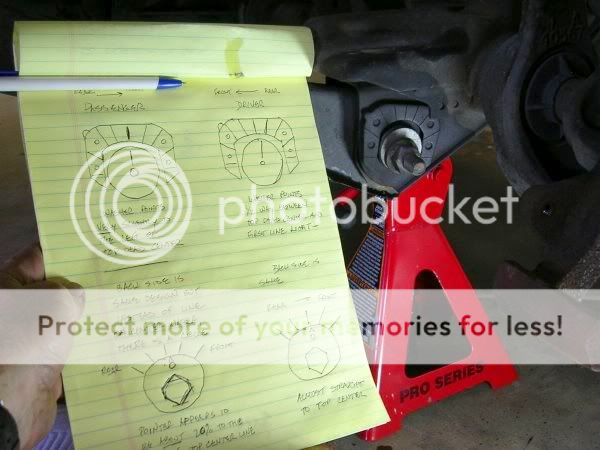
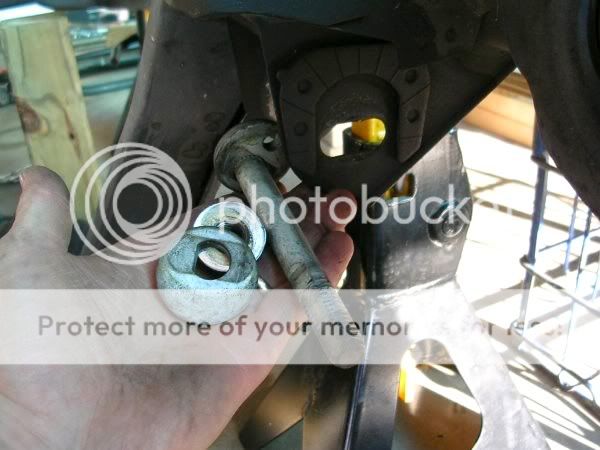
I've mentioned before that this is the first time I've done some of this work so I don't know what kind of issues may come up as I put the jeep back together. The lower control arms have special bolts and washers with eccentric holes and flats to set axle caster. By rotating the bolts and washers before tightening, you can adjust the tilt angle of the axle relative to the frame. I have some pictures of the bolts a little later in this post. The XJ axle I'll swap in is a little different in several ways....including a lack of caster adjustment markings like on the TJ. I made some notes anyway while it was still together in case I needed to know something later.
Image

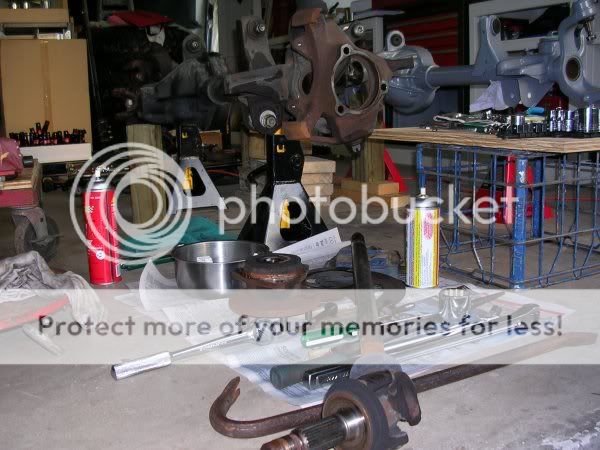
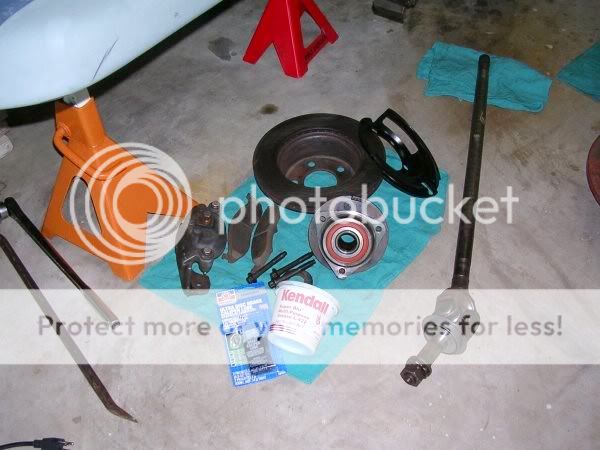
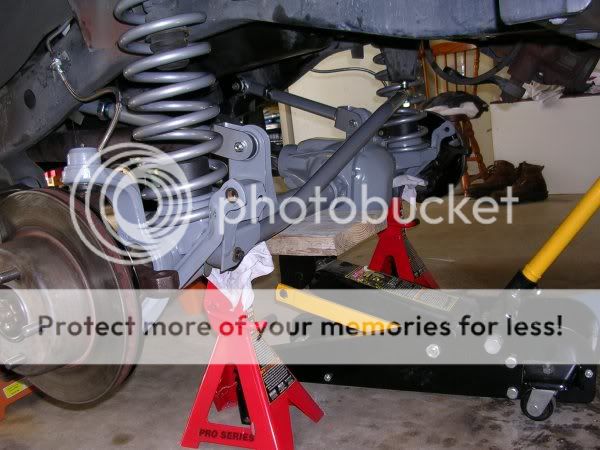
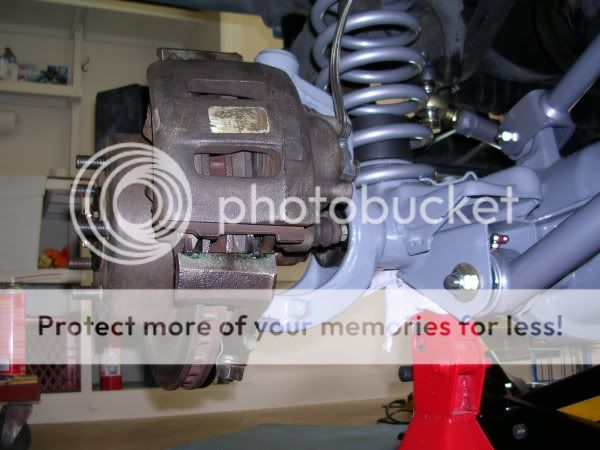
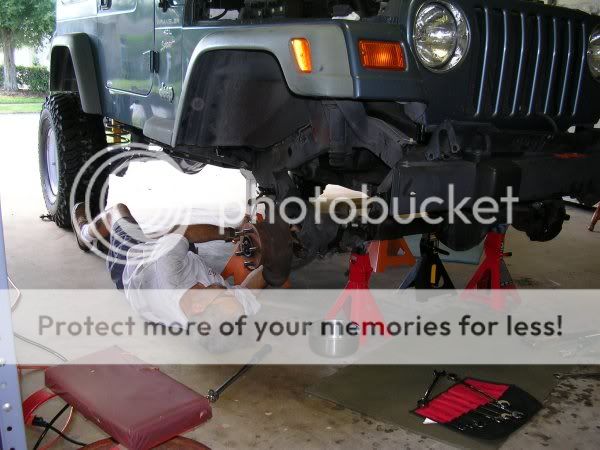
After removing all the steering linkage, I removed the disc brake calipers and then unbolted the four control arms at the frame.
Image

One of the other things I learned during this week in the garage was how to use the delayed timer on my digital camera....so I was able to "star" in some of the pictures....
Image

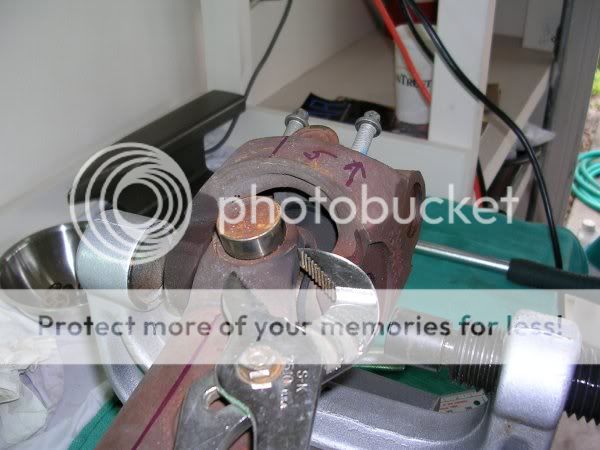
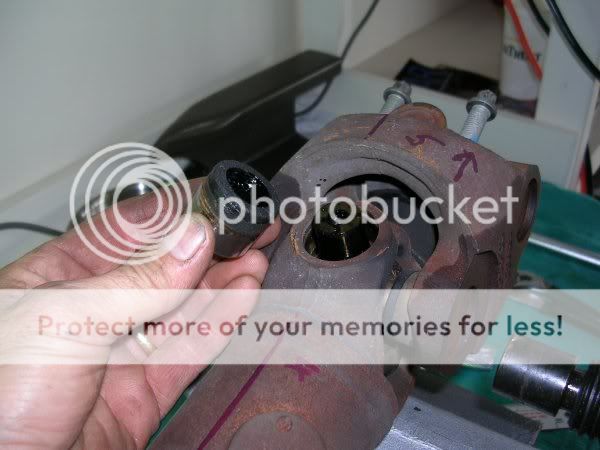
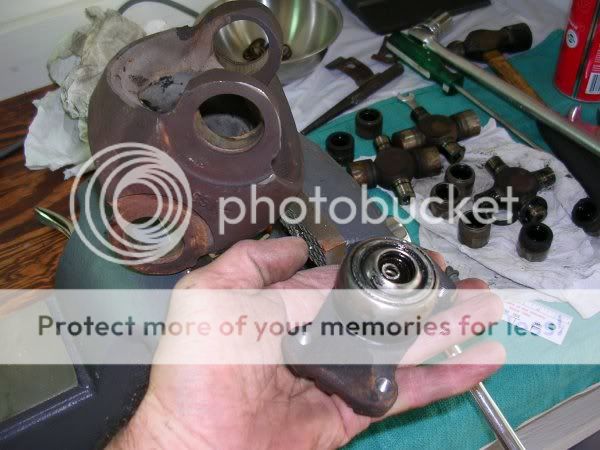
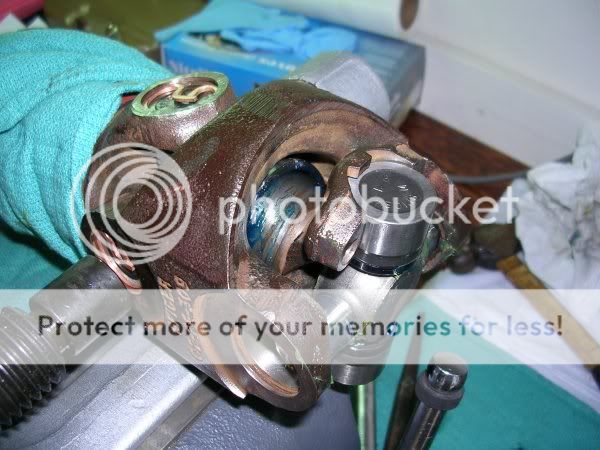
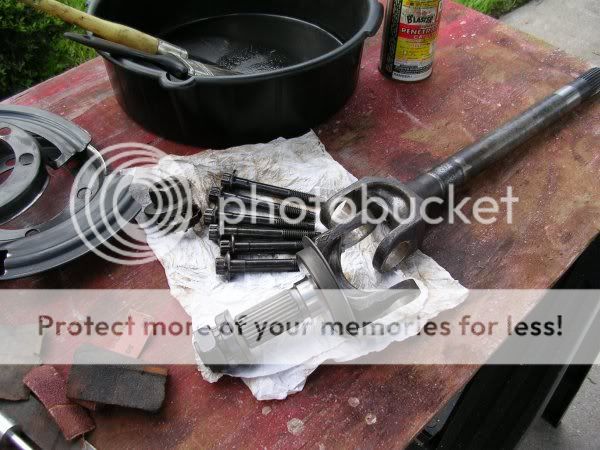
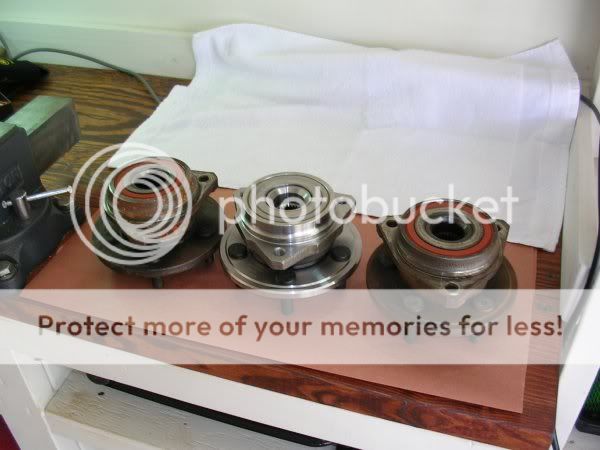
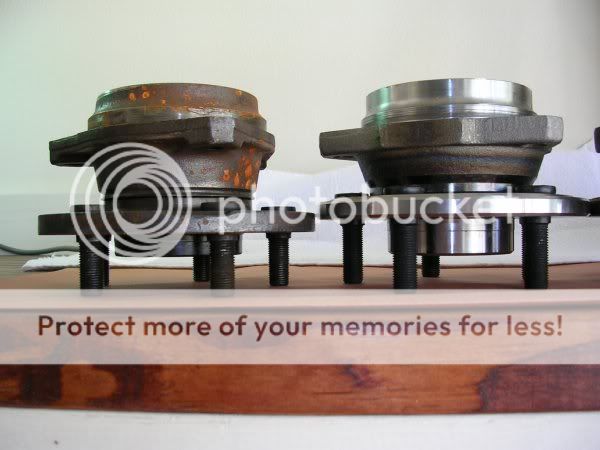
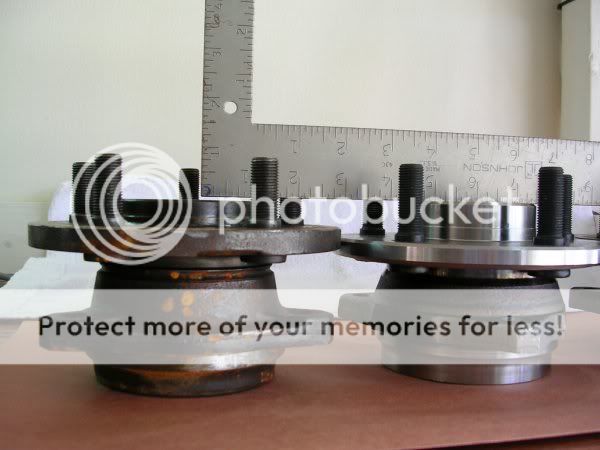
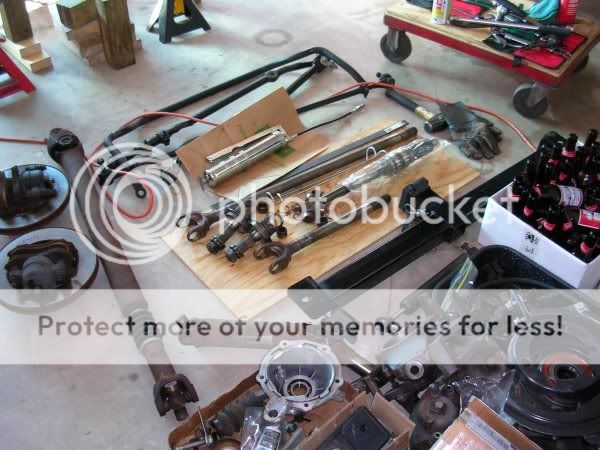
I bought a salvage yard axle and took it apart and cleaned it up some and painted it....that story is in a earlier essay in case you want to go back and read about it. It has factory 4.10 gear ratio to match the rear rubicon dana 44. Just so this post can stand alone, I'll repeat that my swap axle is a from a '99 cherokee XJ with a four cylinder motor. The XJ front axle is a high pinion dana 30. The high pinion pumpkin puts the driveshaft on top of the axle centerline. This will help with some extra trail clearance and the ring gear is supposed to be a little stronger driven from the top. I went with this swap for those reasons and also because it saved me having to pay to regear my TJ axle. Many of the components are interchangable with my TJ axle. It had full cast brake rotors which are slightly different than my TJ rotors. It is from a wrecked jeep, so there is some risk that it will work without problems. It wasn't as pretty when I bought it.
Image

If you read any of the earlier stuff I posted, I have a growing pile of parts in the garage....some useful and some to be replaced.
Image

These are the adjustment bolts for the front lower control arms to set the caster angle. By rotating the bolt head, the shank will move along the elongated hole in the frame mount. Since the control arm bushing is a round hole, the axle has to rotate when you dial the bolt head. My rubicon express suspension lift kit will have adjustable arms, so I won't need these for the reinstall.
Image

...more below....

_________________
steve

'98 TJ sport gunmetal blue
33's with modifications to make them fit....still need a few more things....

first jeep....
'04 liberty sport 4x4 khaki
modified as recommended by L.O.S.T.....major fun on vacation....

L.O.S.T. (in fla.) #000496


Top
 Profile  
 
 Post subject: ...the axle swap part....
PostPosted: Fri Jan 02, 2009 1:29 pm 
Offline
Lifetime Member
Lifetime Member
User avatar

Joined: Thu Jul 07, 2005 12:26 pm
Posts: 174
Location: altamonte springs, fla. (orlando)
When I was cleaning up the XJ axle I'm going to use, the steering knuckles were good and the axle shafts cleaned up okay. I decided the XJ brakes and hub bearings I took off weren't worth much. My TJ brakes had been working fine but I had read about the Vanco Brakes Co. kit for TJ jeeps that uses ford explorer brake rotors and calipers. Good brakes was a good idea to me so I decided that I'd direct the last of my funds towards that kit. I'm over the limit of what I can spend on the jeep for awhile so they'll be no winch or roll cage for now.

Anyway, I called Vanco and found out that it would be a few weeks before they would be able to ship their kit. So I need my brakes from the TJ for now. I told Van I'd be using new hub bearings and he suggested I purchase the bearings for late model wranglers. The bearing design is matched to the type of brake rotor used. Later model wranglers use a "full cast" brake rotor. My TJ has what they call "composite" rotors so I need my old TJ hub bearings to use with my old brakes. I have some pictures that will come up later when I put the brakes back on the jeep.

I'll also look at the condition of the TJ axle shafts and decide if I'll put new u-joints in those or in the XJ shafts for use in the swap axle.
Image

I mentioned this in another essay, but the axle shaft is retained with a single large nut against the hub bearing. It takes a 36mm socket. I have a 36mm socket but it's 1/2 inch drive. I use a 1 7/16 inch socket on a 3/4 inch drive breaker bar. It's easier to work a large nut with the bigger bar. I'll look into metric sockets for my 3/4 inch set. Since I started working on the jeep, there's a lot of tools I want to add to my box. The earlier essay has more detail and pictures about how to break this stuff down.
Image


------------

I don't have any pictures but it was about now that I drilled the front track bar mount hole at the driver's frame location. The hole is tapered and you have to convert it to a straight 5/8 inch hole for the rubicon express adjustable track bar. A 5/8" drill bit usually requires a 1/2 inch chuck drill motor. I have an older craftsman model my dad picked up somewhere. It has a ton of torque, it isn't variable speed, and the trigger sticks. I read about how easy it is to get the drill bit jammed in the tapered hole so I was careful. The dang drill motor about tore my hand off when it jammed, it twisted out of my grip and spun the power cord around like a whip.....and knocked my eyeglasses across the garage. I had to have a cold beer.

So after wrapping my hand with an ace bandage, the trick for drilling the new hole was to fire the sticky trigger and then let it go. While the bit is spinning, push it up into the hole and let the friction stop the drill. Lower the drill and fire the trigger again...let the trigger go and cut some more. My new bit was able to cut the hole in just a few repetitions of this method without further damage to my sprained thumb.
Image

When I was taking this salvage yard axle apart, I couldn't get the bolts for the sway bar links out. They have a torx head but I couldn't unthread them. I didn't know if they were "permanently" attached. I finally decided I'd wait till I pulled the TJ axle and see if there was something I could learn. The bolts in the TJ axle came out without a problem. These bolts need to come out for the disconnects I'm going to be using. Beating on them with a hammer wasn't working.....
Image

It turns out the shank of the bolt is knurled and required a puller to push them out.
Image

I have to drill a 5/16" hole in the center of each spring perch for the extended bump stops. The suspension kit comes with self-drilling screws but they're a chore. I ruined the cutting tip on the first screw but made the second one work for both holes.
Image

These are the steering knuckles that came with the axle. They're the same as the TJ knuckles. I had cleaned the rust scale up earlier and the slides for the brake pads were in good shape.
Image

These are the front control arms from the rubicon express superflex kit. I purchased the 4 1/2 inch spring kit and swapped for 3 1/2 inch springs....and paid for adjustable control arms at all eight locations. I read a lot of stuff on the internet, joined the local jeep club and asked questions, and made a parts list. I purchased quite a lot of my parts from a local independent jeep shop. I told the owner what I was looking to do with my jeep and he put together a package price that was as fair as any internet deal. This fella has built a business around his own jeep passion. He's now a new friend and he and my few dollars help support the jeep hobby in my own community. I'm not wealthy and I understand the value of a "best price" deal that so many jeepers brag about. But if you have a small jeep shop in your community, you should check them out. Support independent businesses or there won't be any. Google "Jeepers Den" in Orlando if you're interested.
Image

Image

Coil spring compressors really help when your a one-man pit crew. I didn't need to crank the springs down much to get them in position on the perch. You have to place the bump stop spacer inside the coil and attach it after the spring is in place. Spring compressors can be dangerous when using them to change coil over struts like in my KJ. When I put the spring lift kit on that vehicle, I had to really squeeze the springs. It was like working with a loaded bomb.

I should have bolted the track bar in around now, but didn't realize it.
Image

After I set the springs in place and attached the lower bump stop, I was thinking about the front driveshaft install. I didn't realize it works out better to hang the axle track bar as a first step. I made a similar mistake on the rear axle install. Later I ended up readjusting the overall length of the control arms when I installed the track bar. There was too much misalignment at the bushing end where it swings in the axle mount.

more below....

_________________
steve

'98 TJ sport gunmetal blue
33's with modifications to make them fit....still need a few more things....

first jeep....
'04 liberty sport 4x4 khaki
modified as recommended by L.O.S.T.....major fun on vacation....

L.O.S.T. (in fla.) #000496


Top
 Profile  
 
 Post subject: ...the front driveshaft part....
PostPosted: Fri Jan 02, 2009 1:31 pm 
Offline
Lifetime Member
Lifetime Member
User avatar

Joined: Thu Jul 07, 2005 12:26 pm
Posts: 174
Location: altamonte springs, fla. (orlando)
Before I can dial in the front axle location, I need the front driveshaft attached to check the pinion angle. Since I'll have a high pinion, I need to see if my TJ driveshaft is going to be too long. I'm hoping the suspension lift will compensate for the pinion yoke being a little closer to the transfer case and allow the standard driveshaft length to work.

When I went down to the local driveline shop to order a double cardan style rear drive shaft, I took the front driveshaft with me to let the guys look at it. It has a dent in the tube and I didn't know if it was something I should worry about. And I picked up some spicer 5-785X u-joints to replace the old ones.
Image

This joint is at the front axle pinion yoke where it uses a strap kit to attach it. At the other two ends, the bearing caps use external snap rings.
Image


An italian mathmetician from the 1500's named Cardano has a place in the history of what we know as a universal joint. A cardan joint is what some europeans call it. At the transfer case, the front shaft is a double cardan style....two bearing crosses (u-joints) and a center yoke and ball assembly. I didn't replace the center ball but I took it apart to learn how it works. Disassembly is a process of pushing the joint sideways in the yoke and removing the cap...then pushing the joint the other way, etc. You have to be careful when pressing it apart so you don't bind the yoke and foul up something you want to reuse.
Image

Image

Image

Image

The center ball is full of needle bearings just like the bearing caps. You don't want to dislodge them when you're taking this apart. The center ball design splits the angle of the double cardan joint evenly between the two bearing crosses to minimize vibrations.
Image


The front driveshaft uses spicer 1310 series bearing crosses. But unlike the front axle universal joints (spicer 5-760x), the retaining rings are different (external vs. internal). Some folks consider the front axle shaft universal joints to be 1310 series also, since the size specs are close. I guess that may not be technically correct. The point being that the drivetrain series identification indicates dimensions of drivetrain parts but not necessarily part numbers.
Image

While I had it apart, I painted the tube with primer....and again, these joints use external retaining rings.
Image

When the joint caps fit between locating lugs, sometimes the cap needs to be pressed to "pop" the seal and allow the dimension across the caps to fit the yoke.
Image

more below....

_________________
steve

'98 TJ sport gunmetal blue
33's with modifications to make them fit....still need a few more things....

first jeep....
'04 liberty sport 4x4 khaki
modified as recommended by L.O.S.T.....major fun on vacation....

L.O.S.T. (in fla.) #000496


Top
 Profile  
 
 Post subject: ...the front pinion angle part...
PostPosted: Fri Jan 02, 2009 1:32 pm 
Offline
Lifetime Member
Lifetime Member
User avatar

Joined: Thu Jul 07, 2005 12:26 pm
Posts: 174
Location: altamonte springs, fla. (orlando)
more pictures....

The incidental education you get when you work on stuff is useful. This double joint is flexible, but it has limits. My new rear driveshaft has a joint just like this. And the rear driveshaft is much shorter in length. I don't have a lot of trail experience yet. If I ever get my jeep high-centered where the whole rear axle drops too far, I bet the double joint in the rear shaft could easily bind when the driveshaft rotates. Taking this one apart and putting it back together provided the opportunity to consider how I could cause myself a mechanical problem if I ever get stuck like that.
Image

my blood red drive shaft with new spicer u-joints and a dent in the tube....
Image

I bolted in the front driveshaft and went back to setting up the front axle.

For checking the caster of the axle, I used the flat above the lower ball joint. An inexpensive angle finder shows about 4 1/2 to 5 degrees with the pinion pointing straight at the driveshaft. Caster is the forward/rear tilt of the axle and affects the wheel's ability to return to center after turning. I think factory specs are 7 or 8 degrees. When altering the suspension design with a taller spring, we'll have to sacrifice some caster to achieve a proper pinion angle. 4 to 5 degrees is not going to be a problem.
Image

I fooled around with measuring at the output. I also placed a socket on the u-joint bearing cap and tried to measure there. Really, you can eyeball it and tell if the pinion is in line with the driveshaft. I would trust that simple method and then measure along the flat of the axle tube.
Image

I read on the forum where guys tell you they installed their suspension kit in a few hours, etc. Many kits have at least one fixed length pair of control arms. This saves a lot of thinking because the axle location is going to be pre-set by the length of those arms. I not only had a new suspension kit, I also had swapped both front and rear axle assemblies and had adjustable control arms at all eight locations. I had never set up something like this. I had a few things to learn and no one to teach me.

I spent a lot of time messing around with the control arms....both intitially and also later when I had everything together. I don't have the axle track bar installed at this point so some of this early effort on the front was a waste of time. I could have just eyeballed the pinion alignment with the drive shaft. I didn't know it yet, but I'm going to be readjusting the control arm lengths later when I position the axle for a good track bar install.
Image

I thought I was now set correctly with this part. I started working on something else....change the CD in the stereo and get a fresh beer......


Earlier, I had cleaned up the rust scale on the axle shafts from the XJ assembly. I decided to reuse them with new u-joints and use the TJ shafts as spares.
Image

Some day I'll look into aftermarket hardened axle shafts for the front and rear. I'll be on 33 inch tires and the stock shafts will be fine for this stage of my jeep experience. There's a small controversy about the c-ring retainers used with u-joints in the stock front axles. I have more detail on spicer 5-760X u-joints in my first picture essay if you want to hunt that down.
Image

Image


I can now put the axle shafts back in, and replace the hub bearing and brakes. I sorted through my stack of parts and laid out my next task. Some of the details on how this goes together are explained in that same earlier picture essay I mentioned above.
Image

Image

This is going to take a little while. Before I get further involved with the front axle shafts and brakes, I'm going to switch back to the rear and hang the new rear double cardan driveshaft....and try to set the pinion angle in the rear.

see below for more....

_________________
steve

'98 TJ sport gunmetal blue
33's with modifications to make them fit....still need a few more things....

first jeep....
'04 liberty sport 4x4 khaki
modified as recommended by L.O.S.T.....major fun on vacation....

L.O.S.T. (in fla.) #000496


Top
 Profile  
 
 Post subject: ...the front hub bearings part...
PostPosted: Fri Jan 02, 2009 1:34 pm 
Offline
Lifetime Member
Lifetime Member
User avatar

Joined: Thu Jul 07, 2005 12:26 pm
Posts: 174
Location: altamonte springs, fla. (orlando)
I already had the rear axle all bolted up so all I had to do was attach the driveshaft and align the pinion with the tube of the shaft. A c-clamp helps to pop the joint cap seal and fit the rear pinion yoke.
Image

I didn't want to unbolt both upper arms at the same time and have the axle roll out of the springs. I don't know if it would do that but I was going to be underneath the jeep. And I needed it sitting on the springs so I could get an accurate angle measurement. So I had to be careful and unbolt one upper arm, turn the threads a small amount, and then slip the bolt back through the mount. Then do the same on the other side. Then pump the jack up a little more and repeat. With three of the four control arms connected, the axle doesn't want to rotate with the bottle jack pressure and I imagine there's a smarter way to do this. And again, I think you can eyeball the pinion just as well as by using the angle gauge.

When everything was done, I think I ended up with about 18 degrees on the tube of the drive shaft and the double joint splits about 13 degrees to the transfer case output.
Image


let's talk about the front again.......

From left to right, '98 TJ hub bearing with composite brake rotor, new bearing part no. 513158 for late model TJ with full cast rotor, and '99 XJ bearing for full cast rotor.
Image

The new bearing in the middle and the old bearing from the XJ axle are the same except for the seal surface.
Image

You can see the longer wheel studs on the newer style. I'm guessing the newer alloy wheels they started putting on the jeeps may have needed a longer stud. Or the redesigned rotor may be thicker? The brake rotor "hat" on a full cast rotor is a little shallower so the flange offset is changed.
Image

Image

Image

Image

Drilling out the tapered hole for the front axle track bar mount at the frame....on the previous day....put a hurt on my hand. Fortunately, I could still pull a wrench without pain. Pushing was no fun though....and it was no longer as easy to wash the grime off my hands from time to time.
Image

The XJ steering knuckle and axle shaft....used with the old hub bearing, brake caliper and rotor from my TJ. The composite rotor can be identified by the dissimilar metal in the center of the hat, and the soft radius transition from horizontal surface to vertical at the wheel stud edge.
Image

this has been a long string of pictures but I had a lot to do during this stage....more below...

_________________
steve

'98 TJ sport gunmetal blue
33's with modifications to make them fit....still need a few more things....

first jeep....
'04 liberty sport 4x4 khaki
modified as recommended by L.O.S.T.....major fun on vacation....

L.O.S.T. (in fla.) #000496


Top
 Profile  
 
 Post subject: ...the steering set up and the end of this part....
PostPosted: Fri Jan 02, 2009 1:35 pm 
Offline
Lifetime Member
Lifetime Member
User avatar

Joined: Thu Jul 07, 2005 12:26 pm
Posts: 174
Location: altamonte springs, fla. (orlando)
more of the brakes and front control arms....

I got the adjustable track bar in now....the frame end is a flexible joint.
Image

I bolted the track bar at the passenger axle location first. The flexible heim joint on the driver side end didn't naturally align with the hole in the driver side frame mount. I didn't like that I had to physically pull the track bar sideways. I decided to use the free movement of the track bar bushing at the axle mount as a critical factor for the axle position and reset the length of the lower arms to remove any misalignment. Once I had the adjusted control arms bolted to the frame and axle again, I could lift the heim joint straight up into the 5/8' hole on the frame mount.

I supported the axle tubes so that they were at the approximate height of a 33 inch tire. This put the weight of the jeep on the coil springs instead of the frame stands. I then revisited the pinion angle and got it as perfectly aligned with the driveshaft as I could. To change the length of an arm, you have to unbolt it and rotate the threaded end. Like I said about the rear, I was concerned about disconnecting two control arms at the same time and having the axle walk out from under the coils. So it took a while to get it where I liked it.

My final measurements turned out as 15 13/16 inch for the lower control arms and 15 5/16 inch for the upper control arms, measured center of bolt to center of bolt. I ended up maintaining about 4-5 degrees caster, but I didn't make that measurement a deal breaker.
Image

The original rubber brake line has a round banjo fitting at the caliper. The replacement braided brake line is longer but the banjo fitting is rectangular and requires bolting straight up at the caliper. The bleeder valve is kind of in the way. You can see where I smeared some grease where the brake pad ears slide.
Image
Also, on the right just above the red stand, you can see the new bolt through the flex joint in the lower control arm. The grade 8 bolts provided with the suspension kit are long enough to have a unthreaded shank extend all the way through the body of the flex joint. This means a lot of threaded end exposed outside the axle mount and nut. I cut the excess off the bolts with a hacksaw to make a neater looking install.

-----------------

Below is the driver side tie rod from a mid 90's ZJ v-8. Moog part no. DS1312 long tie rod. Compared to the stock TJ tie rod, this one is a solid bar. The rod end to connect to the drag link is integrated into the end of the bar. The separate and adjustable rod end for the driver side knuckle is the same part no. and size as the rod end at the pitman arm. It has a larger diameter adjustment thread than the stock TJ tie rod end.
Image

And part no. ES3096L for the separate rod end. The adjusting sleeve is part no. ES2079S...also the same as used on the drag link at the pitman arm.
Image

Image

The factory tie rod bar is a hollow tube....and is said to be inadequate. This one is solid bar and should be stronger. But it has a couple dog-leg bends in it. Kind of ugly looking. I reused the factory TJ drag link. The steering damper (shock) was also a moog part no. but came in a generic box and said made in mexico. It uses the correct kind of drag link mount with a tapered sleeve....and I like the clean, white look.
Image
There's a lot in the above picture. I've been collecting parts for 18 months and waiting to change my stock TJ on 28 inch tires. My vacation week in the garage included the body lift, motor mounts, slip-yoke eliminator, belly-up skid, the rear rubicon dana 44, the front high pinion 30, well regarded spring suspension kit, new mud tires.....a couple cases of cold budweiser. Please pardon my pausing to take a look.


Front tires on.....cold beer time. I set the toe-in dimension to about 1/8 inch difference between the front and back of the tire measured at 3 and 9 o'clock....pretty easy but the method seems a little inaccurate considering the small difference I'm trying to measure.
Image

This has been a long picture post....maybe a record....even I'm tired of reading it. I still have to bleed brakes, install a tire carrier and bumper, plumb the air locker pump, some other stuff. And a few weeks later I installed the Vanco big brake kit. I have pictures I want to show ya'll about that in my next chapter. Thanks for looking.

_________________
steve

'98 TJ sport gunmetal blue
33's with modifications to make them fit....still need a few more things....

first jeep....
'04 liberty sport 4x4 khaki
modified as recommended by L.O.S.T.....major fun on vacation....

L.O.S.T. (in fla.) #000496


Top
 Profile  
 
Display posts from previous:  Sort by  
Post new topic Reply to topic  [ 6 posts ] 

All times are UTC - 5 hours [ DST ]


Who is online

Users browsing this forum: No registered users and 34 guests


You cannot post new topics in this forum
You cannot reply to topics in this forum
You cannot edit your posts in this forum
You cannot delete your posts in this forum

Search for:
Jump to:  
Powered by phpBB © 2000, 2002, 2005, 2007 phpBB Group. Color scheme by ColorizeIt!
Logo by pixeldecals.com