First, if you have a pre-2009 KK go to the post by SkinInc69 called "Installed dual KJ tow hooks on the KK. Pic's inside!" at
http://www.lostjeeps.com/forum/phpBB3/viewtopic.php?f=88&t=46929. It does a great job of explaining how to install two KJ tow hooks on a KK.

This post talks about the differences in installing the passenger side tow hook for 09-10 KKs that have an additional grill piece that covers where the tow hook goes. This grill piece makes positioning and attaching the tow hook significantly more complicated and time consuming if you don't want to take the bumper off. I only bought one tow hook so I did not install one on the driver's side. I think this would be pretty similar to what I did but it is a bit harder because there are a couple of hoses that are very close to the tow hook (I'm sure this is why Jeep says you can only put in one front tow hook on KK. As many have shown, you can actually install two).
Here is the additional grill piece I am talking about. As you can see, it blocks easy access to where the tow hook is attacted.

Here are the tools I used.

Here are the parts and the instructions that don't address the extra grill piece.

You can see in the instructions how much easier the access is if you don't have the extra grill piece.

First, you cut out the passenger side piece of the grill with a knife. There are three tabs to cut (you can see them in the first picture in this post). Go slow and use a minimal amount of pressure so you don't slip and gash something (you or your KK!). It cuts pretty easily.

Next, you fish the hook up from under and behind the bumper (you can't fit it through the hole from the front). This takes a while because you have to try about 10 different ways before you finally get it through to where it needs to go. I did have to push forward a little bit on the plastic parts of the bumper cover to get the hook to slip through. When I finally got it through, I wasn't quite sure how I did it. You'll just have to try a lot of different approaches and angles until one works.

Next you slide in the clip the bolt will thread into (getting your hand in here is not easy!).

Next, you install the M bolt (see better instructions and pictures in SkinInc69's post referenced above).

Next, start the nuts with a ratchet.

Getting the bolt in takes a universal joint and a long extension (I used a 10" extension). Torque to 40 ft-lbs. +/- 5 ft-lbs.

As you tighten the nuts, go back and forth between them so the M bolt ends up going straight through when it is tight. You need to go to a long wall socket before you are done because the threads extend too far to keep a normal socket on the nut. When it got close to tight enough, I had to use a combination wrench on the front nut (I could not get my torque wrench in there even with a universal joint on it). I had to guess on the torque on this nut.

You can get the rear nut with a universal joint on the torque wrench (same torque spec as the bolt).

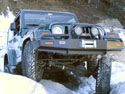
Here is what it looks like from the underside when it is done.

...and from the front.

Thanks to SkinInc69 for his great how to post. Reading that and looking at his pictures helped me a lot in figuring out how to do this.