For an update, well, this past Monday 03/21/2011 was 9 months to the day since I first took my KK into my original (1-man) street rod shop guy to start on these off-road projects. I had already stripped off the OEM bumpers and had some plans in place and had been waiting, with my winch, for some time to begin this work. I've been accused that my KK armor projects are my new kid -- and the 9 month gestation period is only adding fuel to that topic

Since my last post, we got all of the parts I'm having powder coated for my personal KK, and select parts for my beta tester, blasted down to bare, raw, so-called "white metal" as part of surface preparation for the powder coating. Meanwhile, the extra front and rear bumper I had just tacked together off raw formed and computer cut plates have been lightly primered. I had a super thin green pre-treatment primer put on them so they won't oxidize just sitting around yet I didn't want a flowable primer that would obscure the crisp edges of how the individual plates and components fit together. The light green pre-treatment primer is so thin, it allows labeling of parts to show through the primer. These bumpers will be used by my batch reproduction steel fabrication shop to create jigs off of. Since all of the parts or components are detailed in CAD and can be cut on computer-controlled equipment, and then formed or bent when applicable, jigging up the bumper will be the last item to reproduce the bumpers predictably and for the least amont of labor (thus cost) as possible. I'm anxious to see what they'll cost in batches.
The front winch bumper for my beta tester isn't going to be powder coated but rather he's planning to finish it to match his KK. Thus, I went ahead and had my (new or second) multi-person street rod shop doing my prototype fab work for me finish it out and use a flowable, smoothing, primer on it.
All of the parts to be powder coated, including my front and rear bumpers and all the accessories (including one each of each of the 3 different Grille Guard options, radiator skid plate, etc.) all got taken to the powder coating shop this past week since they'd been blasted clean. The powder coater did a little prep work on them this week and told me Friday that he should be done with them mid-week this coming week.

Like most things I do, I'm not just doing some basic, bare bones approach, but I'm going top of the line in my powder coating finish. I want my KK off-road bumpers to not only look good, but also be as well protected, including / especially on the back or insides as possible. I know from wheeling in the midwest there will be times that there will be mud or salt-laden snow caked up on the insides of the bumper and thus I'm wanting maximum corrosion resistance. I'm not gonna cheap out at the very end as I want my KK armor to look awesome as long as possible. (please don't misunderstand,
no exterior finish, including powder coating, will be impervious to scratches from rock collisions or dragging when wheeling, I'll have to be diligent about maintaining protection and touch-up on them)
Here's one of my garages at home filled with bumpers:
One the left, in gray, is the fully primered front winch bumper for my beta tester, behind it is my old OEM front bumper (that was amuzing to compare the size differences with), then in green are the two tacked together only front and rear bumpers.
While fine-tuning some templates that will facilitate installation of the front bumper, I had to check them against the tacked together only master front bumper.
Got the template to work out and be very clear. Ready to use it when installing the gray primered bumper on my beta tester's KK in April.....
I'm having every KK bumper serial numbered. Below is the serial number on the tacked together only front bumper.
Of course, the serial number for my personal bumpers is "...001". My front bumper beta tester will be getting "003". If I counted all the interim or draft fit-ups or versions, instead of mine being "001", it would be some crazy number like 18, 123, 5321 or something......at least that is how it feels. I didn't bother to keep track of all the draft versions and part fit-ups (except on my CAD drawings), other than I've got a bunch of scrap steel where some of it will be going to recycling and others will be going to a good home.
Here's the done, fully primered, front bumper for my beta tester: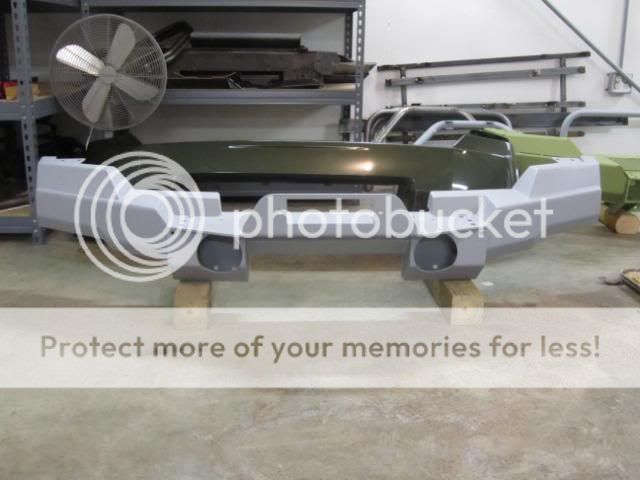
It looks really great to see a bumper finished with some paint on it (even if its just primer). Of course, there are some pieces missing from this but you get the idea.
Here's the rear, tacked together only, bumper temporarily re-installed on my KK:
A friend of mine saw the light-green tacked together bumpers on my Jeep Green KK and liked the two-tone so much, that she advised that she would want that color combination if she had a Jeep. And no, I'm not going to be designing off-road bumpers for Volvo's SUV!

My personal KK bumpers being powder coated will provide two-tone, but they won't be green. Me, I'm going for matte black, same as my heavy duty rock sliders.
With rear bumper test fit-up, identified amount of extension required to my OEM tow plug wiring:
All connections soldered then individually heat shrink wrapped before wrapping and protecting the entire extended wiring.
Threw in tow hitch I've had: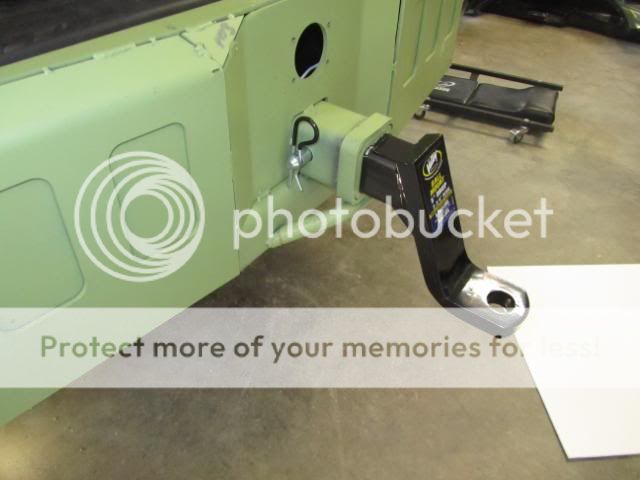
I'm gonna need a new tow hitch for a couple reasons. The tow hitch receiver on my heavy duty Basic Rear Bumper is nearly 3" higher than it was on the OEM tow hitch assembly plus within the next month (after final installation of my bumpers), I'm going to be swapping out my suspension lift from my JBA 2" to JBA's now well-proven 4" (Adjust-A-Strut) lift. Thus, I'm probably going to wind up with a dropped tow hitch like some of the large lifted pickups use to get 8-14" of drop.
The above photos are all from last weekend's work. During the week I've been working on drafting up my detailed installation instructions (from my raw notes) so they can be fine-tuned and become photo-laden as a result of the bumper installs on my and my beta tester KK. I'm a detail kinda guy, so it is taking some time, but I know the end result installation instructions will be better than anything I've ever received with any of my KK mods. My goal is that the installation instructions be very clear and helpful for the DIYer. I know how frustrating it is getting instructions that don't even match your vehicle, are outdated, confusing, unclear, missing steps, etc.
Unfortunately, I can't work on my KK projects or installation instructions this weekend as I'm working on tax preparation stuff

....back to the taxes.....


 ). Definitely at Moab and multiple times this summer