LOST JEEPS
http://www.lostjeeps.com/forum/phpBB3/

Glow Plug Inspection, Remove and Replace
http://www.lostjeeps.com/forum/phpBB3/viewtopic.php?f=98&t=70159
Page 1 of 3

Author:  Squeeto [ Fri Aug 17, 2012 1:01 pm ]
Post subject:  Glow Plug Inspection, Remove and Replace

Glow Plug Inspection, Remove and Replace

Inspection:
Good glow plugs are .5 to 1.5 ohms measured cold. The truck will throw trouble codes P1260 to P1267 when the plugs go bad. Typically the bad plug will read in the hundreds of ohms.

If you suspect a bad glow plug, measure its resistance:
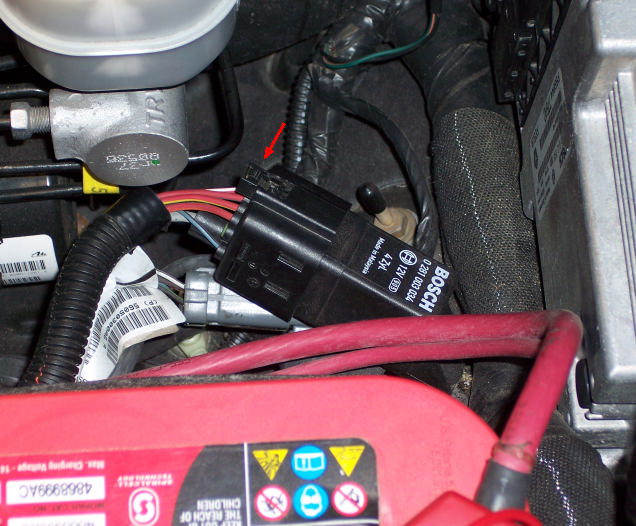
-This is the glow plug controller situated between the battery and the master cylinder.
-Push down on the tab and pull the connector apart.

Image
Image

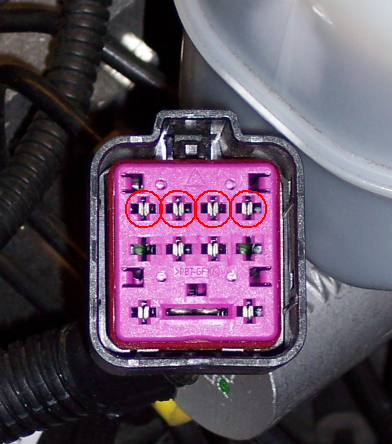
Connect one lead of the ohm meter to the negative battery terminal and measure at the indicated terminals.
Unless the wiring harness is on backwards (can happen), the glow plugs should be 4-3-2-1 (left to right).

Remove and Replace:
Warm up the truck so you have a hot engine.
Remove engine cover.
Remove the battery (10mm); you will need the room (you must, at least, remove the positive terminal to the battery).

Image
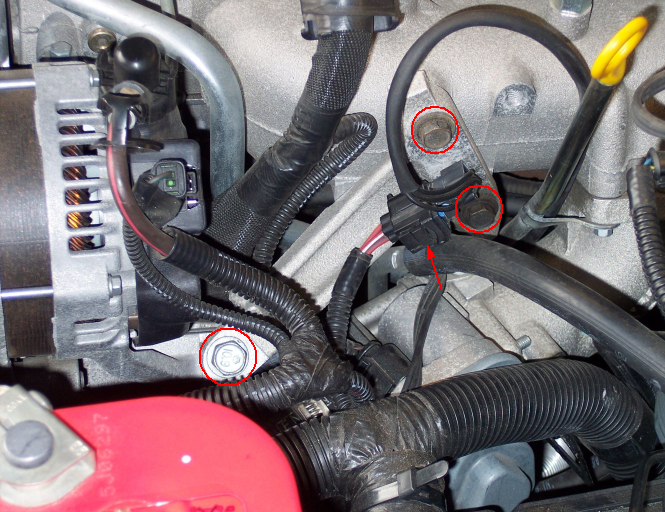
To gain access to #2 glow plug, remove the alternator rear "T" bracket (13mm and 15mm).
Squeeze the black tab (red arrow) and unplug the harness connector to the glow plugs.
Flip the bracket out of the way.

Torque:
13mm M8 ( 9.8 ) - 12 ft-lbs
15mm M10 ( 10.9 ) - 14 ft-lbs

Image
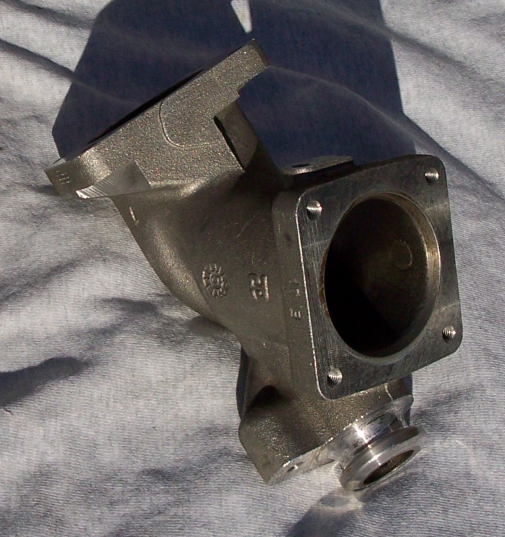
To gain access to #3 glow plug, you need to remove the intake elbow.
Remove the CAC hose (8mm).
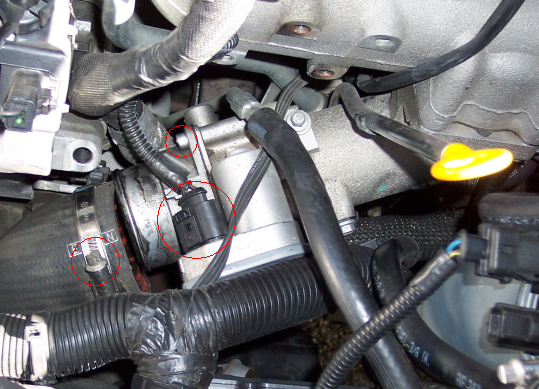
Unplug the connector to the EGR Air Flow Control valve (FCV). The release tab pulls in the same direction as you need to remove the connector.
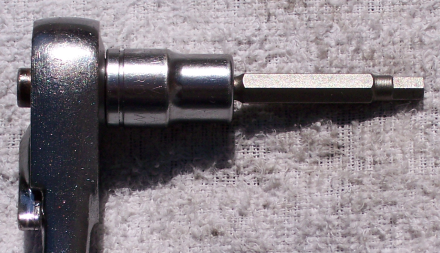
Remove 4 hex (Allen) bolts (5mm) holding the FCV to the intake elbow (see next pic).

You may need a tool like this to pop the bolts:
Image
The FCV has a o'ring seal to the elbow that may need to be replaced.
Part #05142806AA.
It seems to be a 64x3.5mm Viton (70 or 75 durometer).

Image
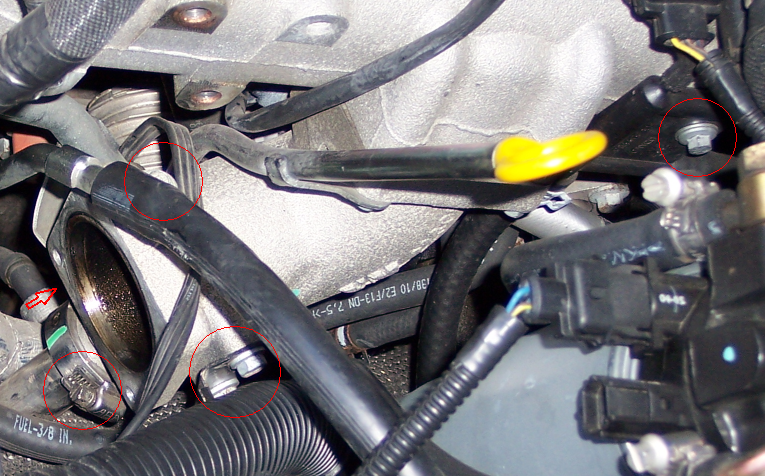
Loosen the clamp (7mm) on the EGR pipe enough to slide it off of the flange and down the pipe.
Remove the pair of 10mm bolts shown holding an electrical cable bracket.
Remove the (long) 8mm bolt at the far right.
Remove the (short) 8mm bolt hidden underneath that the arrow points to. This bolt runs parallel to the EGR pipe. And remove the (short) 8mm bolt above it.

Image
Remove the 4 (long) 8mm bolts holding the elbow to the intake manifold.
I couldn't get my fingers on the inside front bolt and had to come from underneath. I will be re-installing it the same way.

Leave a couple loose bolts in the elbow and crack the gasket with a wood dowel and hammer. It should only take one small blow.
If you are careful, you can slide the elbow back and off of the top of the EGR pipe. You then won't need to remove the 2 bolts at the bottom flange of the pipe.
Image
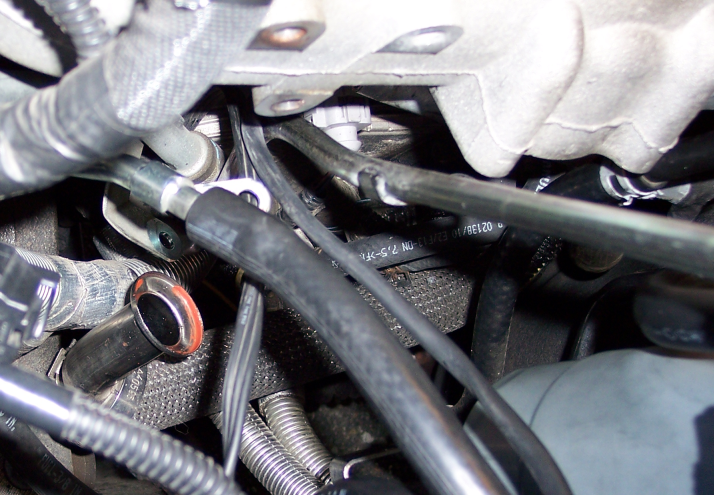
For re-install, the EGR pipe should have high temperature RTV Silicone re-applied (Permatex Red, or Orange as a 2nd choice).

Image
Clean up the elbow and intake manifold that is accessible.
The new gasket to the manifold is #05066946AA (my dealer cost, Aug. 2012, $14.45!).

The 8mm M6 (10.9) bolts should be torqued to 6 ft-lbs

Image
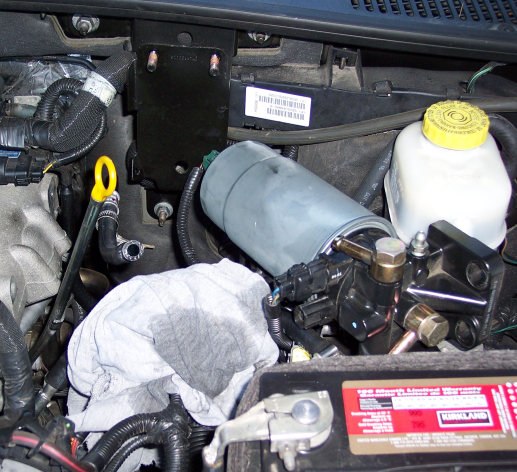
To gain access to #4 glow plug, remove the hose on the top left of the fuel filter and the two 13mm nuts holding the fuel filter to the firewall mount. Set the filter to the side.

Image
Remove the glow plug connectors. They are tucked under on the side of the engine.
This plug wire has a white band indicating that it should be on the #1 glow plug (closest to the alternator).

Image
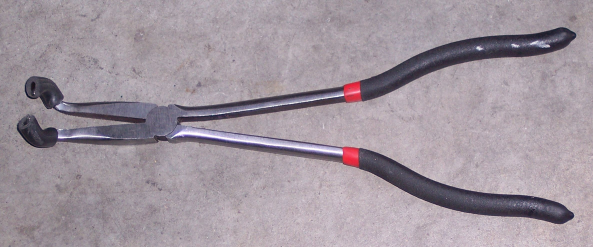
Long pliers are required to get at these. The picture shows hose pliers with vacuum hose for protection.

Image
Glow plug #1 is a straight shot so nothing has to be removed (except the battery if you like).
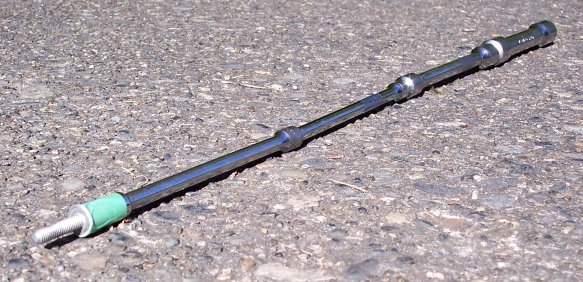
The glow plugs can be removed with a 10mm deep socket and a 6 inch wobble extension.
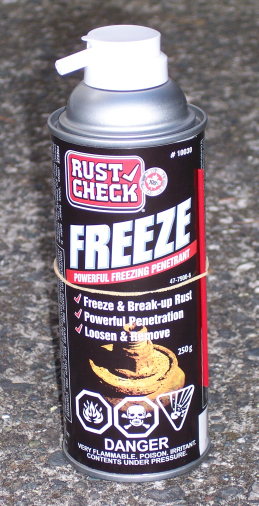
Put a rag around the plug and use a good penetrating oil/freeze spray to help when "cracking" it loose.
Heat expansion, rust and diesel goop can pretty much weld the plug in place so care must be taken in order not to break it off. Tighten then loosen the plug a few times to try to break it free.

The glow plug can be spun out with a section of 1/4" gas hose on the end of a rod or dowel. The next shows the hose on the end of a 1/4 inch extension.
Image

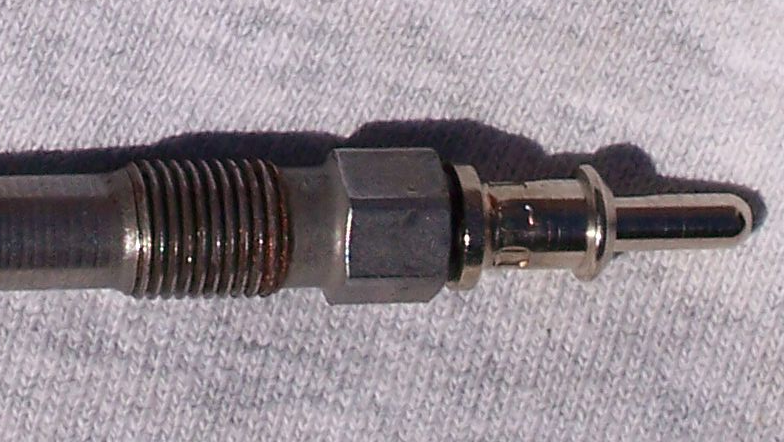
Use a little copper anti-seize on the threads to make for easier removal next time.
This is a previously anti-seized plug that had 10 months of service extending through the winter.
Image

Torque the glow plugs to 9 ft-lbs (12.5 Nm).

Reverse steps to re-install noting torque values and required rtv silicone.
Pump the air out of the fuel filter.

Author:  paulrc [ Sun Nov 18, 2012 12:43 am ]
Post subject:  Re: Glow Plug Inspection, Remove and Replace

Hi,

Thanks for the writeup. I used your procedures and was able to install glow plug 3 and remove DTC 1265. Unfortunately, I reused the same gasket for the elbow intake because the one I ordered from Chrysler did not fit and there is a vacuum leak coming from somewhere near the elbow intake. Are you sure this is the correct number - 05066946AA for the elbow intake gasket? I ordered two of
them and it is way smaller than the gasket currently on there. Also why did you put RTV gasket on the EGR pipe there was no gasket when I removed it today?
Currently my vehicle is shooting out white and black smoke when accelerating from a stop. Hopefully if I can figure out where exactly the air leak is coming from this will stop.

Thanks,

Paul

Author:  ChooChooman74 [ Sun Nov 18, 2012 12:52 am ]
Post subject:  Re: Glow Plug Inspection, Remove and Replace

Check with Idparts.com for the gaskets. That is where I ordered mine from.

Sent from my Nexus 7 using Tapatalk 2

Author:  paulrc [ Sun Nov 18, 2012 1:14 am ]
Post subject:  Re: Glow Plug Inspection, Remove and Replace

Thanks, the gasket I needed was Intake Throttle Square Gasket 5142613AA. Another fault of mine that I realized is that I did not change the o ring seal also. I'll update when I order the parts and try and fix this air leak. Although the gaskets that I had not replaced looked to be in good shape they could have been reduced enough to allow air leaks in. Reviewing my work I did not have to remove the egr pipe. All I did was remove the cac hose and the elbow intake along with the rear t bracket to gain access to glow plug 3.

Author:  Squeeto [ Sun Nov 18, 2012 1:21 am ]
Post subject:  Re: Glow Plug Inspection, Remove and Replace

paulrc wrote:
Are you sure this is the correct number - 05066946AA for the elbow intake gasket?


I got this number from the parts fiche. At $14.45 from the dealer, I just made my own.
Let me know if you find another number. edit- I see that you just posted a part #.

paulrc wrote:
Also why did you put RTV gasket on the EGR pipe there was no gasket when I removed it today?


It is a potential leak point that I prefer to seal. It is your choice though.

Author:  Squeeto [ Sun Nov 18, 2012 2:06 am ]
Post subject:  Re: Glow Plug Inspection, Remove and Replace

paulrc wrote:
Thanks, the gasket I needed was Intake Throttle Square Gasket 5142613AA.


I see which gasket you need. I didn't split this apart.

This is the gasket that I refer to in the procedure:
Image

Author:  paulrc [ Fri Nov 23, 2012 6:46 pm ]
Post subject:  Re: Glow Plug Inspection, Remove and Replace

I found my air leak. When pressing on the acceleration pedal you can hear the high squeal pitch of air leaving the intake elbow. I actually have an air leak between #4 the o ring seal and number 3 in your diagram. I am going to put an RTV gasket around the o ring seal. I purchased a brand new O ring and still it leaks. I was hoping you can tell me where you got the diagram because I can't find it on the internet. Originally I thought it was the CAC hose causing the leak but it looks good.

Author:  Squeeto [ Fri Nov 23, 2012 7:15 pm ]
Post subject:  Re: Glow Plug Inspection, Remove and Replace

paulrc wrote:
.. where you got the diagram..


viewtopic.php?f=5&t=24600

Author:  paulrc [ Tue Nov 27, 2012 1:08 am ]
Post subject:  Re: Glow Plug Inspection, Remove and Replace

Thanks this is going to be a big help.

Author:  factory53 [ Thu Jan 03, 2013 3:02 am ]
Post subject:  Re: Glow Plug Inspection, Remove and Replace

Hi sorry for the dumb question, but is accessing the number 1 glow plug not mentioned because it's fairly simple...sorry, I'll be doing this when my new GPD Etechno GX3123 plugs show up in two weeks.

Also, is there a list of things that I should do (Clean, replace, check, etc...) while I'm moving everything out of the way to get at these plugs? Just wondering if this is a good time to do a bunch of other work.

Cheers,

Author:  ns_buck [ Sat Jan 05, 2013 1:07 am ]
Post subject:  Re: Glow Plug Inspection, Remove and Replace

Just did mine today. #1 is kind of a pain in the @$$. Its behind the alternator and covered buy hoses, harnesses, tubes, etc. You will need a 10mm deep socket 1/4" drive and a 6" extension and a long pair of needle nose. You will also need some orange permatex, nickle anti-seize, and a good freezing penetrating oil. You should really replace the 2 gaskets and o-ring. Clean the intake elbow and throttle valve (careful not to damage the throttle motor with solevent while cleaning) Look for any signs of fuel or oil leaks, but really look at all the hoses tubes and harnesses. I have a lot of rubbing and chaffing with mine. As if they just slapped these things together at the factory and didn't bother with proper hose/harness routing. Found my intake to turbo duct split at the turbo. $60 from the stealership. Not to mention the #3 glow plug was cracked and was missing a lil piece from the tip! :banghead: Oh well... New Etechno's seem to work good... :D

Author:  woodtick [ Sat Jan 05, 2013 9:11 am ]
Post subject:  Re: Glow Plug Inspection, Remove and Replace

Squeeto,

I want to thank you for an awesome writeup. It is write ups like these that make this forum a great resource for all. Great job. :pepper:

Doug

Author:  Squeeto [ Tue Jan 15, 2013 12:18 am ]
Post subject:  Re: Glow Plug Inspection, Remove and Replace

factory53 wrote:
Hi sorry for the dumb question, but is accessing the number 1 glow plug not mentioned because it's fairly simple.
Cheers,


Yes it is just a straight shot with a 10mm deep socket and a wobble extension.
I will make this more clear in the write-up.

Author:  factory53 [ Fri Jan 18, 2013 1:15 am ]
Post subject:  Re: Glow Plug Inspection, Remove and Replace

Thanks to everyone on this thread...awesome information.

My Etechno's showed up today delivered to my door for $196.00 (Canadian). My dealership wanted to charge me $1048.00 for four OEM ones. Crazy...

I'll let you know how it goes...can't wait to get rid of the CEL, and get my Jeep starting properly.

Cheers!

Author:  arbby [ Sat Feb 02, 2013 5:10 pm ]
Post subject:  Re: Glow Plug Inspection, Remove and Replace

How can I tell if my glow plug is 7v or 5v steel and been flashed at the dealer?

Thanks

Author:  Squeeto [ Tue Feb 05, 2013 2:57 pm ]
Post subject:  Re: Glow Plug Inspection, Remove and Replace

arbby wrote:
How can I tell if my glow plug is 7v or 5v steel and been flashed at the dealer?

Thanks


Phone your dealer and see if the 5v glow plug TSB 08-005-11 has been done.
They love questions like this because it means business for them.

Author:  arbby [ Tue Feb 05, 2013 11:47 pm ]
Post subject:  Re: Glow Plug Inspection, Remove and Replace

Squeeto wrote:
arbby wrote:
How can I tell if my glow plug is 7v or 5v steel and been flashed at the dealer?

Thanks


Phone your dealer and see if the 5v glow plug TSB 08-005-11 has been done.
They love questions like this because it means business for them.


Easy enough! I will call tomorrow.

Thank you.

Author:  factory53 [ Wed Feb 06, 2013 3:08 pm ]
Post subject:  Re: Glow Plug Inspection, Remove and Replace

Just ordered the two gaskets and the o ring from the dealership and I'll be replacing all of the glow plugs this weekend. Can't wait!

Author:  factory53 [ Mon Feb 18, 2013 12:06 am ]
Post subject:  Done...I'm shocked at the mess in the intake (pics)

Well firstly, thanks for the write up...I followed it step by step and it worked beautifully.

Can you tell which was the bad #3 glow plug that was causing my CEL?

Image

Now here is the scary part!

When I took apart the intake elbow, this is what I found inside of it:

Image

I can't believe the amount of soot and oil in there. I also reached up in to the manifold itself and pulled out what I could and it's as bad as the elbow. I've done the elephant hose mod, but should I be pulling the manifold off and cleaning that all up or will that soot eventually dry out and blow out?

I'm glad my CEL is gone now and it starts perfectly again!

Cheers everyone.

Author:  kjjet [ Mon Feb 18, 2013 10:18 am ]
Post subject:  Re: Glow Plug Inspection, Remove and Replace

YA...Thats alot of soot. Your still running a EGR. I GDE tune will stop the build up of EGR soot. That stuff is bad for your engine.

Page 1 of 3 All times are UTC - 5 hours [ DST ]
Powered by phpBB © 2000, 2002, 2005, 2007 phpBB Group
http://www.phpbb.com/