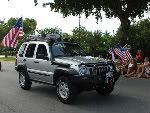
I have not seen a Westin the boards so I thought I'd share some pics of it. Just put it on yesterday, so far, so good. It's aluminum construction makes it very light-weight yet it's very strong. According to Westin, it can carry 200 lbs. Wind noise is not very bad at all.


I aslo installed the Mopar light bar on Saturday and I have some comments/suggestions. If you're going to tackle one of these, make time in your schedule. It took me 5 hours because I followed the directions. I can save you some time (maybe 30 mins -1 hr) if you stay away from some of the trapings.
The job is not as bad as many think it is and it does come with a harness and the power plugs right into the fuse box (just follow the picture).
To get the A pillars out you'll need a 7mm nut driver. A typical socket it too fat to get up into the hole. I had a spare socket and grinded it down to fit. A 7mm nut driver will do the job just fine but I didn't have one handy. You'll need a T15 and T20 to get all the rest of the screws out and the head liner will droop down. I stuffed some rags up there to space the headliner away from the roof and the drill bits that were about to come through at high speed.
The part that most people probably fear is the drilling of the holes. You have to drill one 1" and eight 25/64"

holes. You are not going to find a 25/64" bit in your typical drill index (has to be a very good one) and you're not going to find on on sale all by it's lonesome at Home Depot. You'll have to go to a real hardware store to find one or just break down and buy yourself a manly index!
Here's the part that following the directions to the letter (actually no words) can cost you. The instructions will tell you to put the bar on the roof and measure 2.75" from the front edge of the bar to the front edge of the roof. Once you do that simply mark the holes (I used a grease pencil). Having done all of that, I removed the bar and started drilling (I recommend masking tape over the area to be drilled). The front holes are supposed to be located in the middle of a double-wall support for the roof. Well, when I drilled the front holes, they were too far back causing my drill bit to hit the support underneath and skate forward. My first hole looked more like an oval because of this. Even though I was much more careful with the other front holes, I still had a problem because the support did not allow the nut zerts to fit flush. The rear holes are no problem because there is only the sheet metal. I had to use some english (and a bit of german) to get the front zerts in correctly.
Based upon my experience, I recommend placing the bar's edge 2 5/8" inches from the roof's edge. This 1/8" closer should put you hole right in between the walls of the support and save you a lot of time. The rest, quite honestly is plug and play.
I have not mounted the LED which tells you the bar is on or not. I took the instument cluster out and the LED from the factory seems to be there but I have not yet had a chance to trace the wiring. Once I figure it out, I will share the wiring with you.
[/img]

 Login
 Register
 FAQ
 Search