I hope some of the following information provided to be helpful for those contemplating a Jeep Liberty Lift. Also know, [for the newbie out there] there a million different ways to lift a Jeep. I tried to stay with a conservative approach to keep the wife happy, keep maintenance cost (future) in-check, and have something just a little bit different than your standard SUV. So... I'm sure what I'm sharing hasn't already been said but just consider this to be a refresher for those old and new to the hobby.
My goals were to have the Jeep that's, well, tweaked and not a monster truck. As I said above, conservative is the theme. After all, this is a urban assault vehicle for the wife and 5 yr. old twins girls (yeah, I know. No comments. LOL) I wanted something that looks fairly OE stock. I also wanted good parts - springs, struts, shocks, etc. There's nothing worse that getting that telephone call from the Mrs. when there's a problem with the DD. So, I don't mind spending good money for good parts. Lastly, I wanted to make sure I had the means to install the "kit" myself with minimal effort.
I bought for this project:
- OME MD springs
front - #926
rear - #947
- OME struts (f) & shocks (r)
front - #NS131
rear - #NS132 (not the #NS132L)
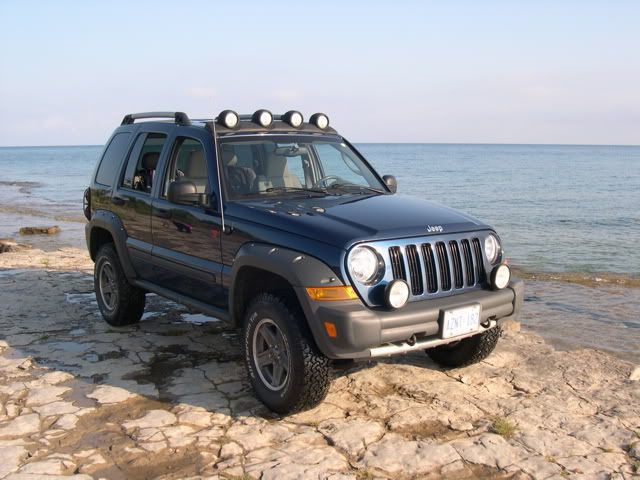
- Moab (5) wheels, Ebay knock-offs
- Tires (5) Goodyear Silent Armor, 245/75R16
- Center caps from the local Jeep dealer - the caps that came with the wheels I purchased were blank, I wanted "Jeep" in the center
After much reading and asking many questions to fill in the blanks on this forum I started by printing out an article from
www.boulderbars.com on "how to install a lift" -
http://www.boulderbars.com/images/kj_pr ... rticle.pdf - very helpful. I also started out by taking various measurements around the vehicle body and frame, I was curious to get a before and after dimension. Once this was accomplished I was ready to start. I'll add a note and say, because of my situation with the timing and such I starting the evening before to try to streamline the whole process.
-Get the Jeep up in the air (evening)
-Place on jack stands (evening)
-Remove existing wheel/tire - cracking the lug nuts loose while it was still on the ground earlier (evening)
-I disassembled the front end and had the front strut/spring assemblies laying on the ground (evening)
Done for the night.
The following morning...
- I load up the wife, the girls, and strut/spring assemblies along with the new struts & springs and head out the door in my DD
- I dropped off the girls at school
- I drop the wife at work (that's a good place for her while working on the Jeep)
- I then drop both the old and new front end parts with my brother (at "his" shop) who happens to be a ASE Certified Frame and Uni-body man with the promise I'll pick them up at lunch time and feed him at the local diner.
- With a stop at Sears on the way home I picked up my new wheel/tire combo - I had dropped the wheels off earlier in the week
- Once home again I disassembled/reassembled the rear - springs and shocks
<insert a short break here>
- And now back to take my brother out for lunch and grab the newly assembled strut/spring assemblies
- I reassembled the front suspension
- Install the wheel/tire combo - snug the the lug nuts and do a final torque once on the ground, recheck the torque periodically the next couple days
- Ready for an alignment, back to my brother's shop
<insert short break here>
- Return to home - quickly clean up garage mess, wash hands, change clothes, comb hair, and out the door
- I pick up the wife... and she's, ah, surprised. Long story, although she doesn't hate me. Got that going for me
- We pick up the girls from school... and they refer to the Jeep as a "monster truck". (Not Helping Me! Argh!) They love it though. <grin>
Done!
The pictures were taken the day after I completed the lift. Talk about good timing!


To summarize the project... I'm very happy! Woot! The girls love it, my twin 5 yr olds - got that going for me. The wife... Well, I'm wearing her down. LOL.
A person could probably do this job in 4 hours using regular hand tools and working at a steady pace if they had all the parts staged and preassembled pieces. Me, it probably took about 6 hours if you don't include all the running around I did plus, I was dealing with a some arthritis (Gout) in my ankle at the time which makes walking/standing painful. If you've got a 2nd person [and a long pry bar or jack handle] to assist along the way that will help especially when it comes to the rear springs.
Alignment. I like a level ride. One of the other things I did was to add (2) two clevis on each side as recommended by several others... That amounted to .280", as it is, the tires have a slight/minor/hardly at all/not even noticeable rub on the front inner wheel well at full lock. The pinch weld, 1" clearance. During the alignment process, in order to get a better or preferred spec alignment my brother "took the engine cradle loose and pulled it forward about 1/4", maybe 3/8"... " (the slop of a bolt and mounting hole). It didn't drive horrible before the alignment but, there was a definite toe-in issue and you could feel it when turning. In my discussion with him AFTERWARDS we talked about the upper arms available aftermarket and concluded that that would be money well spent if you were to lift any higher.
A couple other numbers I'll throw out there. The stock steel wheel and tire weighed in at 51 lb. each whereas the Moab wheel and new larger tire came in at 65 lb. each.
What did I get for my money? ......... 4" lift overall! Killer! That's going from a worn slick 215/75R16 to a new 245/75R16 and OME MD springs. I was hoping for 2 1/2" lift overall and would be most pleased with 3" but... 4"! All I can say is that I think my OE springs (67,000 miles) were dead, that's where the extra height came from. As it is things have worked out okay. The wife's parking garage at work has a maximum height of 77", I've got 75 1/2" to the luggage rails.
Costs... Well, before I get there, I had two different lift plans. Both kick ars. I went with the conservative route due to the wife's parking situation.
My first plan:
Frankenlift with all OME pieces, 235/85R16 MT, on the OE steel wheels
My second plan (as you see in the pic posted):
Moab wheel, 245/75R16 AT, and all OME pieces
In the end what I saved by not buying the Frankenlift I applied to the Moab wheel combo and the wife is able to park in garage at work out of the elements.
Costs:
Rusty's - shocks - $95 w/shipping
4x4connection - springs f&r, struts - $581 w/shipping
Moab wheels (5), Ebay knock-offs - $631 w/shipping... They charged me tax too, not happy about that.
Tires (5), 245/75R16 Goodyear Silent Armor, Sears, out the door - $827 - A lot of places will charge you extra fees if you bring in "internet" tires loose
OE Jeep center caps (5) - $50
Clevis - hardware store, qty. of 4 - $2
Front end alignment - free (brother)
Strut/spring disassemble/reassemble - $10 lunch (brother)
My labor - free
I think that covers about everything, probably more than wanted. Sorry about the lack of pictures, the dig camera broke a couple of days before the work ensued. If anyone has any questions or comments feel free to PM me also.
Clark


 2011 Ford F-150 XLT 4X4