It is currently Sun Sep 14, 2025 7:29 am

All times are UTC - 5 hours [ DST ]


Post new topic Reply to topic  [ 7 posts ] 
Author Message
 Post subject: Disassembly of Turbo
PostPosted: Tue Jun 11, 2013 11:00 pm 
Offline
LOST Member
User avatar

Joined: Thu Jan 05, 2012 8:43 pm
Posts: 324
Location: Dubuque, IA
Since I had to replace the trubo on my jeep from a oil leaking into the exhaust housing, I have wanted to take it apart and get a look inside. After it has sat on the self in the garage for a few months, I took it outside and laid some news paper down and started.

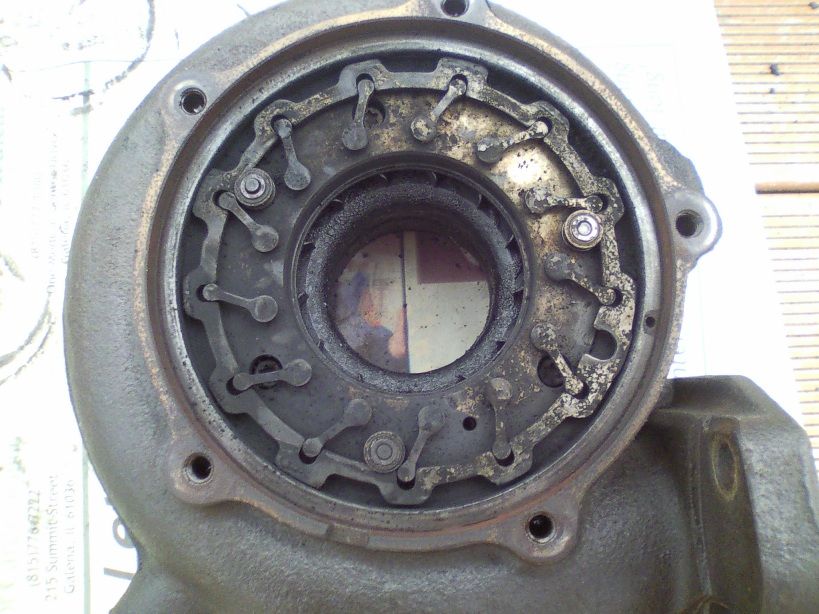
So far I have only removed the housing on the compressor side. There are no wear/grind marks between the housing and the compressor wheel.

Image

One of the blades on the compressor has paint on it. I would assume this is to identify an orientation for assembly or balancing of turbine/shaft/compressor assembly.

Image

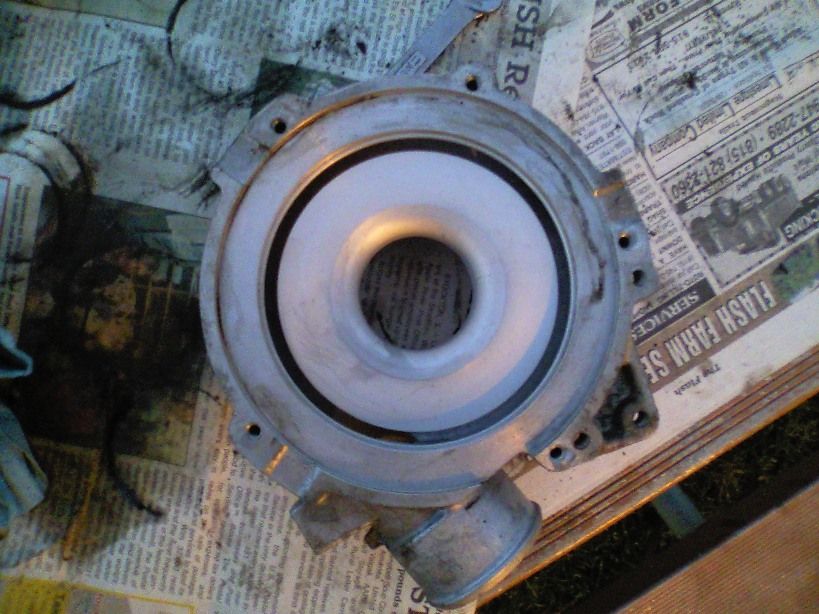
More updates to come as I disassemble the exhaust side. The exhaust housing and the center section are stuck together so I sprayed with some pb blaster where they meet and will check back tomorrow.

_________________
Phil
2005 131k 3.7 Gasser (Lifted-CRD Springs, 4.10 Gears, F+R DTT, Teraflex 2wd Low, Skidrow/Mopar Skids, Rock Lizard Super Skinks, Goodyear Wrangler Authority 31x10.5-15)
2012 Triumph Tiger (TKC 80 Front Tire Heidnau K60 Rear, Crash Bars, Skid Plate, Bark Busters, Pelican Case Top Box)


Top
 Profile  
 
 Post subject: Re: Disassembly of Turbo
PostPosted: Wed Jun 12, 2013 7:39 am 
Offline
LOST Junkie
User avatar

Joined: Sat Dec 20, 2008 7:02 pm
Posts: 607
Interesting, I was going to do this! Now I will just let you do all the work, thanks.

_________________
-05 Dark Khaki Limited CRD. GDE ECO tune. In-tank lift pump, Transgo doo doo kit, B&M trans cooler, replaced trans solenoid pack and filters, Newer Michelin tires, Timing belt with all related parts replaced at 110,000miles.


Top
 Profile  
 
 Post subject: Re: Disassembly of Turbo
PostPosted: Wed Jun 12, 2013 7:48 am 
Offline
LOST Addict

Joined: Mon Jun 14, 2010 8:49 am
Posts: 1336
Location: Greenwood SC
I was about to contact GDE for a write up on how to do this since i know Keith has done it a few times to clean turbos up with sticking vains. But if your goin to do the leg work with photos i will sit back and watch.

_________________
My CRD Build Thread
Soon to Come:more lights


Top
 Profile  
 
 Post subject: Re: Disassembly of Turbo
PostPosted: Wed Jun 12, 2013 12:19 pm 
Offline
LOST Addict
User avatar

Joined: Thu Sep 06, 2007 9:51 pm
Posts: 6302
Location: Somewhere between Heaven and Hell... But it is really hot here on Earth...
The shiny compressor wheel looks pretty good, why were you going about disassembling this unit?

The compressor wheel is a reverse-thread, you should be able to get it off by wrapping it in a rag and holding both ends with your hands.

I'd be interested to see what the thrust bearings look like on the exhaust side, there aren't any 'seals' that people expect in the center cartridge of these. Everything is just machined VERY tight, so if something isn't... That was the source of your problems.

_________________
Proud supporting vendor of LOST Jeeps
TRAVELING CRD TECH. I come to you!
Need help? Just ask! I've taken it apart more than most.
Email jeep [at] maincomputer [dot] com - BOARD MESSAGING IS BROKEN
Over 225 CRDs currently driving with my valves, timing belt, rockers, or ARP Studs.
Bad noises = REALLY bad things.


Top
 Profile  
 
 Post subject: Re: Disassembly of Turbo
PostPosted: Thu Jun 13, 2013 10:26 pm 
Offline
LOST Member
User avatar

Joined: Thu Jan 05, 2012 8:43 pm
Posts: 324
Location: Dubuque, IA
Here on the compressor, you can see where a bit was machined off. This is how the spinning assembly is balanced. Since it is balanced this way, in order to rebuild it, the compressor must be threaded on to exactly the same position where it was taken off from. This is my guess why these turbos are not rebuild-able.

Image

I was able to get the exhaust housing off today. You can see here all the little linkages that run the vanes in our variable geometry turbos. Below I have a link of the variable vanes in action.

http://s291.photobucket.com/user/pgrommes/media/IMG_0802_zps00d80dd0.mp4.html

Image

_________________
Phil
2005 131k 3.7 Gasser (Lifted-CRD Springs, 4.10 Gears, F+R DTT, Teraflex 2wd Low, Skidrow/Mopar Skids, Rock Lizard Super Skinks, Goodyear Wrangler Authority 31x10.5-15)
2012 Triumph Tiger (TKC 80 Front Tire Heidnau K60 Rear, Crash Bars, Skid Plate, Bark Busters, Pelican Case Top Box)


Top
 Profile  
 
 Post subject: Re: Disassembly of Turbo
PostPosted: Fri Jun 14, 2013 11:48 am 
Offline
LOST Newbie

Joined: Fri Mar 29, 2013 6:43 pm
Posts: 6
They just know you will have to buy a complete turbo and not have a choice. :evil:


Top
 Profile  
 
 Post subject: Re: Disassembly of Turbo
PostPosted: Sun Jun 16, 2013 12:06 am 
Offline
LOST Addict
User avatar

Joined: Thu Jul 23, 2009 5:47 pm
Posts: 1817
Location: York,PA
very cool thanks for posting the video. I have always been curious how the vanes were actuated.

_________________
2006 Liberty CRD Limited Deep Beryl Green Metallic Clear coat, Fumoto valve, MH ProVent (removed), GDE Eco tune,
OME 790/948 springs, OME struts, OME N132L shocks, Jeepin by Al A-arms, Hercules Terra Trac AT2 245/75R16
Weeks Stage 1 EGR delete, 5 volt steel glow plugs


Top
 Profile  
 
Display posts from previous:  Sort by  
Post new topic Reply to topic  [ 7 posts ] 

All times are UTC - 5 hours [ DST ]


Who is online

Users browsing this forum: No registered users and 25 guests


You cannot post new topics in this forum
You cannot reply to topics in this forum
You cannot edit your posts in this forum
You cannot delete your posts in this forum

Search for:
Jump to:  
Powered by phpBB © 2000, 2002, 2005, 2007 phpBB Group. Color scheme by ColorizeIt!
Logo by pixeldecals.com