OK, thought you guys would love my wonderful post.

OK, here's the scoop. Troy and I put this kit on like we were just any old joes to get an idea what is involved in installing this kit for the customer not as a fab/install shop. I am working with Marlin to make this kit as painful to install as possible so I have some things to discuss with him to improve the kit.
First thing, we tore the front end apart, Troy pulled out the CV's and completely disassembled them so we could cut them down. This is a very messy job. Troy and I discussed some of the issues that could possibly arise from cutting the shafts, the main being the retainer ring grooves would be gone and fitting the CV boots back on and clamping them back down would be a bit more difficult as the machined surface the boot fits to would be reduced. But, as this install is to follow the instructions and work out the bugs and pass on information for improvement, we went in search of how best to cut the shaft. We needed to cut 3/8" off. The instructions list several methods, one being cutting with a cut off wheel on the grinder. This probably would work just fine for cutting off the material, but cutting a round surface like this isn't the easiest and keeping a straight cut. I'm pretty good with a grinder, but wan't real comfortable doing it with a grinder as I'm sure the average joe installer would really be uncomfortable doing it, and if joe installer has little experience using a cutoff on a grinder, could be potentially unsafe. So, I took the shafts to a friend of mine to use his bandsaw. Found out the whole shaft is hardened steel. His big industrial bandsaw barely polished the surface without making a single scratch and was wearing teeth out on the saw. So, next up, I had him research machining them down while Troy and I went back to work on assembling the coilovers and installing the brakelines.
We started on the brakelines, and ran into a cross threading issue so that part of the line was no good, so we skipped doing the front brakelines. Troy and I think there is a possibility of a bad batch as we have heard some other issues real recently exactly like ours. Bad batches happen, just the way it is sometimes unfortunately with sourcing out parts. Troy has an exact set of that he picked up some time ago and they installed just fine, so it seems to be a batch issue.
OK, so only thing left to do in the front while waiting on CV shafts was to assemble the coilovers/strut assemblies. This was a pretty easy task, except for one thing. The long 450lb spring rate coils where just too much for average joe installer strut compressors, and these compressors aren't the cheapos either. Just wasn't enough compression to install without being a safety hazard. So, after working all day and getting no very far, we called it a day, and it was a long one. Saturday, I took the struts in for assembly at PepBoys. Didn't take long once they actually started and only cost $20 each. Went to my buddies shop to find out the scoop on the CV's. He went to six machine shops, and only one could do it, and it would take all day and atleast $300 plus the cost of bits ($$$$). So, since this is just the 4" kit, Troy reassembled the shafts and we got back to work. I talked to Marlin about the shaft thing, and it seems to be the biggest concern for most interested in his kits. I have pretty easy access to a lot of tools and shops in the area, and if it was this difficult for me to get the shafts done, then yes, I would say it would be a big concern for the customer. I told Marlin it would be a better idea to provide the shafts already machined in his shop and do a core charge type of thing. Yes, it will probably raise the price, but believe me, it will be worth it over the time, money and hassle average joe installer will run into.
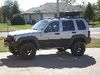
So, getting the front back together wasn't a big deal once we had everything back to install. Only thing I can really think of that will be suggested to Marlin is to use 400lb springs instead of the 450s. I did initial pre lift measurements. Dave had the Rusty's kit on, and was sitting at 20.25" from center of wheel hub to bottom of stock flare front and rear. I didn't get stock measurements when I had the chance, so we'll just compare the used Rusty's to the JBA kit. I'm not counting the initial measurements as being worth much as there is always a settling process on the front end after a new lift, so a few more weeks and we'll get measurements again. But, just for fun, after a quick run around the block, the front was 23.25" center hub to flare, so 3" lift over Rusty's. After settle and some flexing, I would expect this to drop about 1" more.
The rear went extremely well. The YLink bracket went in very well, and took out a lot of binding, so flexing the rear is going to have awesome results. However, we run into the same crossthreading problem with the brakeline, so I fabbed a bracket real quick so we could reuse the stock line. Also, the rear bumpstops didn't make a lot of sense for install as there wasn't any bolts and the hole for a bolt wasn't big enough for a hex head type of bolt, so I'll have to talk with Marlin on that install as well. My measurements after the JBA install in the rear were 21.25" so a 1" gain over Rusty's. I will have a better idea of actual lift gains over stock once I get some stocker measurements.
So, yes we had several good snags, and as frustrating as snags are, we are happy they happened, because it allows us to work with Marlin to make this kit much better and easier for the average joe installer to feel comfortable and confident that this kit is worth the money and not going to be a scarey install. The component quality of this kit is outstanding and worth every penny. It is definately a taller kit that Rusty's and the Frankenlift. The install is difficult, but with the issues we ran into resolved by Marlin before shipping the kits, it will be a fairly simple straight forward install. Still hardwork, but less frustrating is basically what I am saying. So, I have nothing bad to say about this kit, even with the snags, this is a pretty good kit if you want a 4" kit. I am posting all of this not to bash this kit, because it certainly is not. This install is for the customers benefit to see that steps are being worked on to make it that much better and the install that much easier, so customers can feel confident that this kit is worth their time and money.
And to make the install more realistic as the average joe installer, we did the entire install in my two car garage (about 1 car worth of room with all the crap in it). Total time working on this kit with all the snags and running around time minus one hour for lunch was 15 hours. Without the running around and snags, this could easily be installed in less than 10 hours. We will get more pictures of the install soon, but we will need to install the new brakelines and still need to figure out the CV shafts part of it so pictures of those will come as well. So, I've been going nonstop for too many weeks, I'm taking the day off to spend quality time with the kids.

 Login
Login Register
 FAQ
FAQ Search