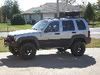
The OME lift…it is IN!!! And boy oh boy does it look good! I started the install at about 5pm Friday night at my FIL(Father-in-Laws). When I got there he wanted to look at the instructions just to get an idea of what he got himself into. We referred to them two times both times we laughed at the directions.
Next we headed out to the garage. I backed the KJ in and we worked on the rear first. OMG was it simple. We jacked up the back, put a jack stand on each side. Took off the wheels…broke off one stud due to Discount Tire cross threading one lug then removed the shock and pushed down opposite sides to pull out the coil. We reversed it to put back together. Very simple….very very simple.
Then I turned the KJ around so the front was in the garage…it was about 110 that day so we wanted to be in as much shade as possible, lol. Now we jacked up the front, put jack stands underneath, took off the tires and then started on the passenger side. This was where it got fun.
The front is definitely more difficult than the back but it is in no way hard. Just takes a little muscle and a port-o-power helps . Of course under the hood we took out the battery and air filter. I don’t know about you but my air filter was a pain to pull out. When it finally came out, it was almost like a cartoon, with me flying backward nearly falling over the tool chest. It was too funny.
We removed the bolts holding the strut in the engine compartment. Next, we removed the clevis and UCA bolt. Later we learned that you don’t have to do this until you are ready to put the new strut in. Now with the strut out we decided it was time to go buy a compressor, the one that my FIL thought he had was AWAL. He must have lent it out and it never came back. Not a big deal since we have to buy a new stud and a lug anyway. FYI, AutoZone says they rent them out for $40 and when you bring it back they give you the $40 back…doesn’t make much business sense to me but whatever. In this case we just bought one.
Long story short here, 2 stores later we got all we needed along with a couple of headaches.
Once back, we are feeling pretty froggy. We jump on the strut and start to compress it. This was pretty easy as well. Took a little time but not bad…sweat is good. LOL. We pulled it all apart and pull out the OME HD set. WOOHOO. We start to compress the OME coil. We get it nearly completely compressed when we realize that we did not attach the compressor as spread out as we should have. We undo the compression and start again. Now we have it spread out to the max. We are cranking away at it and feeling good. We get it compressed and insert the strut…only to realize that the cover/boot will not fit past the compressor hooks. WTH! So we undo the compressor. With the coil undone we put the boot in and then started to compress it…mind you these are HD coils…and by this time all we want to do is have a few beers and tell it where to go. However, we stuck with it so we get it compressed, slip in the strut and tighten down the top plate. As we are looking at it, sore and completely soaked with sweat we think…how the hell does this one nut hold this entire thing together? But it does, just seems odd….here we are using HD compressors for the HD coils and low and behold a little 5 cent nut is holding it all together. Kind of humiliating in a way.
FYI, I did get to see my life flash before my eyes…we tried to be sneaky…during the first compression…maybe the second I forget now, when we realized that there was not enough coil clamped down, we tried to use a pole jack and a pair of vise grips….I won’t get into detail but I will say it is one of the top 5 dumbest things my FIL tried and later he admitted…after the vise grips flew off the coil, missing my face by maybe an inch. I felt the air move past my eye. I jumped and razed the hell out of him. LOL. So do NOT use Vise grips on a Coil Spring….EVER! lol. I know I know common sense…well when you are in 110 degree heat that kind of goes by the way side…every now and then. Luckily no one was hurt.
Now that we got the first strut all assembled we look at each other…it is now 9pm, we are covered in sweat and my heart is still pounding from the eye popping vise grip incident…and we decide to call it a night to cool off and have a few drinks.
Next morning, I arrive at 8am. I inform my FIL about how his Daughter is mad because we did not get it finished in one night and she wants to go Geocaching today. So, if we hurry we can go hiking…which if we hurry will probably be done around noon…which means 112 outside. He laughs and says…you married her, lol. Granted it was not presented meanly but she did want to go caching…in the end we dragged it out so we would not have to shhhhh

So we start assembling the front passenger side. The coil is done from the night before and we start. We pop in the Strut and work on getting the clevis put back in. Here is where we used my FILs Port-a-power. It is a small hydraulic jack like devise that worked pretty darn good. We forced down the LCA and the clevis slipped right in. Not too hard. We reattach the UCA, FYI the stud turns on the UCA so make sure you use a wire brush to remove any left over threadlock, I had a bunch of red on mine. Then a pair of trusty…non flying vise grips to grab it while tightening the nut. This side got done fairly quickly even with a couple of oops, issues.
Next we moved to the drivers side. While working on this side we realized how much we screwed up while doing the passenger side. This side we hammered out in about an hour and a half. Granted on this side we did drink so it always goes better while drinking After we get the strut in and are about to put the tire back on we decide to clean up a little. It is at this point when I notice a part we forgot to install…that darn boot that was a pain on the other side…well it went in so easy this time because we did not install it, lol. So we took it all apart again and put it back together. We are now pros at OME Lifts, lol. We dropped it down and checked it out. The first words spoken were by my FIL and he said, “Goodbye soccer mom, hello truck.” He was right too, it no longer looks dainty and looks like it should have from the factory. I took a few quick measurements and in the rear it raised 5”!!! HOLY HELL! Now before I get a ton of emails saying YEAH RIGHT, I will say that it settled and I am now at a respectable and normal height. I will post those figures tomorrow. We are having a small get together tonight so I won’t be able to post any pics today.
Next, I am working on a deal for some Moab rims

although the stock rims and tires look pretty good. No complaints out of me there. Also upon closer inspection my tires are good enough for a bit longer so I will wait on the BFGs…unless a sweet deal comes along that I can not pass up.
In the end we had a blast lifting the KJ…a couple well more than a couple challenges but in the end it was all worth it! Oh and to add insult to injury, Sunday after hearing my wife complain about not getting to go geocaching Saturday we headed out to hit a few. We were about a mile away from the house and we started to hear some rattling. I pull over and notice that the rear shocks came loose! Thinking back…did we or did we not tighten them down? I remember as I was tightening them later that we did but for whatever reason they worked themselves free. After they were tightened down I did some driving here and there and I checked all the bolts and nuts again but no more loose nuts or bolts. Maybe it was a fluke or perhaps just a lapse in memory but all is good now.
A word to the wise; make sure to triple check your nuts and bolts to be sure they are nice and tight. Also if you have any doubt about what lift to get and if you can do it yourself, buy and install an OME! You will not be sorry…at least I know I am not. I already had 2 people come up to me and say WOW that looks great, what have you done to it?
Thanks again to everyone that answered my various questions and PMs. You were right.
And Tom, if you are really nice perhaps I will take a couple with my phone and upload them

....maybe.

 Login
 Register
 FAQ
 Search