I have to agree about the Galvi fumes and Milk. But hey it couldn't hurt, right? Milk is good for you. Also note again; I did the welding outside and stood upwind. Less exposure that way. It is still not good for you however, as can be said about inhaling any fumes from welding, even more so from Galvi.
JEden8, If you can get nongalvi for a comparable price that is by far the better way to go. I also have to agree with not using aluminum, unless you have a lot of experience with it. It can be very touchy to weld.
I used two 10' long pieces to make each "loop" around the rack. After I bent them to shape, I cut off the extra and then welded a coupler in the center front and center back to complete each "loop". The rack because it is two tiered, is the basket. I chose not to weld expanded steel on the bottom cross bars, because anything I plan to put up there would not slip between them, and I was able to reduce the total weight that way.
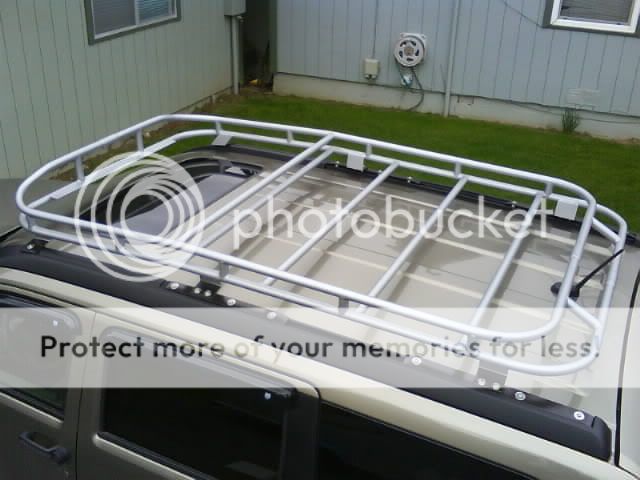
Also if you look at this Pic you will see there is a bend in the "loops" forward of the center mounting points down toward the windshield, following the contour of the roof line. Then back up to make the opening for the lights and to also make the front, center, and back upper cross bars parallel.
If I didn't follow the roof line contour a little it would have stuck way up in the front.

I do have the dimensions, but the KA and KK roofs are different widths. Also with the KK there are no mounting points for the front corners above the windshield. If you go much farther forward of the front KK mounts you will really have to consider extra reinforcement to carry the load and some way keep branches from getting stuck under the rack and ripping it off.
The hardest part for me was dealing with all the angles, there is nothing straight on the top of the Nitro. Front to back there is a bend & a bow, side to side the same, and the front is wider than the back.
I used 2x4 pieces to set a standard height from the roof too the bottom of the lower rack "loop". Then calculated the bend angles. I also used the rail bolts to locate the front to back and side to side measurements.
Something else to consider is when welding the small spacer pipes to connect the two "loops" is, the pipe will expand and contract with the heat of the welding process and could change the angles or even cause a drooping/swayback effect. Now, mind you, I don't have argon hooked up to my welder so the tubing heated up much more than it would have if I had it. In order to get the drooping/swayback out of the "loops" I had to apply heat to the opposite side of the tubing below each spacer weld. This can be very tricky. A "welding frame" would have made this much easier, but hind site is always much clearer.

 Login
 Register
 FAQ
 Search